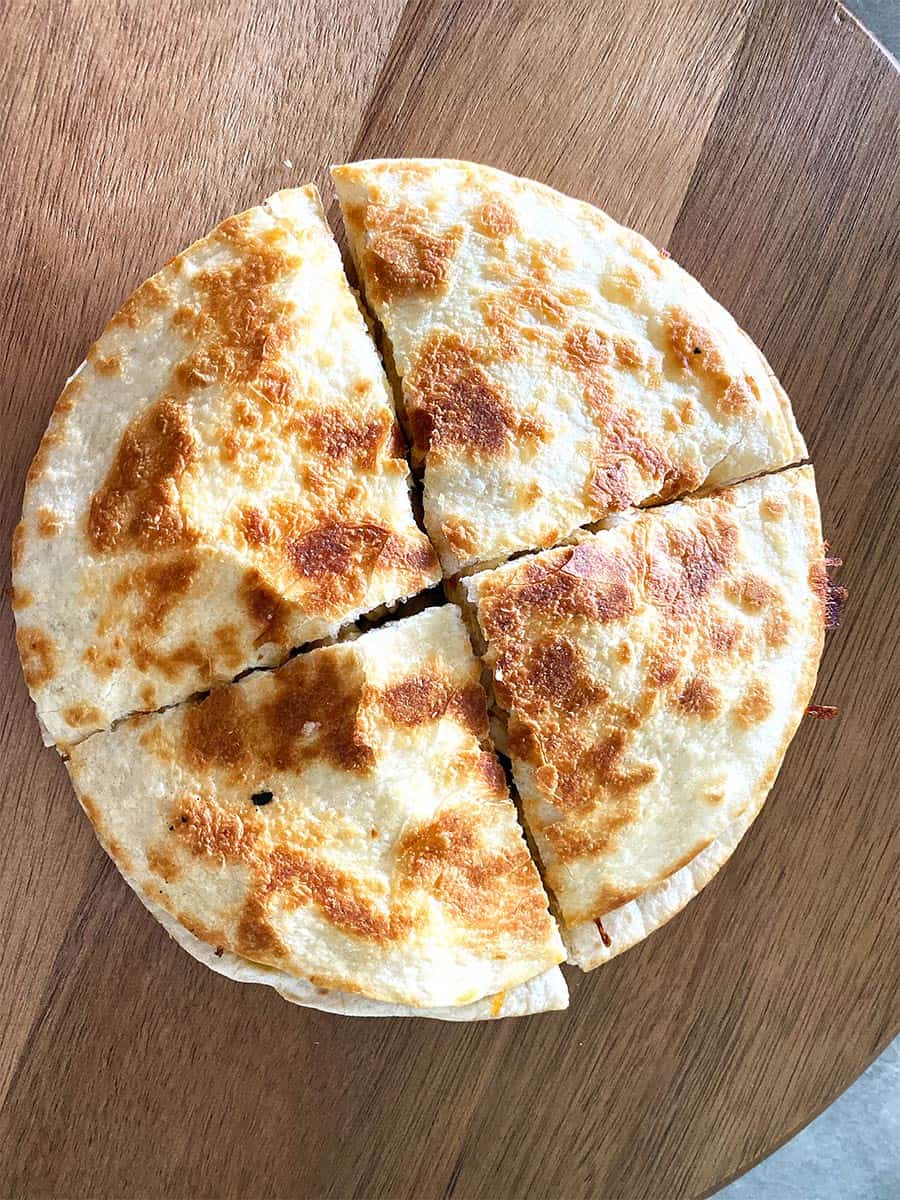
Cheesy ground beef quesadillas are a great way to use leftover Cuban Picadillo. In fact, you can turn almost any leftovers into a quesadilla.
And these ground beef quesadillas are easy to make, needing just three ingredients: tortillas, cheese, and picadillo. I like to make a quick pico de gallo or guacamole to top the quesadillas, but a little sour cream will work just fine too.
Leftovers Make Great Quesadillas
I love to raid the fridge and throw an impromptu quesadilla party with any leftovers I find. We’ll take out some sour cream, cheese, tortillas, last night’s restaurant leftovers, or any bits and pieces from previous dinners. My son will usually keep the quesadilla production going, handing out little triangles of cheesy goodness as he goes along.
Actually, I can’t think of a time that I intentionally made a filling for quesadillas. Leftovers are so easy to use that I usually wait until I have something in hand to throw together into a quesadilla. I used leftover Cuban Picadillo for these cheesy ground beef quesadillas, but you can use any protein, veggie, or bean you have on hand. It’s delicious with leftover grilled meat and veggies, chicken fricassee, or ropa vieja (shredded beef).
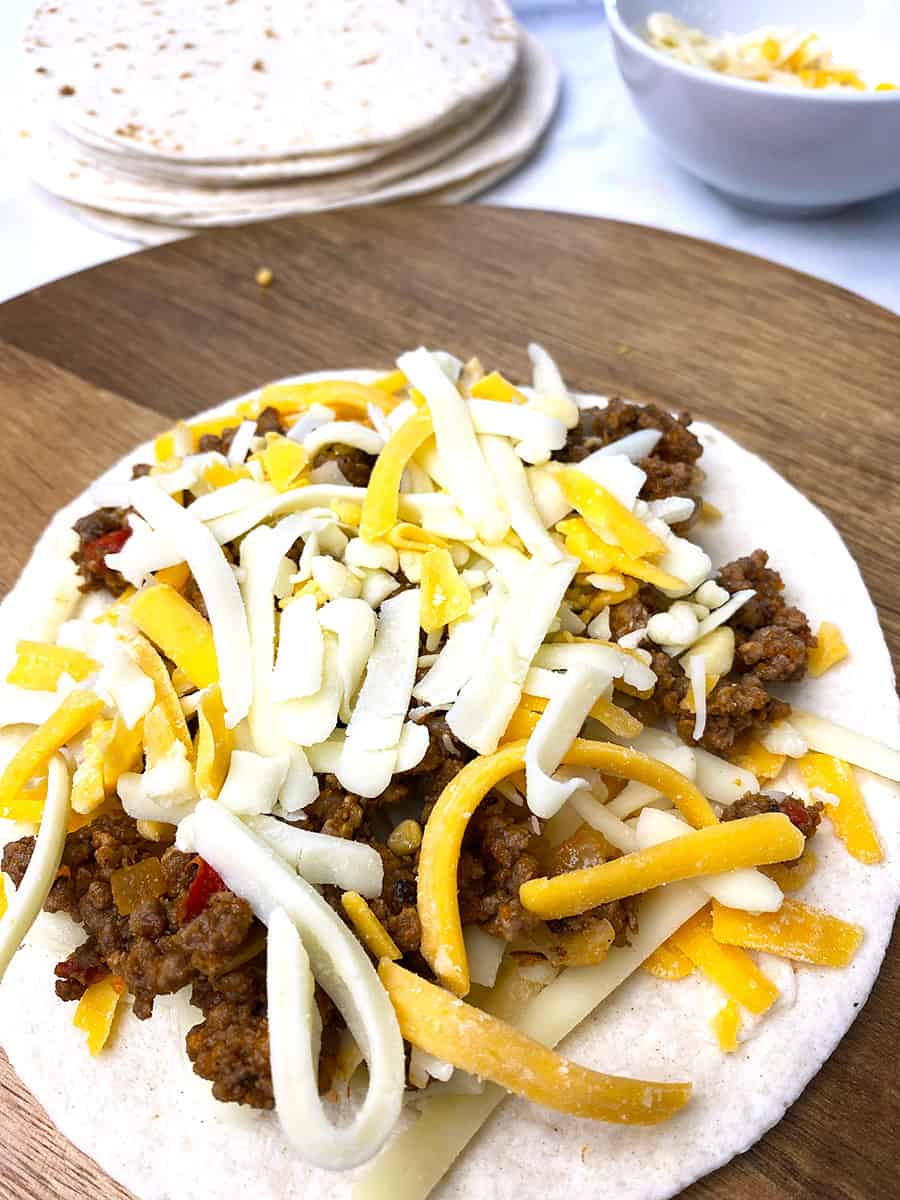
Now about the cheese… I like to use Colby Jack cheese, but cheddar or mozzarella works well too. You can also use a mix of cheeses. It all depends on what you have on hand. Because the beauty of quesadillas is convenience and invention.
How To Make Ground Beef Quesadillas
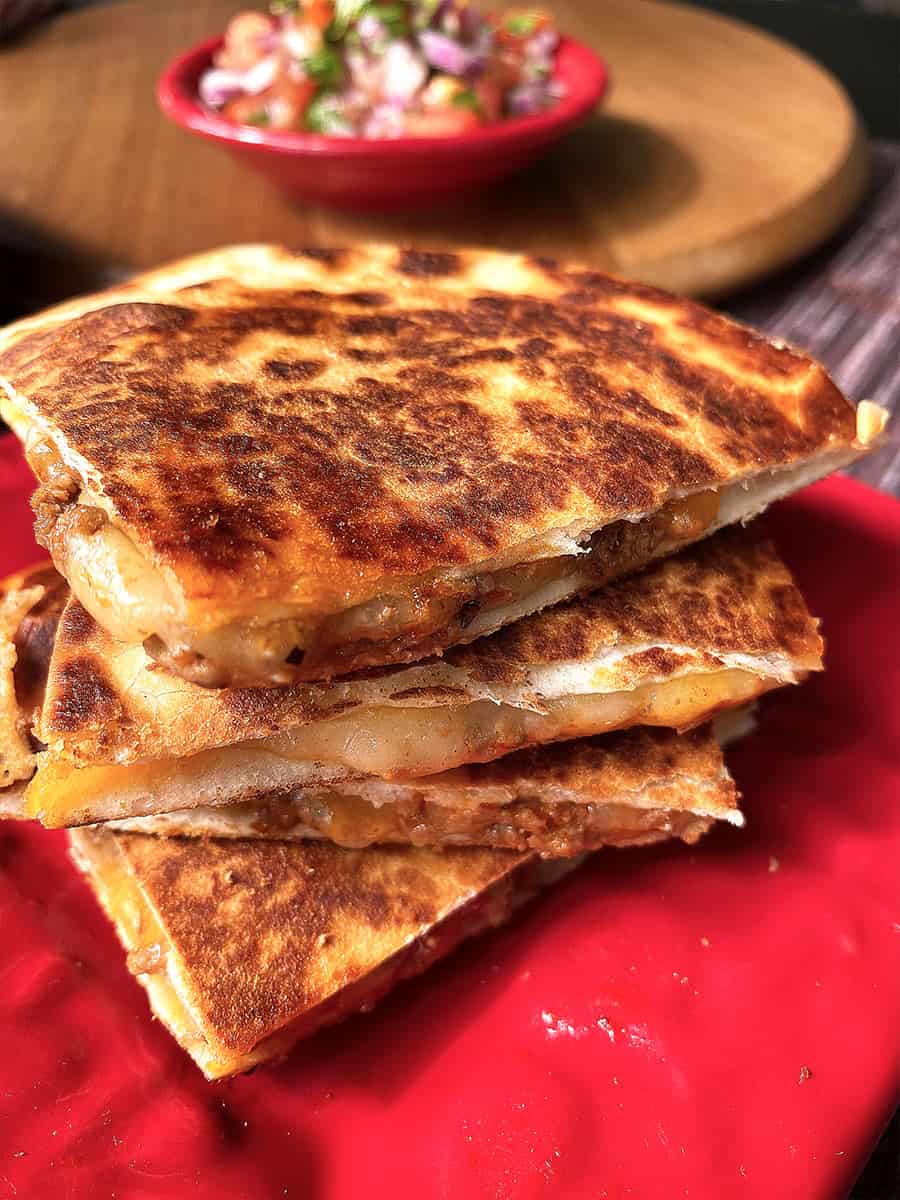
The key to making a good quesadilla is to make sure to layer the cheese. If you use cheese on only one side, the tortillas won’t stick together. Also, using a little butter instead of oil gives it a next-level taste.
I usually assemble the quesadilla with one layer of cheese, a protein, a veggie (onions and red bell peppers are great), and then top with a second layer of cheese. If I’m feeling fancy, I may add a few spices or sauce between the layers. Then, I add a little butter to a heated sauté pan and add the quesadilla and cook slowly to make sure the cheese melts and the crust doesn’t burn.
You can also make these quesadillas in a panini press, making sure to butter the tortilla before putting it on the press. It’s really so easy to make and share.
So, the next time you find your fridge filled with a lot of little leftovers containers, throw a quesadilla party.
I love making these cheesy beef quesadillas with leftover Cuban picadillo and Colby Jack cheese. They are quick and easy to make and disappear quickly!
Preheat a saute pan over medium heat. While it heats up, prepare the quesadillas.
On top of one tortilla layer 2 tablespoon cup of cheese, ¼ cup of picadillo meat and top with another 2 tablespoons of cheese. Top with another tortilla.
Add about a ¼ pat of butter to the pan and place on quesadilla. Lower the heat to low and cook minutes on each side. Repeat for the other quesadillas.
Serve with salsa and sour cream.
Notes
I like my quesadillas on the cheesy side. But if you want to cut down on calories, you can use 1 cup of cheese instead of two. this way, you’re only adding 1/4 cup of cheese per quesadilla. One serving makes a great lunch, but half a quesadilla makes for a great snack.
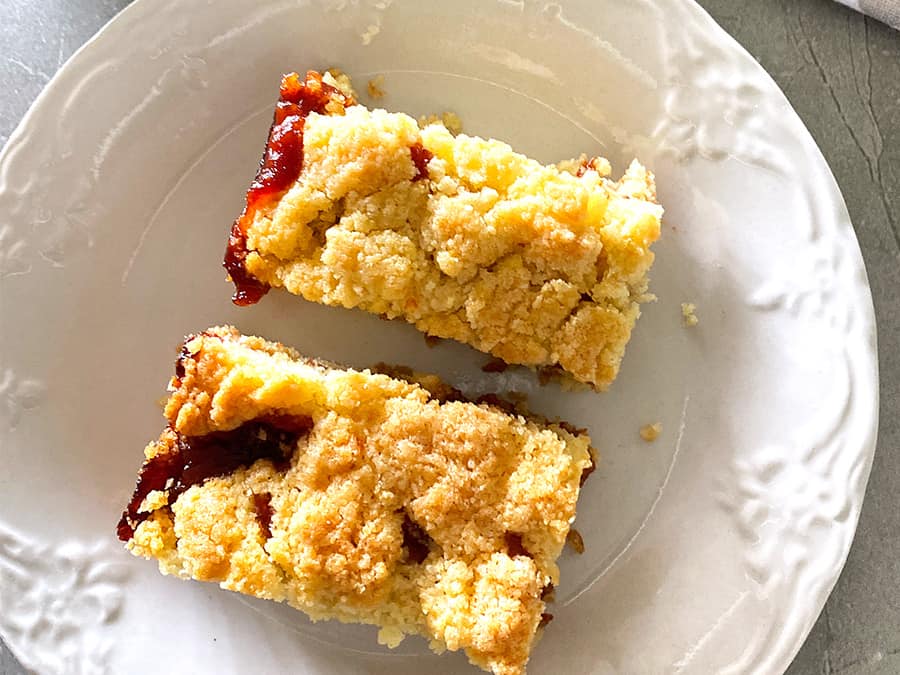
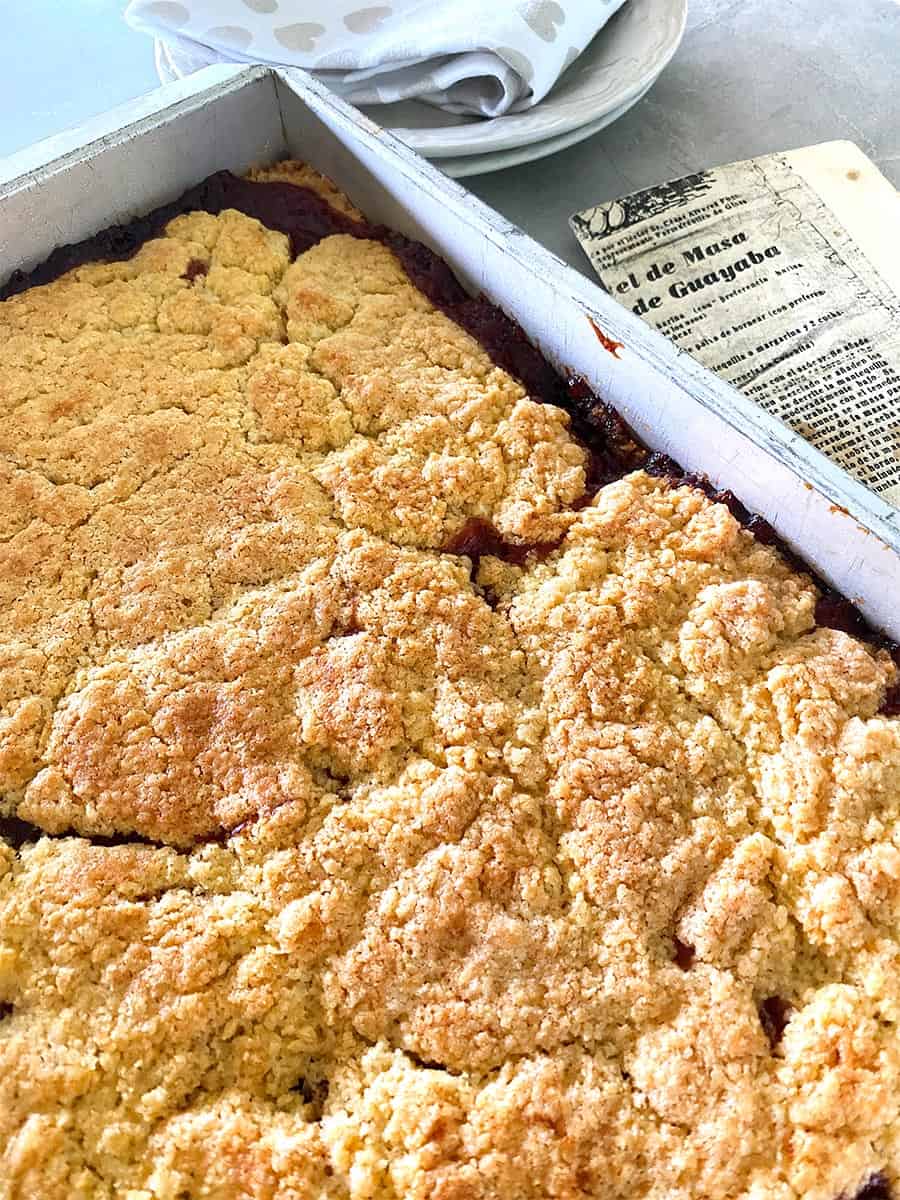
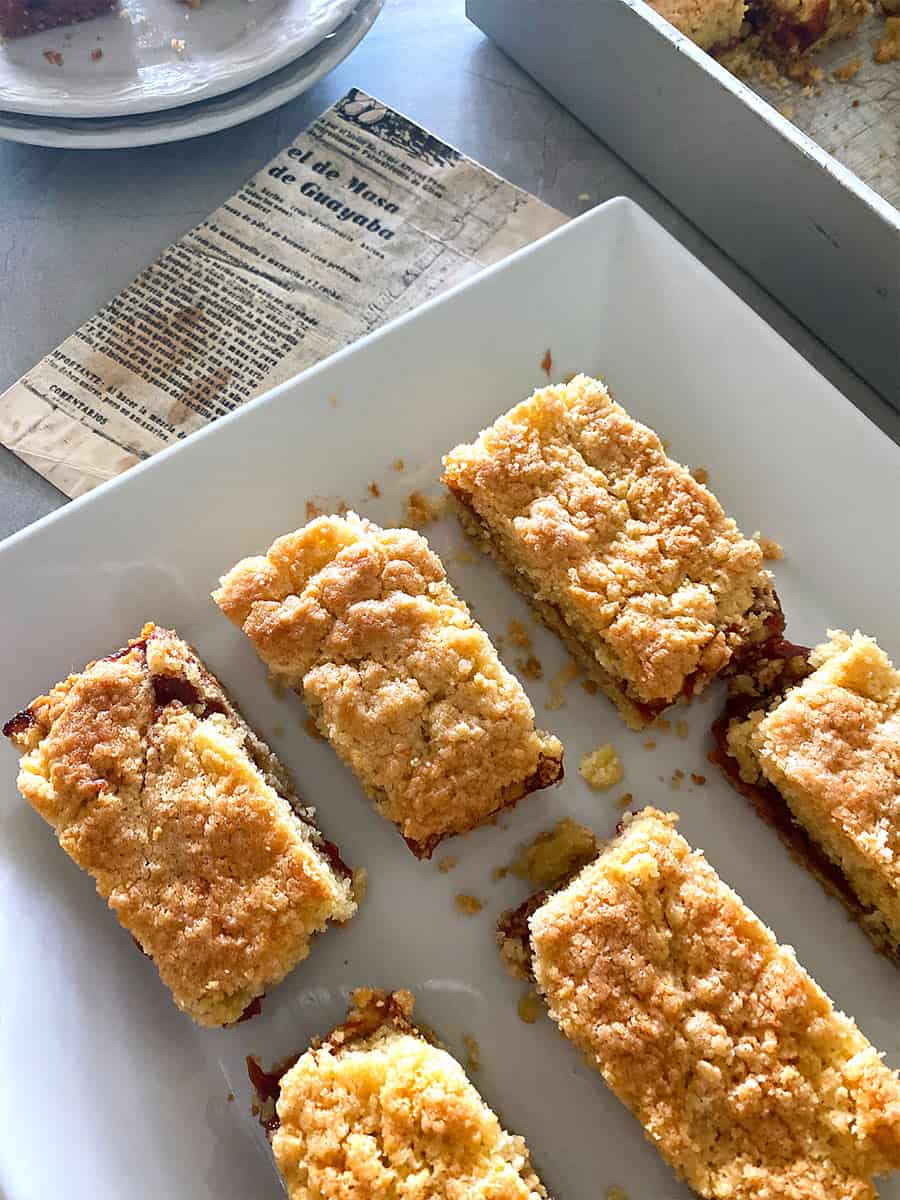
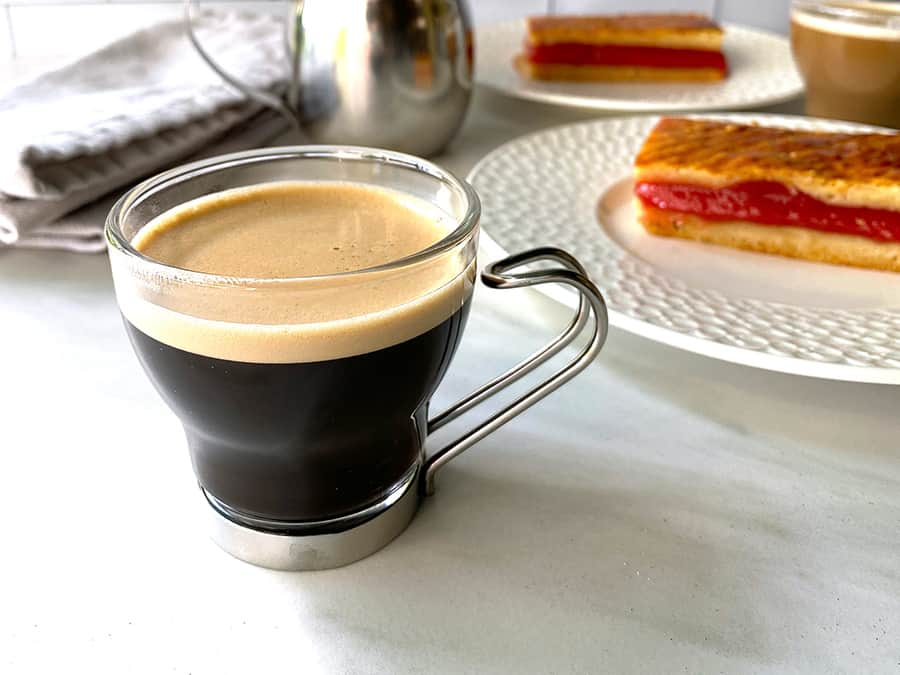
If you walk into any Cuban bakery in Miami, you’ll find these guava bar cookies called Masa Real prominently displayed. They are so tempting with their rich stripe of guava jam sandwiched between sweet buttery pastry. Masa Real (mah-sa-ree-al) means royal dough and can be used in both sweet and savory dishes. But to be honest, the sweet version is the most popular.
Guava, known as guayaba (gwah – yah – bah), is synonymous with guava paste to me because that’s the only way I’ve ever eaten guava. But the fruit is grown locally in Miami, and it’s about the size and shape of a very fat pear. You can buy it at most local fruit stands and supermarkets. I actually went out and bought some before I started writing this blog. The fruit is pretty green right now, but as soon as it’s ripe, I’m giving it a try. (You guys are such a good influence on me!)
Best Way To Eat Guava Paste
Guava paste is sold in cans or bars and can be cut and enjoyed with a slice of gouda cheese or on top of Cuban crackers smeared with cream cheese. It’s basically Cuban jam. In fact, cream cheese and guava paste is our version of PBJ. But by far, one of the best ways to eat it is in Masa Real. (Another famous guava pastry is Cuban pastelitos, but we’ll save that for another post!)
How I Came Across This Guava Bar Recipe
This recipe is not like any of the masa real recipes I’ve found online. It’s really super easy. You don’t need a mixer or a rolling pin to make these guava bars.
I got this recipe at least 30 years ago from Felix, my grandmother’s long-time boyfriend. He found it in a Latin newspaper, in a section titled El Hombre en la Cocina (The Man in the Kitchen). Back then, it was unusual for a Latin man to cook, so maybe that’s why they made this recipe so easy?
Whatever the reason, I’m glad I found it. My recipe is dog-eared, torn, and butter stained. I love recipes when they get that way! It shows it’s a favorite and so worth sharing it with you.
This recipe is also special because it’s one of the Cuban dishes I make that Mami doesn’t. So, she likes it when I bring her some fresh baked masa real (the Bean Train working in reverse!).
How To Make Masa Real de Guayaba
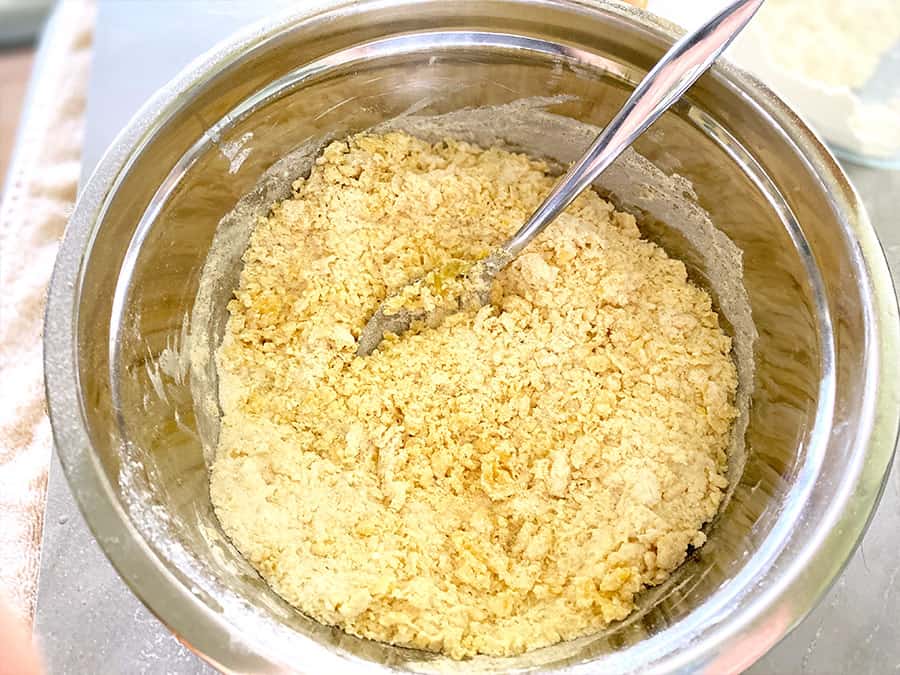
These guava bars are easy to make, and you don’t even need a mixer. In fact, you mix it as little as possible so you don’t overwork the dough. You melt the butter and then add a crumbly mixture of flour, sugar, eggs, and baking powder. Then mix lightly with a fork.
I’m going to warn you that this recipe uses a ridiculous amount of butter. So much so that some of the butter will just sit on top of the dough. Don’t worry. The butter will incorporate into the dough as it bakes. It will taste perfect, not oily at all.
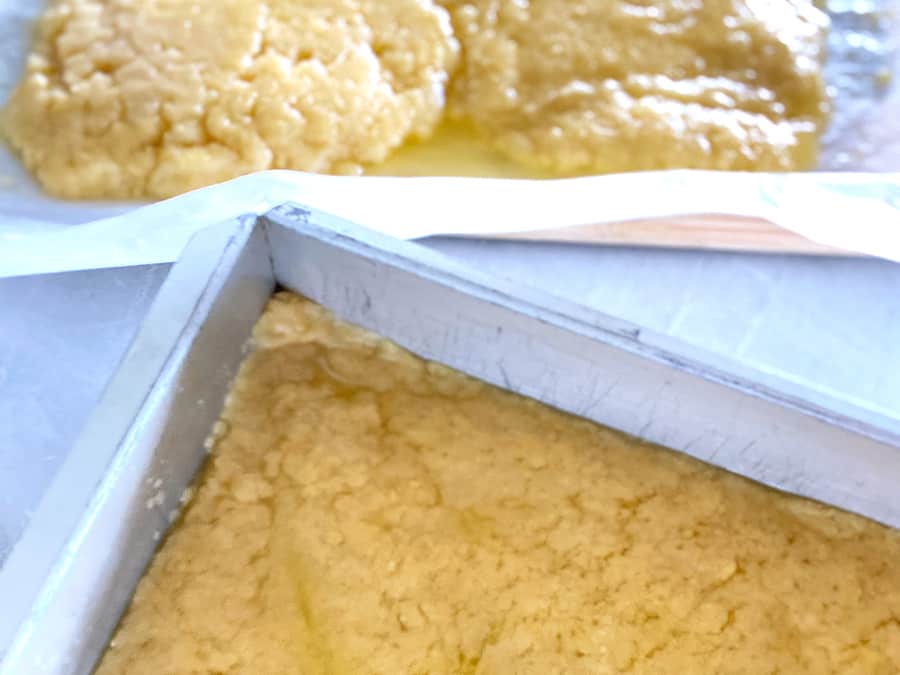
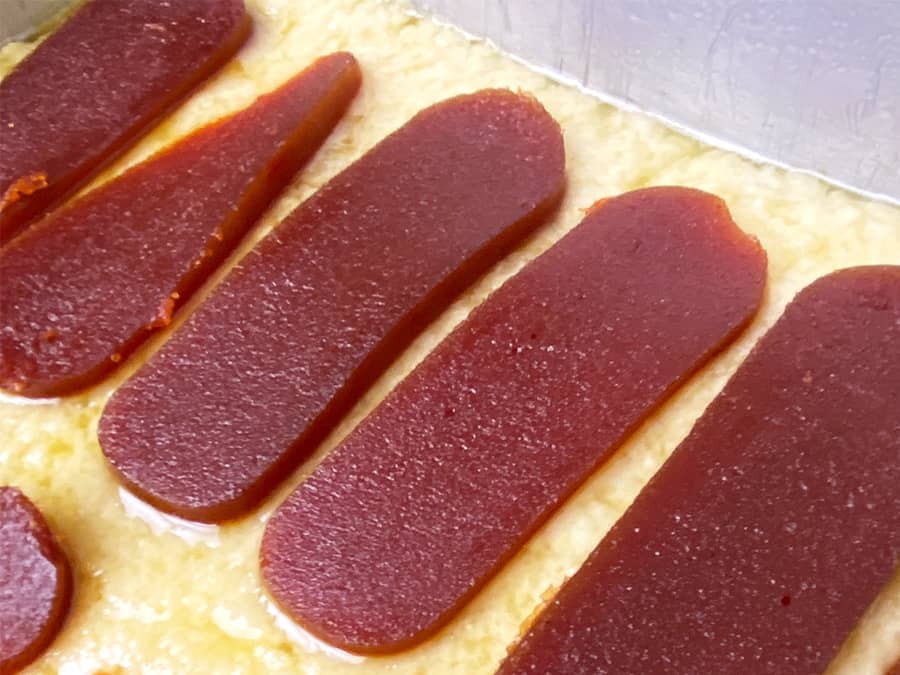
Once the dough is ready, you divide it in half and smooth half onto a 9×13 pan and then layer the sliced guava paste on top and then add the rest of the dough and smooth it down. That’s it!
I know I probably scared you by saying that it has a ridiculous amount of butter (3 sticks, in fact). But the taste is really rich, so a little goes a long way. I cut the masa real into 20 pieces to give you the traditional Cuban bakery size. But I usually cut that size in half when I’m serving, so you can get 40 squares of masa real from one recipe.
Some Tasty Changes To The Original Recipe
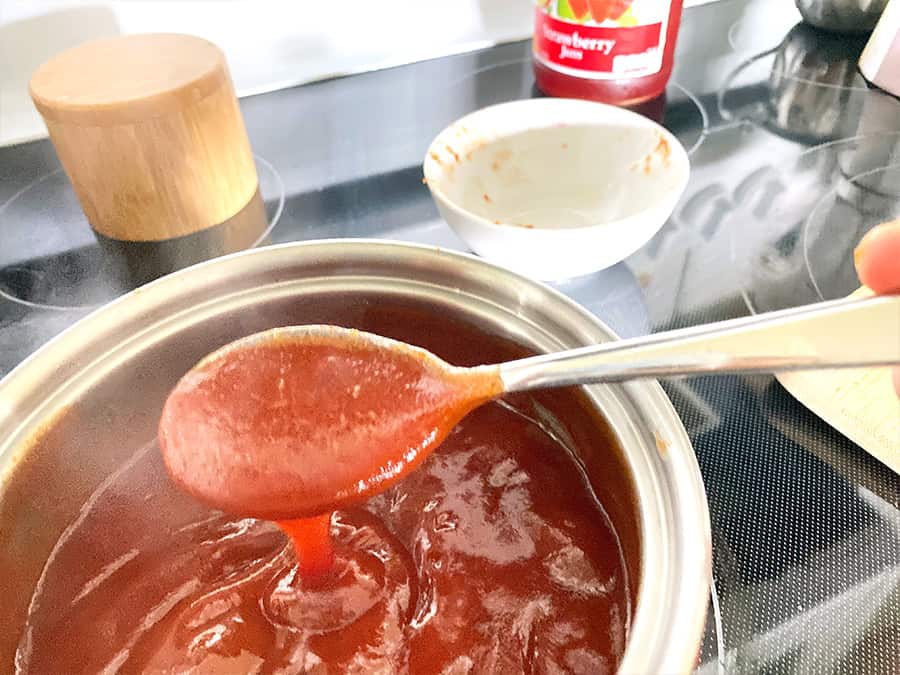
While I love the original guava bar recipe, my kids wanted to make some changes. So lately, I’ve been melting the guava paste, so it’s a spreadable jam. It’s a little more work but not too crazy. And my kids like it better that way. The guava layer is not as thick, and the buttery pastry is moister because it mixes in with the guava jam.
Instead of layering the slices of guava paste, you pour the guava jam over the first half of the dough. With this method, you need to cool the dough in the fridge for 15 minutes before adding the guava jam. Otherwise, you’ll get a hot mess. Which I’ve done before, and it’s not bad at all, but not as pretty.
Another change I’ve made recently is adding a little strawberry jam and salt to the melted guava. It’s soo good that way! I got this idea from my son, who’s been making guava strawberry jam which he uses for French toast and for cocktails (I’ll share those another time!).
Not sure which version of the recipe to make? Take the easy way out and make the original recipe with the sliced guava paste. Either way, you’re gonna love these guava bars!
Masa Real reminds me of Felix, my mother’s common-law husband of more than 30 years. He really liked to bake and was nice enough to share this recipe with me. While I don’t have many memories of Felix, he tended to keep to himself, I feel it’s important that I tell you a little bit about him today.
To be honest, I didn’t have much of a connection with him. He was not very social, and we didn’t have much in common. He started seeing my grandmother when I was ten years old, and his attitude towards kids was that they should be seen and not heard. That attitude didn’t seem to change much when I grew up. It’s not that he was unfriendly. He just didn’t really interact that much with people.
And lately, it’s really made me wonder if he felt seen or heard himself. He’d studied agricultural engineering in Cuba because that’s what his father wanted him to do, but he really didn’t like it. When he emigrated to the US, he never tried to pursue his degree. Instead, he took on odd jobs he didn’t seem to like much.
But late in life, he finally got a job he really liked, working at the Publix Bakery. He fried the donuts and croquettes and baked the cakes and cookies.
Thinking back on his life now, he can teach us two things.
Connect with your passion – Find your purpose, work diligently to discover it. Your purpose is that thing you do that makes you feel alive and connected with the world. It may not be the job you do, but the ways you get to be creative and joyful. I have to wonder what Felix’s life would have been like if he had discovered what he liked to do earlier in life. It seemed like life happened to him. I can relate because too often I’ve let life happen to me too. That’s why Bean Train is so important to me. It gives me a chance to do some of the things I love to do.
Connect with your people – Felix was pretty solitary. He didn’t really connect with my mom or me. When he moved to Miami from New York, he didn’t stay in touch with his older siblings or his nieces and nephews. Not having had any children of his own, I wonder if there’s anyone who will remember Felix.
But this recipe reminds me of him. That’s one of the things I like about family recipes. They keep memories alive. Felix can live on in this recipe. I think he would have liked that, to be seen and heard through his favorite cookie.
These guava bar cookies, known as Masa Real, are so rich and delicious! And super easy to make. Buttery pastry and rich guava jam are layered together to make this super popular Cuban dessert. These rich bar cookies are a hit for bake sales, potlucks, and teacher gifts.
Ingredients
Scale
3 sticks butter
14oz package of guava pasteaffiliate link (I like to use Conchita brand)
2 tablespoonsstrawberry jam (optional – see note)
Dash salt
4 cupsall-purpose flour
1 ½ cupswhite sugar
2 tablespoonsbaking powder
4eggs
Instructions
Guava Bar Recipe Version 1: (see note below)
Guava Jam:
Cut the guava pasteaffiliate link into ½ inch cubes.
Bring ½ cup water to boil over high heat and add the guava cubes.
Lower the heat to medium and let the guava melt, stirring occasionally.
While it melts, add 2 tablespoons of strawberry jam and a dash of salt.
Once all the cubes have melted, remove from the heat and pour into a glass bowl.
Let it cool to room temperature before using.
Dough:
Mix the flour, sugar, baking powder, and a dash of salt until combined.
Beat four eggs in a separate bowl until combined and then add to the dry ingredients.
Mix together to form a crumbly meal.
Melt the butter in a pot over medium heat.
Once melted, add the dry ingredients to the pot and gently mix with a fork until all the dough is wet. It will look like you’ve added too much butter, but it’s OK.
Shaping and cooling the dough:
Spray a 9×13 pan with butter spray.
Add half the dough to the pan and use a piece of parchment paper or wax paper to flatten and smooth the dough to cover the full pan.
Cut a piece of parchment paper or wax paper a little bigger than the pan.
Add the other half of the dough to the paper and spread out in a rectangular shape similar to the pan.
Place both pieces of dough in the refrigerator for 15 minutes. This will make it easier to layer.
I do not suggest placing the second dough on top of the first one as it will stick to the paper when you separate them. While the dough cools, preheat the oven to 350.
Layering: Take the two layers of dough out of the refrigerator. Spread the guava jam over the cooled dough in the pan. Place the second layer on top. The top layer may not fit perfectly, that’s OK. Once it bakes, it will look just fine.
Bake: Once the oven is preheated, bake for 30 minutes until golden and a knife inserted in the top layer comes out clean.
Guava Bar Recipe Version 2: (see note below)
If you don’t want to melt the guava and cool the layers, you can follow the original recipe’s instructions. In that case, you won’t need the strawberry jam.
Guava Paste: Cut the guava paste into thin slices no more than 1/4 of an inch.
Dough (this step is the same):
Mix the flour, sugar, baking powder, and a dash of salt until combined.
Beat four eggs in a separate bowl until combined and then add to the dry ingredients.
Mix together to form a crumbly meal.
Melt the butter in a pot over medium heat.
Once melted, add the dry ingredients to the pot and gently mix with a fork until all the dough is wet. It will look like you’ve added too much butter, but it’s OK.
Layering:
Spray a 9×13 pan with butter spray.
Add half the dough to the pan and use a piece of parchment paper or wax paper to flatten and smooth the dough to cover the entire pan.
Place the guava paste slices on top of the dough, covering all the surfaces.
Add the rest of the dough and use a piece of parchment paper or wax paper to flatten and smooth.
Bake for 30 minutes until golden and a knife inserted in the top layer comes out clean.
Strawberry Jam: You don’t need this if you’re making the easier version.
I’ve given you two versions of the recipe.
Version 1: The main difference is that in the first one you make a guava jam and spread. The jam mixes more with the dough and it makes the bar cookie more moist. My kids love it this way.
Version 2: This version is easier. All you need to do is cut the guava paste and layer it with the dough. This gives you a thick stripe of guava and a more intense guava flavor. However if you don’t cut the guava paste evenly you will have some ares with less guava.
Not sure which version of the recipe to make? Take the easy way out and make the original recipe with the sliced guava pasteaffiliate link. Either way, you’re gonna love these guava bars!
This tutorial is for anyone who wants to make the sweet, frothy, strong-flavored elixir of life we call Café Cubano. In this post, you will not only learn how to make Cuban Coffee from a born and bred Cuban living in Miami. I will also explain to you why it’s the elixir of life.
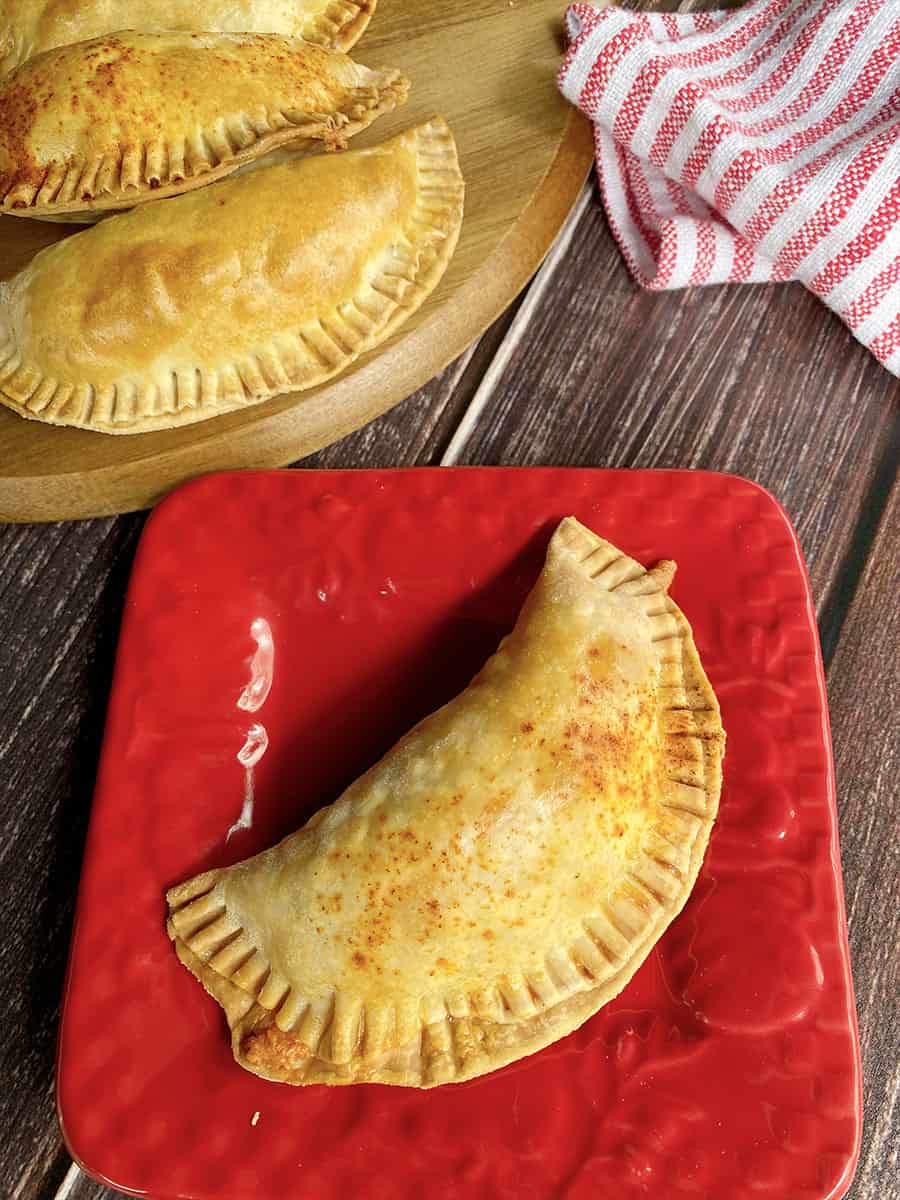
These tasty little beef and cheese empanadas are so easy to make and a great way to savor leftover picadillo. Empanadas are a popular Cuban snack sold at Cuban bakeries and restaurants. You’ll also find them in just about any snack counter in Miami. I love to have these as tapas with a little wine or sangria, but they also work as a snack or light lunch.
Empanadas Origin
Empanadas are originally from Spain, but you’ll find them in most Latin American cuisines. The term comes from the verb empanar, which means to coat or wrap with bread.
While empanadas are from Spain, many cultures have a recipe for meat pie. It’s an early version of convenience food. I just love that they are so super easy to make and are a great appetizer, especially served with a little sriracha aioli on the side.
Beef Picadillo Empanadas
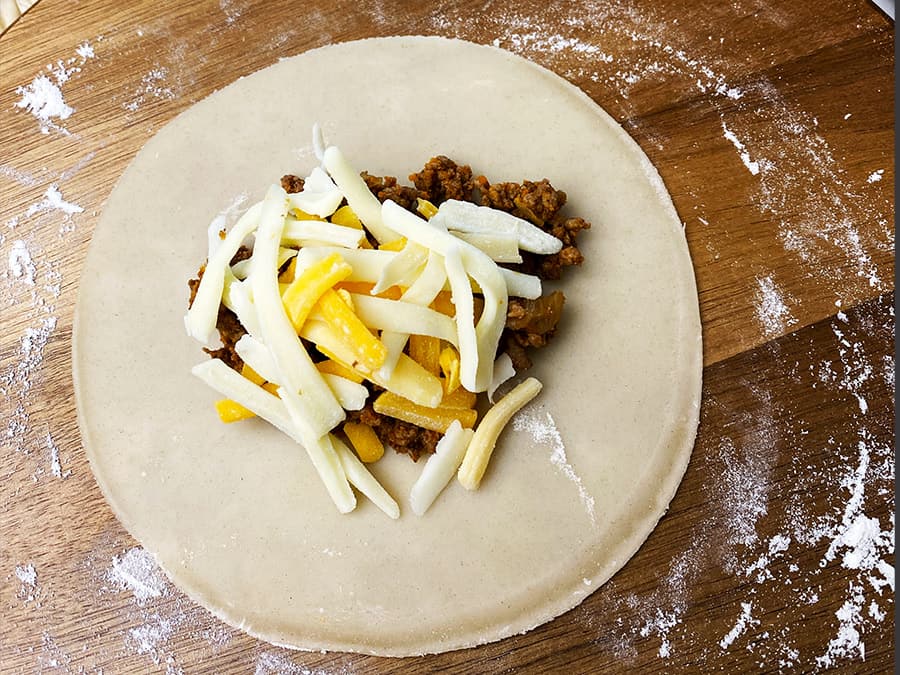
My favorite stuffing is spicy ground beef (picadillo), but you can stuff these little hand pies with so many other yummies. The ones you’ll find most often at Cuban bakeries are filled with guava and cream cheese, picadillo, or chicken. This beef and cheese empanada recipe is stuffed with cheese and picadillo because that’s my daughter’s favorite combo. I used a Colby Jack cheese mix because it pairs so well with the spicy ground beef.
You’ll need about one and a quarter cups of picadillo to make these empanadas. You can use my Authentic Cuban Picadillo recipe. Picadillo is a very popular Cuban dish made of spicy ground beef with olives and served with black beans and rice. It’s the ultimate Cuban comfort food! Make the picadillo for dinner and then use the leftovers to make these cheesy beef picadillo empanadas.
Empanada Dough
Some people make their own empanada dough, but I’m not one of them. I usually buy the frozen empanada discs that are ready to go. So, I can make these empanadas on a whim, whenever I have some picadillo leftovers. One day when I grow up, I’ll make my own dough.
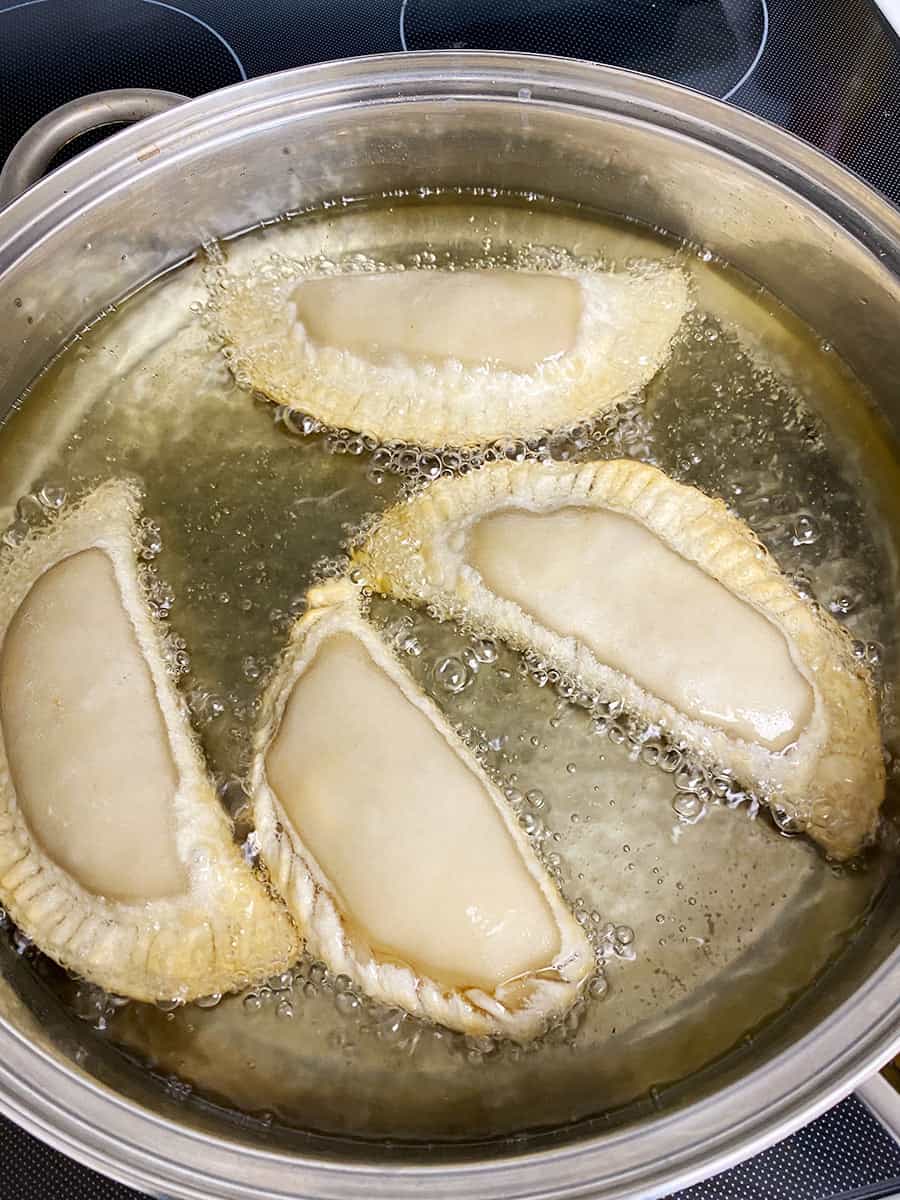
You Can Fry or Bake Empanadas
I like to bake these beef and cheese empanadas because it’s so much easier than frying. But my daughter loves them fried (of course she would… especially when I’m the one frying them :P). But I must say the dough is definitely crunchier and tastier when you fry them.
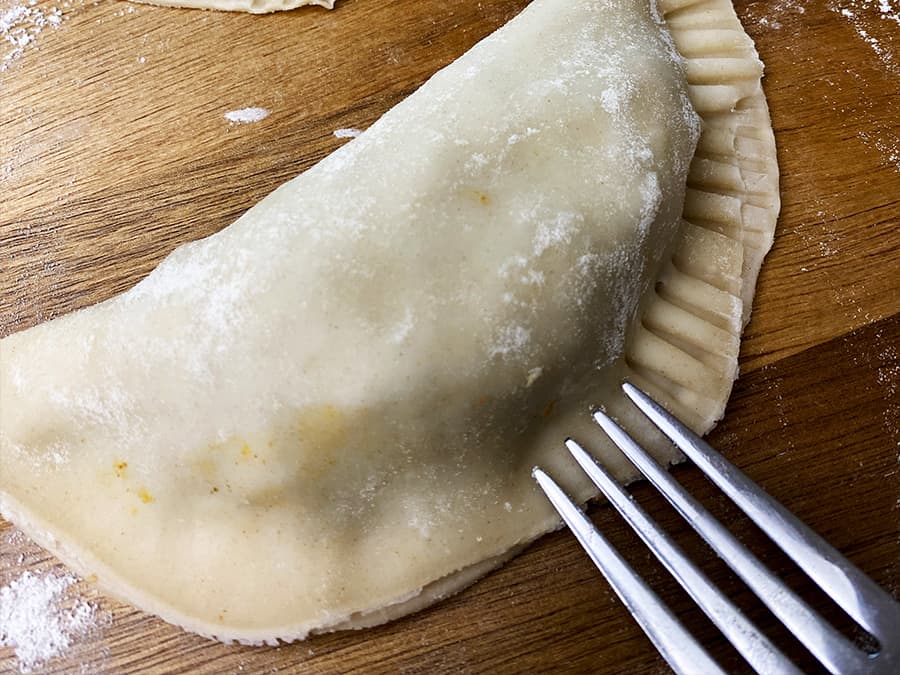
If you’re frying these, you need to make sure you have a good seal on the dough, so the stuffing doesn’t come out and the oil doesn’t seep into the picadillo filling. To do this, you just need to wet the edge of the dough with a little water and then use fork tines to seal the edges.
If you’re baking the empanadas, add a little egg wash and paprika to the tops before baking.
Let’s make some empanadas ya’ll!
When I make these, I think of my Abuela Melba. She used to make empanadas for me and my brother. Years later, after I was married, she would make a batch for me and my hubby and call me to come and pick them up. That was a great way to get me to stop by her house often!
She would always ask me how I liked them and if they were better than my mom’s. That woman loved a little competition! As she got older, her cooking skills started to decline, and her empanadas were a little too greasy with the filling seeping out of the dough. I would still come and pick them up and tell her how good they were, because I knew it pleased her.
Cooking for us was one of the ways she could communicate my hubby. She didn’t speak any English and Jay didn’t speak any Spanish at that time. So, the empanadas were her way of saying she liked “Jerry” (she could never get his name right!).
Food is a connector and memory maker. It helps bridge the gap between languages, generations, and cultures. So, the next time you want to connect and love on your peeps, cook up a batch of your signature dish and share it with them.
These super tasty, cheesy Cuban beef empanadas are very easy to make and can be fried or baked. They are a perfect way to use up Cuban picadillo leftovers!
1 package of frozen empanada discs (they come 10 to a pack and can be found in the freezer section)
1 egg (for brushing on the baked empanadas)
Paprika for garnish (for baked empanadas)
1 cup oil (if you’re frying)
Instructions
Picadillo: Prepare Cuban Picadillo according to recipe found here. If you’re using leftovers, don’t reheat. We want to use the filling cold. If you made picadillo for this recipe, let it come to room temperature before filling. Otherwise, it will make the dough too soft and it could tear. Take out the shredded cheese.
Dough: Thaw the frozen dough, it should take about 15 minutes. You can pull apart the discs once they begin to thaw to speed up the process, but be careful not to crack the dough.
Prep: Flour your working surface so the dough doesn’t stick. Get a little bowl of water for sealing the dough. If you’re baking, preheat the oven to 350 degrees and beat the egg and set aside.
Filling: Add two tablespoons of picadillo and two tablespoons of cheese to one empanada disc. Dip one finger into the water bowl and wet the edges of the dough.
Fold the dough and seal with fork tines.
Baking: Brush the empanadas with the egg wash and sprinkle a little paprika on the tops. Bake for 27 minutes or until golden.
Frying: pour oils into a shallow frying pan and heat to about 350 degrees on medium high. Carefully place each empanada into the oil and lower the heat to medium. Fry on each side for about 3 minutes. Take out with tongs and drain on paper towels.
Notes
Cooking time is based on baking the empanadas. If you’re frying, you can shorten the time by about 10 minutes.
You can opt for making all-beef empanadas and leave out the cheese. If you do that, use 1/4 cup of picadillo filling.
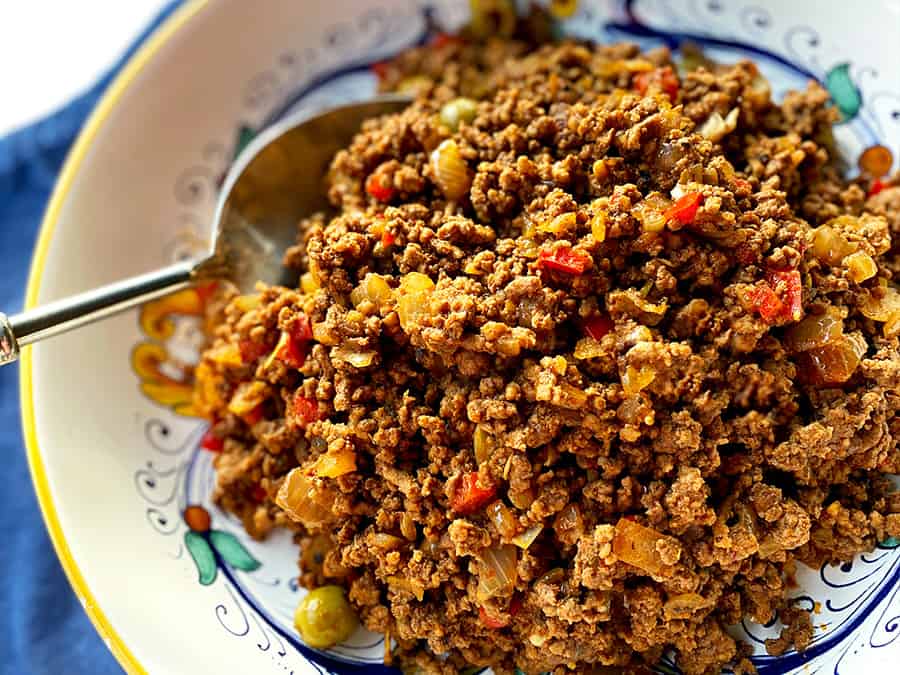
I absolutely love Cuban picadillo! And what’s not to love? This picadillo recipe has very basic ingredients and comes together in just 30 minutes. And the leftovers have endless possibilities!
What Is Cuban Picadillo?
Picadillo is a very common Latin American dish made with ground beef. Like most Cuban dishes, Cuban picadillo uses a sofrito base of onions, peppers, and garlic sauteed in olive oil. We use it in just about all Cuban cooking. This mix is the Cuban version of Italian soffritto and French mirepoix, which call for onion, carrot, and celery.
Other picadillo ingredients include tomato sauce, cooking wine (vino seco), cumin, and oregano. Some versions throw in fried, cubed potatoes or raisins, or both. My crew likes it simple, so I don’t add these. But can I just say it’s sooo good with raisins? It’s got that sweet and savory thing going on. Maybe when I have an empty nest, I’ll be able to make my picadillo with raisins ?
Various Picadillo Meats You Can Use
Most Cuban picadillo recipes call for ground beef, but traditional recipes included a mix of ground beef, pork, and ham. Growing up, Mami used three parts ground beef and one part ground pork to make her picadillo, which is how I made this recipe. But you can make it with all beef. The combination of ground beef and pork gives you a milder, less beefy flavor. But either way, it’s delicious! I’ve even made it with ground turkey (with 7% fat); it’s not a finicky recipe.
Usually, I make it with just ground sirloin, but I wanted to give you the option to try it with the pork. If I’m using a mix of beef and pork, I cook the meat first and drain it since ground pork is a bit fatty. If you’re using all ground sirloin, you don’t need to brown the meat first. You can make the sofrito first and then add the seasonings and the raw meat and break up the meat with a wooden spoon. Let it cook for a bit before you add the tomato sauce and other ingredients.
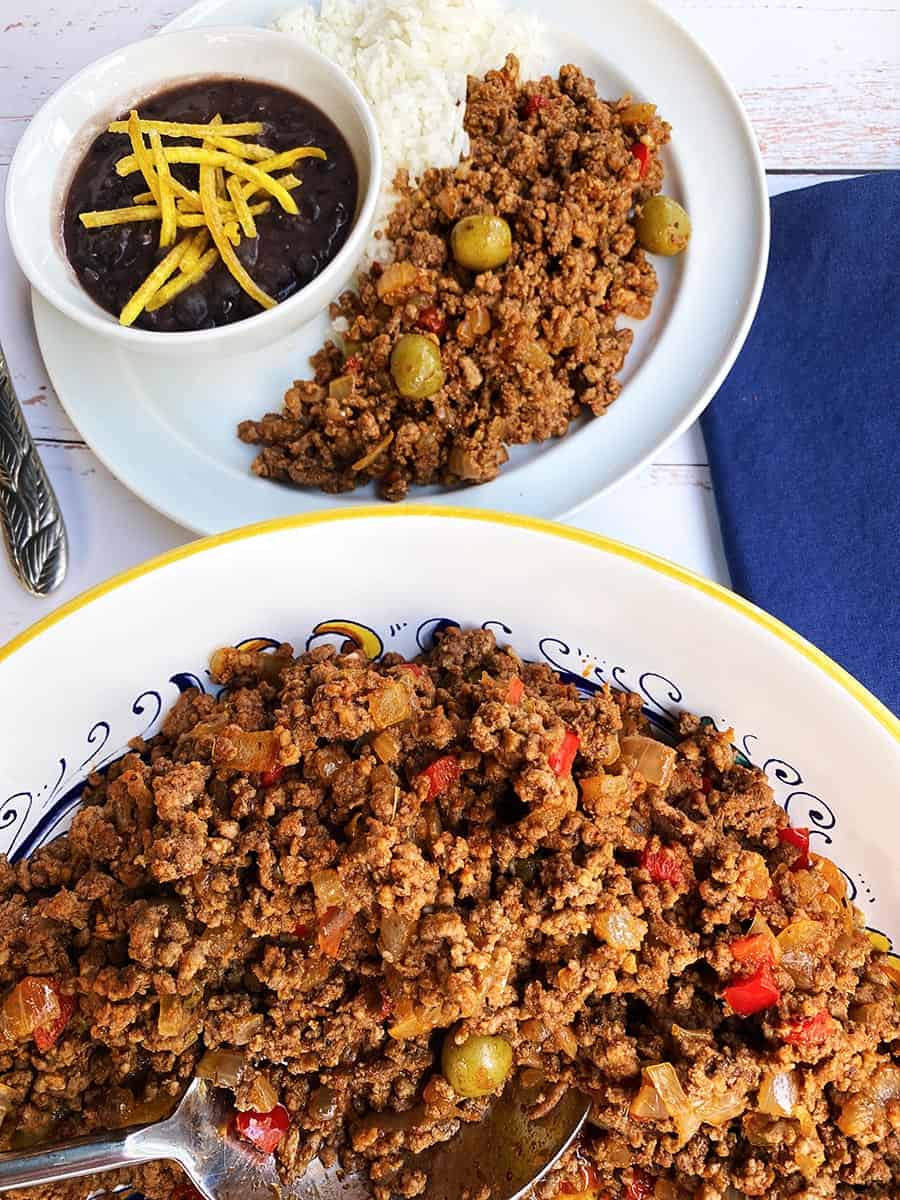
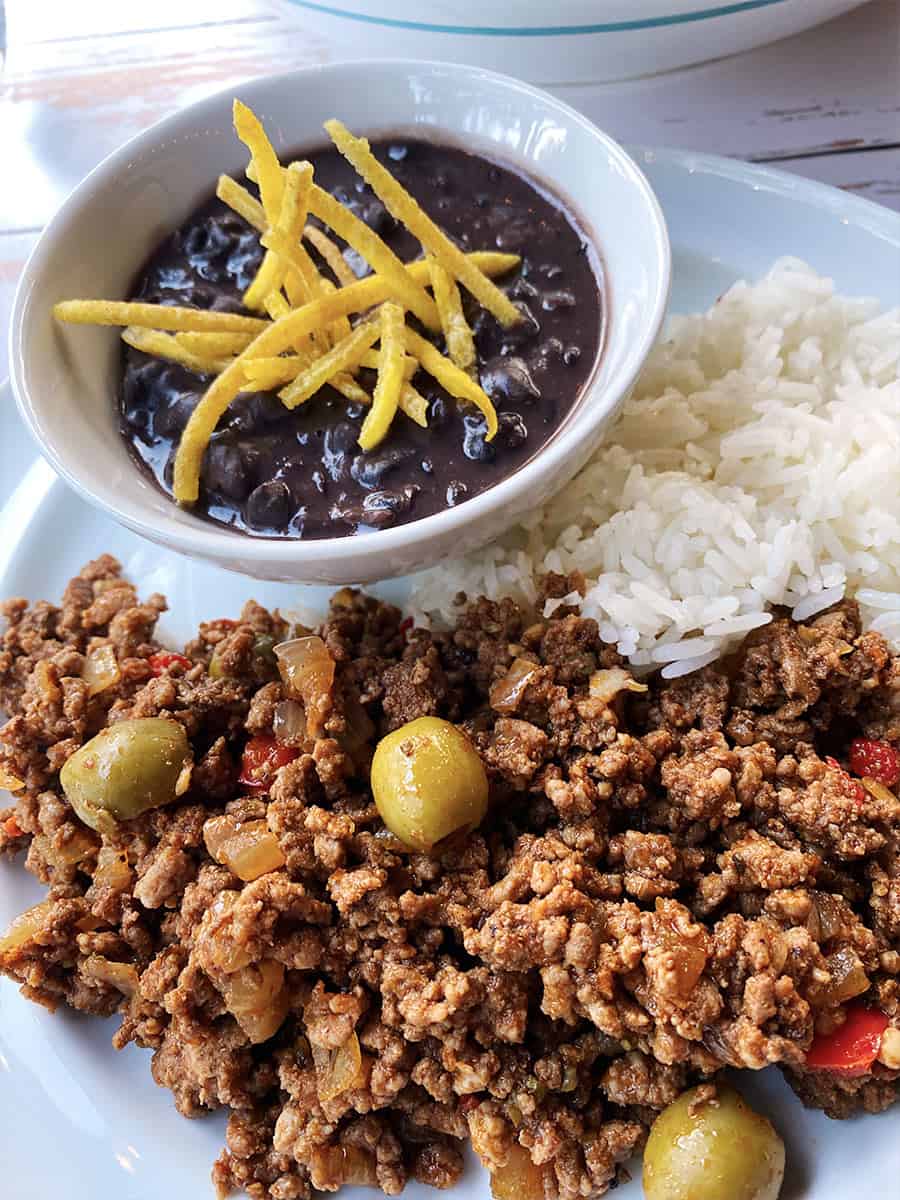
What do you serve with Picadillo? Usually, I serve this dish with rice, black beans, and maduros, which is my ultimate comfort food! My son likes his with white rice and bananas, which is another way Cubans like to eat picadillo.
Now about the leftovers. Picadillo second day is even tastier! It’s the perfect filling for tacos, quesadillas, empanadas, nachos, stuffed peppers and so much more. You can even use it as a base for Shepherd’s Pie. Picadillo is just so easy, flexible and no fuss, I just love it and I hope you do too ❤️
There’s a direct link between memory and taste. A 2014 study found that the area of our brain responsible for our taste memories is directly tied to our ability to remember the time and place we ate it. Scientists believe this is a survival mechanism to keep us from eating poisonous things. That’s a very vital reason, but not as poetic as remembering the taste and smell of your grandma’s cookies.
The reason picadillo, rice, and beans are such comfort food for me is because it takes me back to second-grade me sitting in a small private school in Little Havana. We had just moved to Miami from New York City, and everything was so different, except the picadillo. Mami had placed me in a little school owned by Cubans, and they made home-cooked lunches for us. Wednesdays was picadillo day. And with so many things being different, it was nice to have my favorite dish to help me deal.
Why do you love certain foods? When you eat it does it take you back to another time and place? That connection between our food and our memories is what Bean Train is all about. I record Mami’s best recipes because I don’t want to lose them. One day in what I hope is a very distant future, I may need a bowl of her Congri to comfort me when I can no longer pick up the phone and speak with her.
This quick and easy Cuban Picadillo recipe is so easy to make and a perfect topping for rice bowls, tacos, empanadas and so much more.
Ingredients
Scale
1 1/2 lbs ground sirloin
1/2 lbs ground pork
1 large onion diced (about 2 cups)
1 red bell pepper diced (about 1 cup)
3 cloves garlic
1 teaspoon cumin
1 teaspoon oregano
1 1/2teaspoons sea salt
1/2teaspoon paprika
1/2teaspoon black pepper
1/4 cup pimento-stuffed green olives
2 tablespoons capers
1 8-ounce can of tomato sauce
1/2 cup white cooking wine (vino seco)
1/4 cup raisins (optional)
1 cup cubed, fried potatoes
1 tablespoon olive oil
Instructions
Preheat: Set a large cast-iron skillet on the stovetop on medium heat. You can use a regular stainless steel skillet if you prefer.
Prep: While you wait for the skillet to get hot, chop the onions and crush the garlic. Measure out the spices.
Brown the meat: Add the ground sirloin and pork to the skillet and break up the meat with the back of a wooden spoon. Cook the meat until it’s no longer pink, about 6-8 minutes. Remove the meat with a slotted spoon and discard the drippings.
Add the aromatics: Add the olive oil to the pan and saute the onions, pepper, and garlic for about 3-5 minutes until softened and translucent. Add the spices and cook one more minute.
Add the rest of the ingredients: Return the beef to the pan and add the tomato sauce, cooking wine, olives, and capers.
Add the optional mix-ins: Add the raisins or potatoes, if you want to be a little extra.
Simmer: Cook on medium-low for about 15 minutes.
Notes
Using ground beef only: You can omit the ground pork and use 2 pounds of ground sirloin. In that case, you don’t have to precook the meat. You can sauté your onions, garlic and peppers and add the raw beef when the onions are soft. Break up the meat with a wooden spoon, the same way you would with the beef and pork mixture.
Using ground turkey: It’s also good with turkey. However, if you’re using turkey, replace the tomato sauce with 2 tablespoons of tomato paste and double the paprika and oregano. Also, cook for an extra 15 minutes to give the ground turkey a little more time to absorb the flavors.
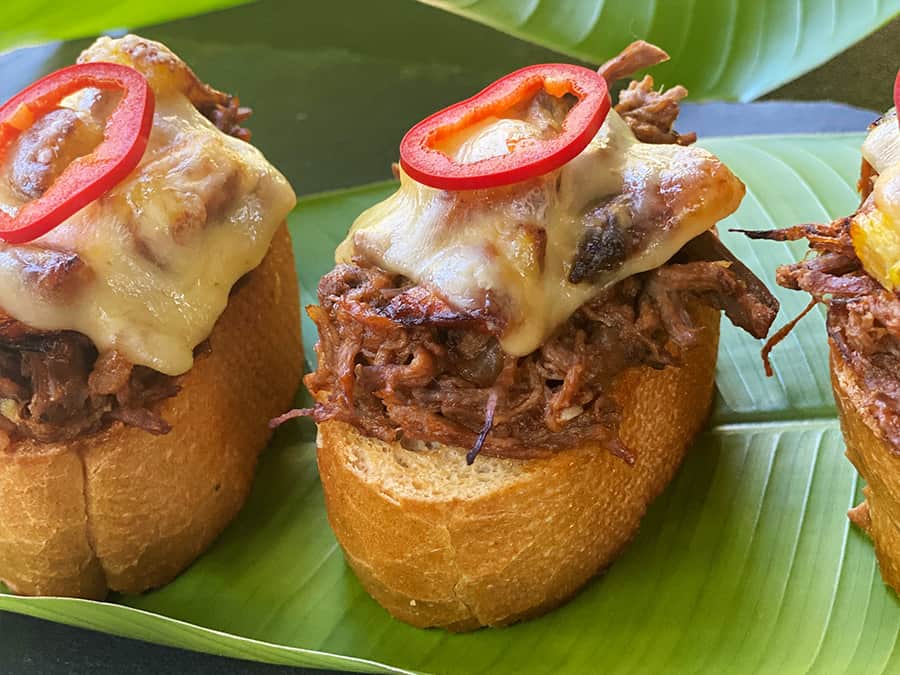
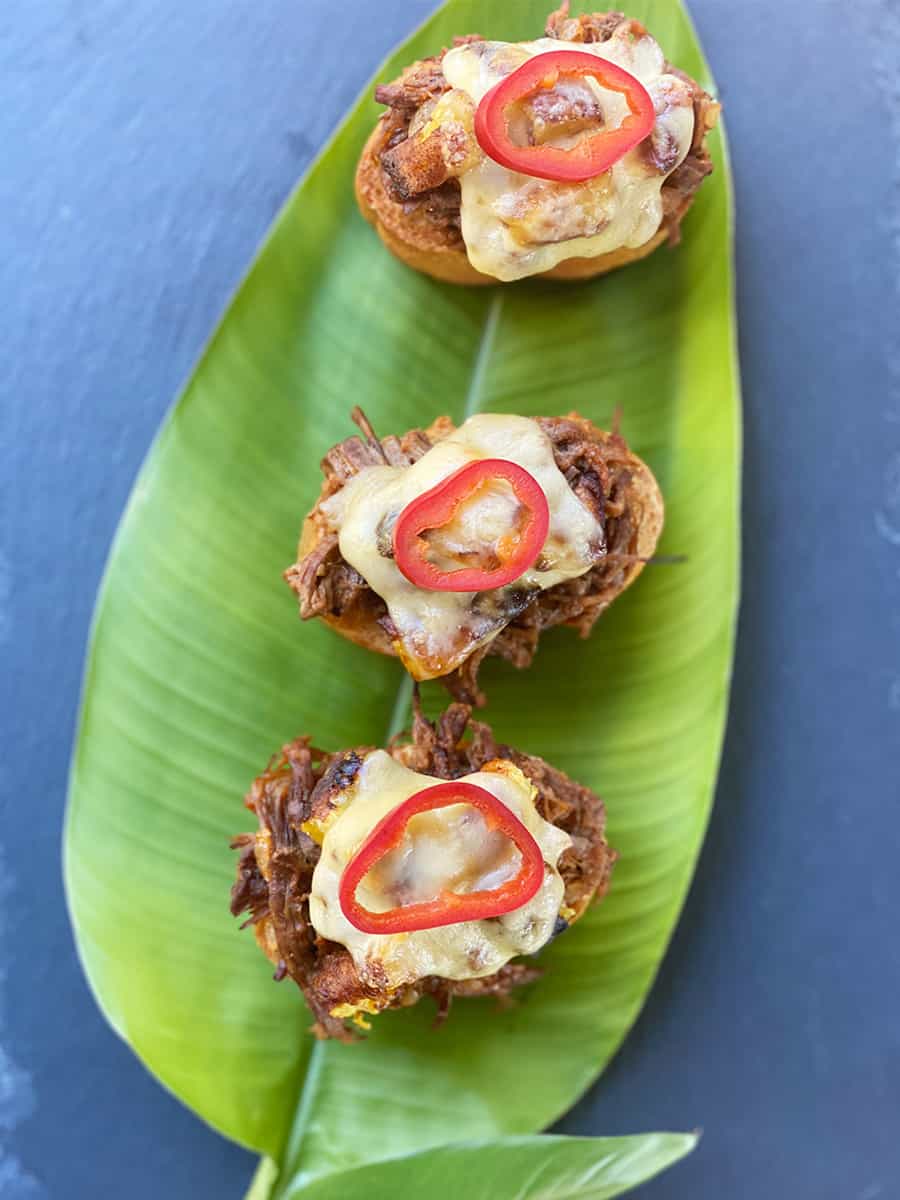
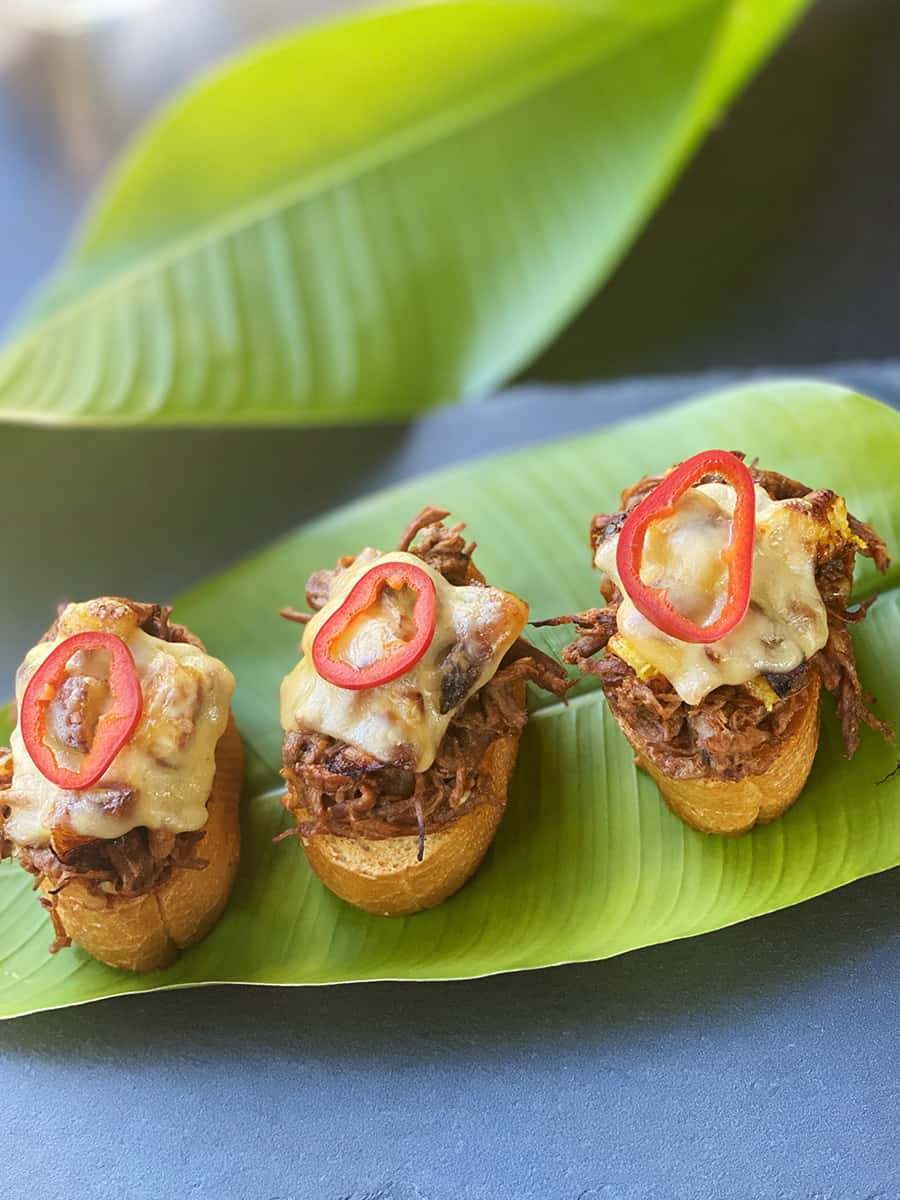
Ooh, you are so going to wow your friends with these little shredded beef appetizers, which I’m calling Ropa Vieja Montaditos. They are totally Instagram-worthy and the perfect wine party appetizer! You may not be as excited with the strange-sounding name, but you will once I ‘splain what my little ropa vieja sandwich is all about.
What is a montadito?
I didn’t just make up the name montadito. This Spanish word describes a particular type of appetizer consisting of a baguette-style bread piled with toppings. The root word means to mount. So, in essence, you’re mounting deliciousness on a bread canvas to create little works of art that won’t last very long on a plate! Trust me, this is the best thing to happen to bread since the invention of the slice.
Now, montaditos are usually more like little sandwiches served on baguette bread. My shredded beef appetizer is more like an open-faced ropa vieja sandwich. A little different, but the name totally works.
What is Ropa Vieja?
Ropa Vieja is a shredded beef stew simmered in a savory tomato sauce. The original recipe migrated to Cuba from Spain, and it’s one of the most popular dishes served at Cuban restaurants in Miami. Ropa Vieja literally means old clothes, which could refer to how it looks. But I found a sweet story online about an old man who had no food for his family, so he cooked his old clothes and prayed over the simmering pot. Then God answered with shredded beef!
Spanish Tapas Bar and My Montadito Inspiration
So now, let me tell you about my little shredded beef and french bread appetizer made with love. I got the idea for this Spanish tapas recipe after visiting a local tapas bar, Bulla Gastrobar. Bulla, pronounced bu-ya, means noise in Spanish. And it was noisy, but it was a good noise. Some of the bu-ya was me smacking my lips over the tapas menu. Tapas are savory little bites served with drinks at Spanish bars (tapas bars), in case you’re wondering. So many Spanish vocabulary words today!
As I was drooling over the menu, I noticed this fantastic little dish pass right by me. I had not seen anything like it before! The dish was a montadito. I ordered one for the table and soon was digging into a little slice of french baguette bread piled high with brisket, tomato marmalade, guindilla pepper, and tetilla cheese. As soon as I tasted my little brisket montadito, I was already planning to make my own version with Cuban ropa vieja.
Allow me to present my own montadito creation with ropa vieja, sweet plantains (maduros) , melted gouda cheese, and pickled peppers. Oh, so yummy and perfect for a tapas party, for brunch, or for lunch or dinner, served with wine, beer, or sangria.
These are super easy to make if you have ropa vieja leftovers. If you don’t’, make the ropa vieja first and enjoy that for dinner, making sure to save a little for the montaditos on day 2. Ropa vieja is usually served over rice with fried sweet plantains called maduros. So save some maduro leftovers too!
Once you have your ropa vieja and maduros leftovers, the rest is pretty much assembly and comes together very quickly.
If you like this recipe, you’ll want to check out my Smoked Salmon Avocado Toasts, they are an easy brunch recipe that requires no cooking 😉
I hope these inspire you to make your own little bread canvases! If you do, share them with me. I’d love to try them too! ¡Buen provecho!
Try these impressive little French bread appetizers made with ropa vieja and maduros. They are perfect for a tapas party! They come together quickly and can be assembled and finished later. If you don’t have ropa vieja leftovers, you can get the recipe here and enjoy that for dinner the night before.
4 slices gouda cheese cut into four each (total of 16) or 1/2 cup shredded gouda cheese
16 slices of pickled peppers or Manzanilla olives
Instructions
Bread: Slice the baguette bread into 1-inch slices (need a total of 16… see note)
Olive Oil: Mix the olive oil, garlic, and a sprinkle of salt and pepper to taste. Brush olive oil on each side.
Toast: Lightly toast the bread in the toaster oven (or you can use an oven set at 350 degrees) until very a very light golden color. About 2 minutes (you don’t want to over toast because it will be toasted a bit more when you add the toppings.
Toppings: To each slice, add a tablespoon of RopaVieja, a few pieces of diced maduros, and a quarter slice of cheese or a ½ tablespoon of shredded gouda cheese
Melt: Toast until the cheese melts in the toaster oven or a 350-degree oven. Top with a slice of pickled pepper or an olive
Serve with beer, wine, or sangria.
Notes
I cut the bread slices to 1 inch but it can be a mouthful once you add the toppings. You could cut just a little shorter and it will save you some calories, too. My best advice is to test with 1 sandwich before you make the rest to see what height works for you.
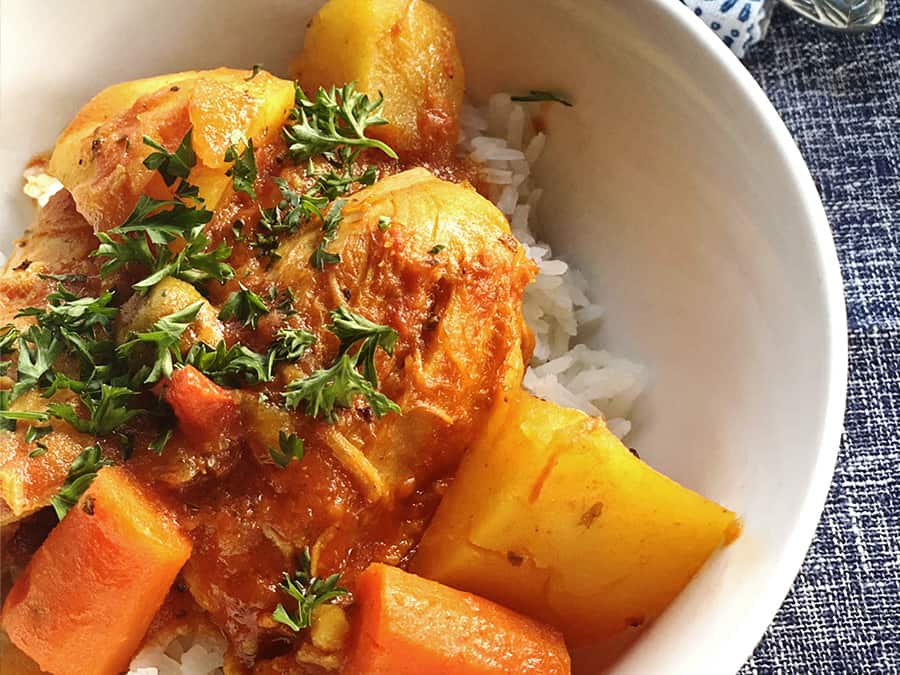
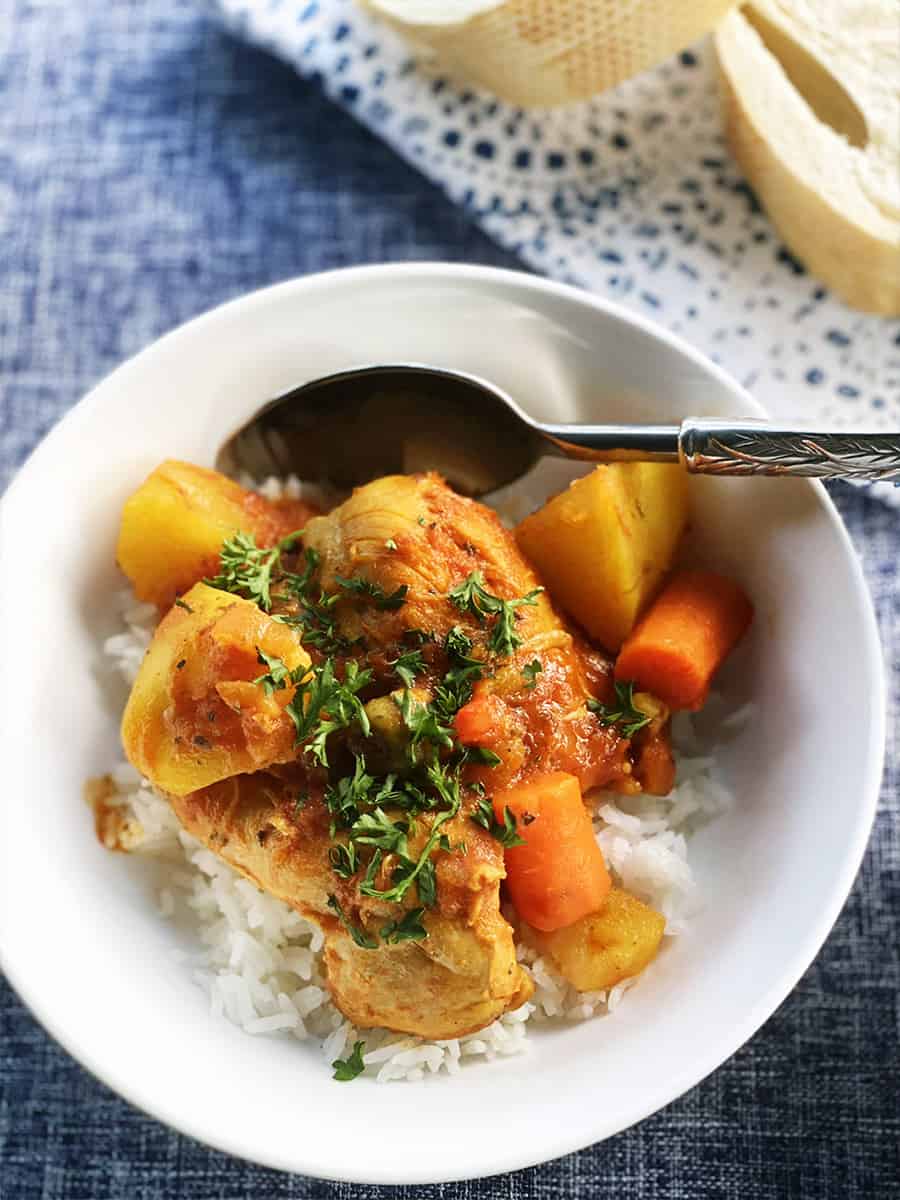
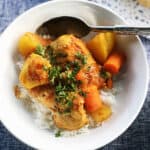
I grew up cooking Cuban food. And this chicken fricassee recipe is the first one I mastered when I was a teenager. What is a fricassee? It’s more a method of cooking than an actual dish. Fricassee is a French word that means cut up pieces of meat sauteed and then simmered in a sauce. This method is also popular in Spain.
And it’s from there that fricassee found its way to the Spanish Caribbean. Cuban Chicken Fricassee (Fricasé de Pollo) has a tomato base with dry wine.
My first fricassee used turkey instead of chicken and I was so proud of it too! Growing up Cuban in Miami, a traditional turkey dinner wasn’t something I did until I was married to my very American husband. I remember thinking I had bitten off more than I could chew as I was cutting up the turkey, but it came out delicious. Mami tried to take the credit for the turkey fricassee since she’s the one who taught me, but I wouldn’t let her. Lady, it was my trophy turkey!
Some Changes To Mami’s Original Chicken Fricassee Recipe
I used to make this with a cut-up fryer chicken, just like Mami used to make. Nowadays I only use skinless chicken thighs. I find chicken breast to be too dry and drumsticks not as meaty.
My Cuban Chicken Fricassee recipe includes carrots and saffron which my Mom didn’t use. Saffron is not traditional and it’s a pricey spice, so it’s totally optional. I like using it because it gives it such an amazing flavor, similar to paella. I found myself compulsively tasting the sauce when I already knew it was good. So super tasty!!
Some recipes also call for raisins but my crew doesn’t like them. I would definitely recommend you try it at least once with the raisins to see if you like it.
This dish is usually served over white rice, but you can also use brown rice. Or serve it as a stew with some crusty bread for dipping. Make enough for leftovers because this recipe is even better the second day. When my kids were little, I would shred the chicken and mix it with rice. The kids loved it! ¡Buen provecho!
As a teenager, I was so annoyed when my mom tried to take credit for my accomplishments, like making Turkey Fricassee from scratch. I didn’t want to be in her shadow. But now that I’m a parent, I understand my mom was simply excited that I succeeded with her help. Parenting can be so hard sometimes, it’s exhilarating when our kids succeed because that means we also succeeded as a parent. Thank you so much Mami, sorry I was such a brat about the fricassee.
Chicken Fricassee Cuban style is a savory chicken stew served over rice. It’s a very popular Cuban dish that’s easy to make.
Ingredients
Scale
3 pounds skinless chicken thighs with bones (you can use a mix of chicken pieces including thighs and breast if you prefer)
1 cup yellow onion, diced
1⁄2 cup red bell pepper, diced
3 tablespoons olive oil, divided
4 cloves garlic, pressed
2 teaspoons oregano
2 teaspoons cumin
2 teaspoons paprika
1 1/2 teaspoons salt
1/2 teaspoon black pepper
pinch of saffron threads (optional)
2 cups crushed tomatoes
1⁄2 cup cooking wine (vino seco)
3 tablespoons Spanish olives
3 tablespoons raisins (optional)
1 cup peeled potatoes cut into 1-inch cubes
1 cup peeled carrots cut into 1-inch sections
Instructions
Spices: Mix the spices, salt, and pepper in a small bowl.
Prep: Cut the onions and peppers and crush the garlic.
Clean and season the chicken: Trim the fat off the chicken. I use kitchen shears for this, it’s so much easier. Pat dry the chicken on paper towels. Sprinkle each chicken piece with the spice mixture and set it aside while you dice the onions and peppers and crush the garlic.
Brown the chicken: Heat 1 tablespoon olive oil in a large skillet over medium-high heat. Brown chicken pieces in batches on both sides, 2–3 minutes per side. Use another tablespoon of olive oil for the second batch, if the pan is dry. You don’t want the pieces to stick to the pan. Transfer the browned pieces to a platter and leave the fat in the pan.
Sautee onions: Add the remaining tablespoon of oil to the pan and saute onion, pepper, and garlic over medium heat until softened about 5 minutes.
Add tomatoes and spices: Add crushed tomatoes, vino seco, bay leaf, and a pinch of saffron and simmer for 5 minutes.
Add chicken: Add the chicken to the pan again and simmer over medium-low heat for 20 minutes, turn over and add the carrots, cook another 5 minutes.
Add the vegetables: Add the potatoes, olives, and raisins and cook for 20 minutes more.
Serve over rice or with Cuban bread for dipping into the sauce!
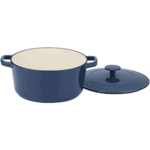
I used to cook this with a regular dutch oven pot, but I recently purchased a Cuisinart Cast Iron Porcelainaffiliate link Casserole and I love it! It doesn’t stick and it’s easier to clean than I expected. And I love how even it heats and how pretty it looks. I’m linking to the one I used for this recipe.
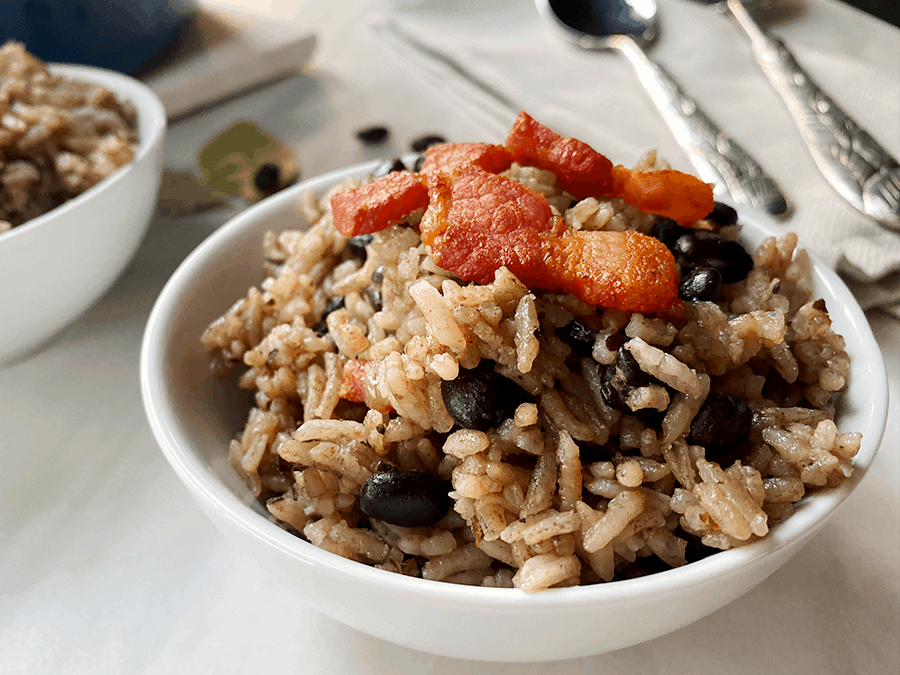
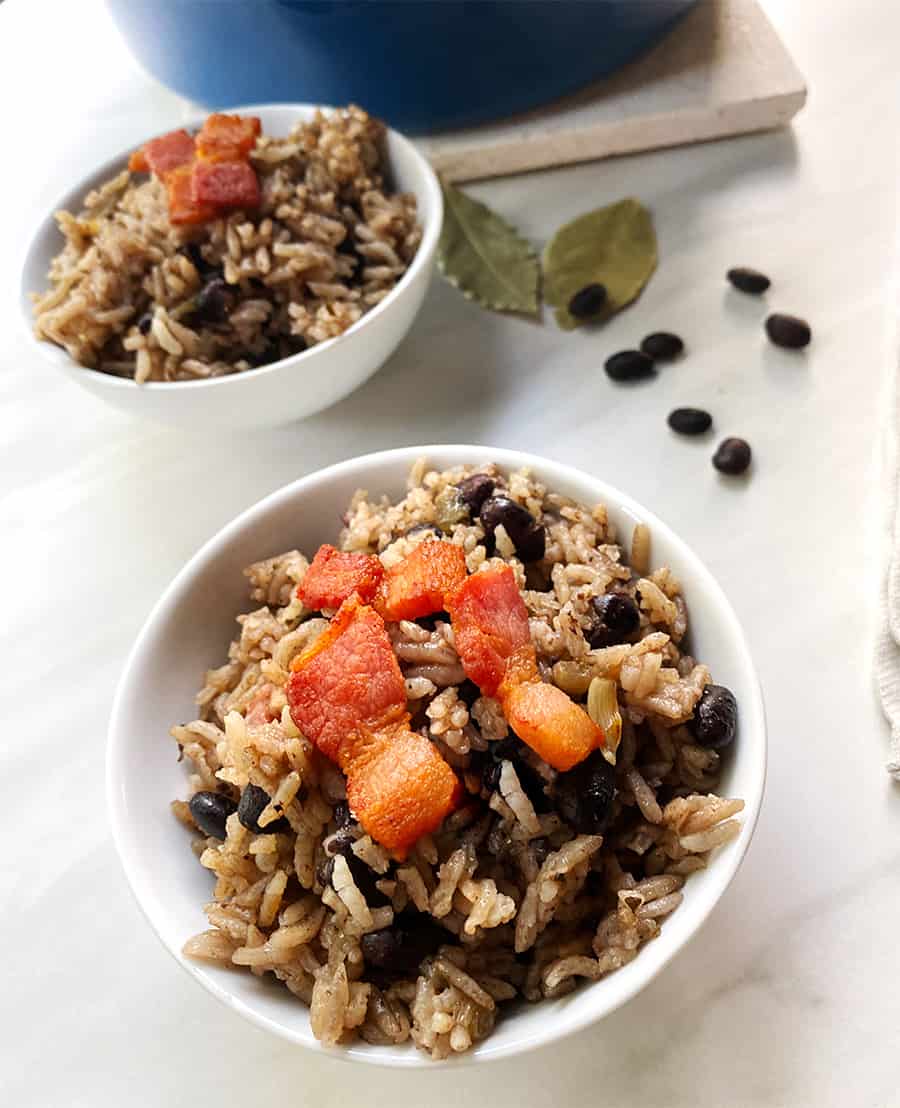
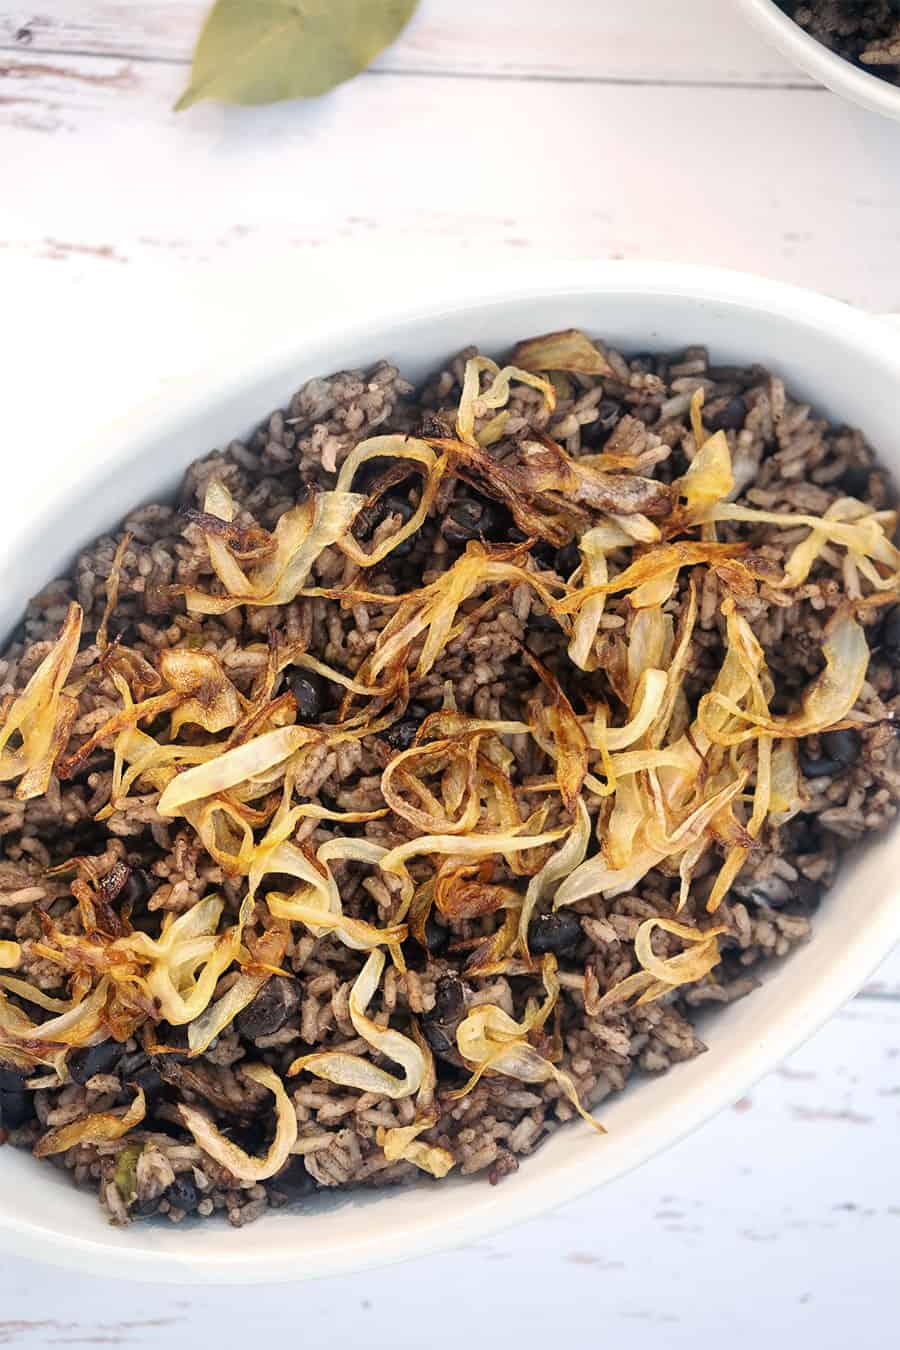
This Cuban congri rice recipe launched the Bean Train Blog! This is Mami’s best beans and rice recipe and the one that her kids and grandkids want to learn and pass down. Every Thanksgiving and Christmas Eve, my brother calls from North Carolina asking how to make it. Every time. That’s what gave me the idea to start this blog, so, Thank You, Henry!
I’m willing to tackle any cuisine, cook up a storm and invite a few extra mouths. But I hadn’t made this recipe until I started the blog. I knew I was grandma material when I could make this recipe just like Mami’s (well, almost, but don’t tell her!).
Congri vs. Moros Debate
Congri is a traditional Spanish black beans rice dish served with just about anything Cuban, especially with roast pork (lechón asado) on Christmas Eve (Noche Buena). Now let’s briefly consider the congri vs. moros debate (or just skip this paragraph if you’re not Cuban). Depending on where in Cuba you lived, congri is made with red beans and rice and moros y cristianos is made with black beans and rice. My mom was a Havana gal, so I grew up calling this black bean version congri.
It’s been hard perfecting this black beans and rice recipe because my mom doesn’t use exact measurements. It’s a little pinch of this, a dash of that, and a handful of the other thing. She cooks “a ojo de buen cubero” which basically means she eyeballs everything. But she’s been making this recipe for so long that it always comes out fantastic. I had to watch her like a hawk to get the measurements down.
How To Soak and Cook Your Beans For Congri Rice
You can’t use canned beans for this congri recipe. You really need to make them from scratch because you’ll be using the bean broth as well as the beans. Softening the beans can be done quickly in the Instant Pot, but you’ll need to finish the rice on the stovetop. Now let’s talk about soaking the beans. My mom always soaked the beans overnight and then replaced the water with fresh water. Some folks say this is not necessary. But recently, I’ve been reading more about anti-nutrients and lectins and how soaking the beans helps remove some of the harmful anti-nutrient compounds. Added bonus, soaking also reduces the complex sugars that can lead to gassy side effects. So, it turns out Mami was right. Soak them beans!
You can also turn this rice dish into vegan black beans and rice by omitting the salt pork. Add a little extra salt in that case. You can taste and make that call. Salt pork is common in southern cooking, so it should be easy to find. But, you can substitute bacon or pancetta for the salt pork if it’s easier. I use a lot of it in this recipe because my daughter loves it so much, but you can use a little less and still have great flavor. ¡Buen Provecho!
I have taken for granted how comfortable and fearless I feel in the kitchen. I owe my mother a debt of gratitude for encouraging me to cook, but I didn’t realize it until a few years ago. Sometimes hurt makes us focus on the negative, and we miss the goodness around us. My mom tended to be very critical of me when I was growing up, which damaged my self-esteem. But she always supported my efforts in the kitchen. I never thanked her for that.
A few years ago, a very talented friend of mine shared why she doesn’t enjoy cooking. When she was young, she tried to make her Dad breakfast and burnt it, and her dad called her stupid. That made me think about my own confidence in the kitchen and how my mother treated my first cooking attempt.
I was eight years old when I made my first dish from scratch. Having seen my mom make Spanish omelet dozens of times, I was sure I could pull it off. So I cracked the eggs, cut up a potato, and cooked it together, not realizing that you had to cook the potato before adding it to the omelet.
I served my mom and stepdad raw potato omelet! They ate it up and told me how delicious it was!! Years later, my dad confessed that Mami made him eat it and say he loved it.
My mom has her shortcomings, but she also has excellent qualities. Being a parent myself, I realize that moms are not perfect, but we do the best we know-how. So thank you, Mami, for sharing your love of cooking with me and always letting me try new things in the kitchen. Sorry, I burned the kitchen a little (just once).
Congri is a traditional Spanish black beans rice side dish served with just about anything Cuban, especially with roast pork (lechón asado) on Christmas Eve (Noche Buena).
Ingredients
Scale
12 oz bag uncooked black beans
2 cups white rice (long grain)
2 oz salt pork, cut into ½ inch cubes (you can use a bit less)
1 medium yellow onion, minced
¼ green pepper, cut into three pieces (you can also mince this)
6 garlic cloves, minced
2 tablespoon olive oil
4 bay leaves
2 teaspoon dried oregano
½ teaspoon cumin
3 teaspoon salt
¼ teaspoon pepper
Instructions
Rinse the beans and soak them in water overnight. If you’re in a hurry, bring unsoaked beans to a boil, turn off the heat and let them soak for an hour.
Drain the water, put the beans in a large pot, add six cups of water, one teaspoon salt, one teaspoon oregano, and three bay leaves. Cook it in a pressure cooker or Instant Potaffiliate link for about seven minutes. Once done, separate the beans from the broth and reserve both. Don’t leave the beans in the broth as that will make the beans too soft. They will continue cooking in the rice. (See note below for stovetop instructions.)
Once the beans are just about done, rinse the rice until the water runs clear. Drain and set aside. My kids are rebels, and they don’t rinse the rice, and it’s still OK just so you know.
Heat a dutch oven (or caldero*) over medium heat. When it’s hot, add the salt pork and one-quarter cup water. Once the water evaporates, add about two tablespoons of olive oil and brown the salt pork for about six minutes. Once done, remove the pork from the pot with a slotted spoon, leaving the drippings in the pot.
Add the onion, garlic, and peppers and cook until the onions are translucent about four to five minutes. (Note on the peppers: My mom usually leaves the peppers in big 1 inch pieces and removes them at the end. But you can mince them if you like.)
Now add rice and sauté for a minute. Add two cups of the bean broth (stir the bean broth before you measure it out to make sure you get the sediment at the bottom, this helps turn the rice black).
To the rice mixture, add one cup of black beans. Add one teaspoon salt, one teaspoon oregano, half a teaspoon cumin, one quarter teaspoon ground black pepper, and one bay leaf. Taste and adjust seasonings as needed. Sometimes you may need to add a little more salt, or you may like it with a little more cumin. My mom’s philosophy with seasoning is less is more, and she’s usually right, but you’ve got some wiggle room here.
Bring to a boil, cover, and reduce the heat to as low as possible until the water evaporates about twenty to thirty minutes. Check the rice and see if it’s soft. If it’s still a little hard, you can add a bit more bean broth. Put a sheet of aluminum foil over the pot and then the lid. This helps to lock in all the steam. Give it a few minutes and check again. Fluff the rice and serve with your favorite meat.
Some favorites to try it with Ropa Vieja, Picadillo, Tasajo, Lechon, Bacalao… just about anything if you’re Cuban.
Soaking Time: You must soak the beans. I usually do it for 4 hours or overnight. But if you’re in a hurry, you can bring the beans to a boil in six cups of water, turn it off and let it soak for one hour. The reason to do this is to remove some of the harmful lectins and to make the beans easy to digest. However, Dr. Gundry, an export on lectins, says that soaking isn’t necessary if you’re using a pressure cooker.
Troubleshooting: If your beans are too soft, don’t add them with the rice. You can add them after the rice is done cooking, just before serving.
Stovetop Instructions: Bring to a boil and simmer until beans are fork tender but not too soft (they should still be whole). This should take about one hour or so.
Leftover Beans and Broth: You will have leftovers beans and broth. You can save these to make black bean soup or save the beans to use in salads and meal prepping.
Freezing Instructions: You can freeze leftover beans and broth, portioned out and separated so you can make Congri another time. Both the beans and the rice freeze well and can be kept up to 3 months in the freezer. You can portion the Congri in small 1-cup containers, as my Mom does for me ❤️
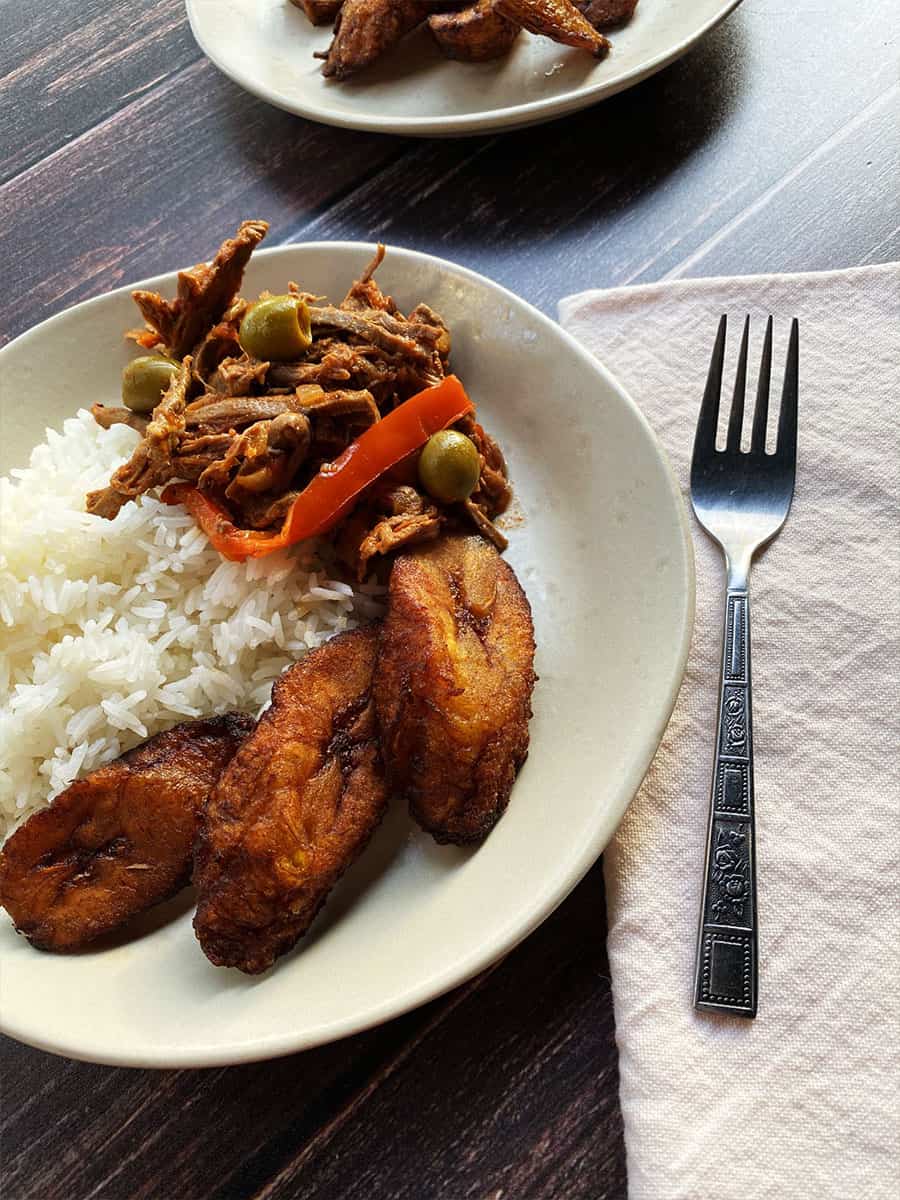
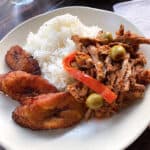
What is ropa vieja? The translation means old clothes, but I don’t know if it’s because old clothes are comfortable, like comfort food. Maybe it’s because you cook it as long as you would boil old clothes back in the day. Either way, my Cuban ropa vieja recipe translates to shredded beef deliciousness!
Full disclosure, as yummy as this is, it’s not my favorite way to eat shredded beef. I prefer to make vaca frita (fried cow) with the ropa vieja meat, but that’s a post for another day. Ropa Vieja is my hubby’s favorite dish. He usually orders this when we eat out at a Cuban restaurant. Hey, sometimes this gal needs a night off, too!
I used to make this dish with flank steak, what a newbie mistake! I learned Mami makes it with shoulder London broil, which is way cheaper. You can buy enough to feed a battalion (batallón) or have enough for great leftovers!
I think Ropa Vieja is the king of leftovers because it tastes even better the next day, and you can make standout party food like shredded beef quesadillas, shredded beef empanadas, or shredded beef and maduros flatbreads. I love having appetizers for dinner, don’t you? It magically transforms dinner time into party time, especially with a glass of merlot.
Mami always made ropa vieja in the pressure cooker. But all the cool kids are using the Instant Pot these days, and I wanna be cool, so I switched it up. This ropa vieja recipe’s directions are the same in either the Instant Pot or the pressure cooker.
Some folks make the Ropa Vieja in the slow cooker, but no matter how many recipes I’ve tried, it’s just not a winner. You really need to simmer the beef at a higher temp to get the sauce to reduce. Otherwise, it’s more like shredded beef soup… not a fan. You could, however, cook the beef in the slow cooker for 4 hours on high or 8 hours on low and then transfer the beef to the stovetop to finish it.
You can serve this over rice with twice-fried green plantains (tostones) or fried sweet plantains (plátano maduro). I’m really into rice bowls these days, so I like to try different bowl buddies, like:
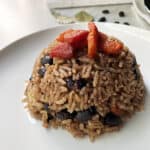
Traditional Cuban: Shredded beef, white rice, sweet plantain bits (maduros), and black beans (or you can use congri rice instead of the rice and beans).
2nd Generation Cuban: Ropa Vieja, Brown Rice, Roasted Cauliflower, and cilantro.
Mashed Cuban Bowl: Ropa Vieja, yuca mash, carrot slices, and Brussel sprouts. It’s like a deconstructed Cuban shepherd’s pie.
I hope you enjoy this authentic Ropa Vieja recipe and try the other dishes you can make with the leftovers.
This shredded beef dish is one of the most popular dishes served at Cuban restaurants and a family favorite at my house. It’s typically served with white rice and fried maduros.
Ingredients
Scale
2 lbs shoulder London Broil (Falda de Paleta)
1 medium onion, minced or sliced (your preference, I went with minced)
3 cloves garlic, crushed or minced
1/2 a red bell pepper, sliced
2 tbs olive oil
16 oz can tomato puree
1/2 cup cooking wine (vino seco) I love using Artañan Vino Seco. It’s amazing!
1/2 tsp cumin
1 tsp dried oregano
3 tbs green Manzanilla olives
1 tsp salt
1/2 tsp black pepper
Instructions
Instant Pot or Pressure Cooker Instructions: Cut the meat across the grain in three-inch pieces, add enough water to cover the beef (about 3 cups) and pressure cook for 30 minutes. Reserve the broth.
Let the meat cool and then shred with two forks or by hand.
Heat 2 tbs of olive oil in a skillet over medium heat. Add the onion, peppers, and sauté until onions are tender and translucent for about 8 minutes. Add the garlic, stir and cook for one minute.
Add the tomato puree, cumin, and oregano. Simmer for another minute. Add the wine and simmer for about 8 minutes.
Add the beef, salt, and pepper and simmer for 30 – 45 minutes, until the sauce thickens and sticks to the beef. Add a little of the reserved broth if needed.
Slow Cooker Instructions: Cut the meat across the grain into three-inch pieces. Place in a slow cooker with one cup of water and2 bay leaves and cook on high for four hours.
Stove Top Instructions: Cut the meat across the grain in three-inch pieces simmer on the stovetop for about an hour and a half.
Serving Suggestions: Serve as a traditional Cuban dish or mix it up with these alternatives.
2nd Generation Cuban: Ropa Vieja, Brown Rice, Roasted Cauliflower, and cilantro.
Mashed Cuban Bowl: Ropa Vieja, yuca mash, carrot slices, and Brussel sprouts. It’s like a deconstructed Cuban shepherd’s pie.
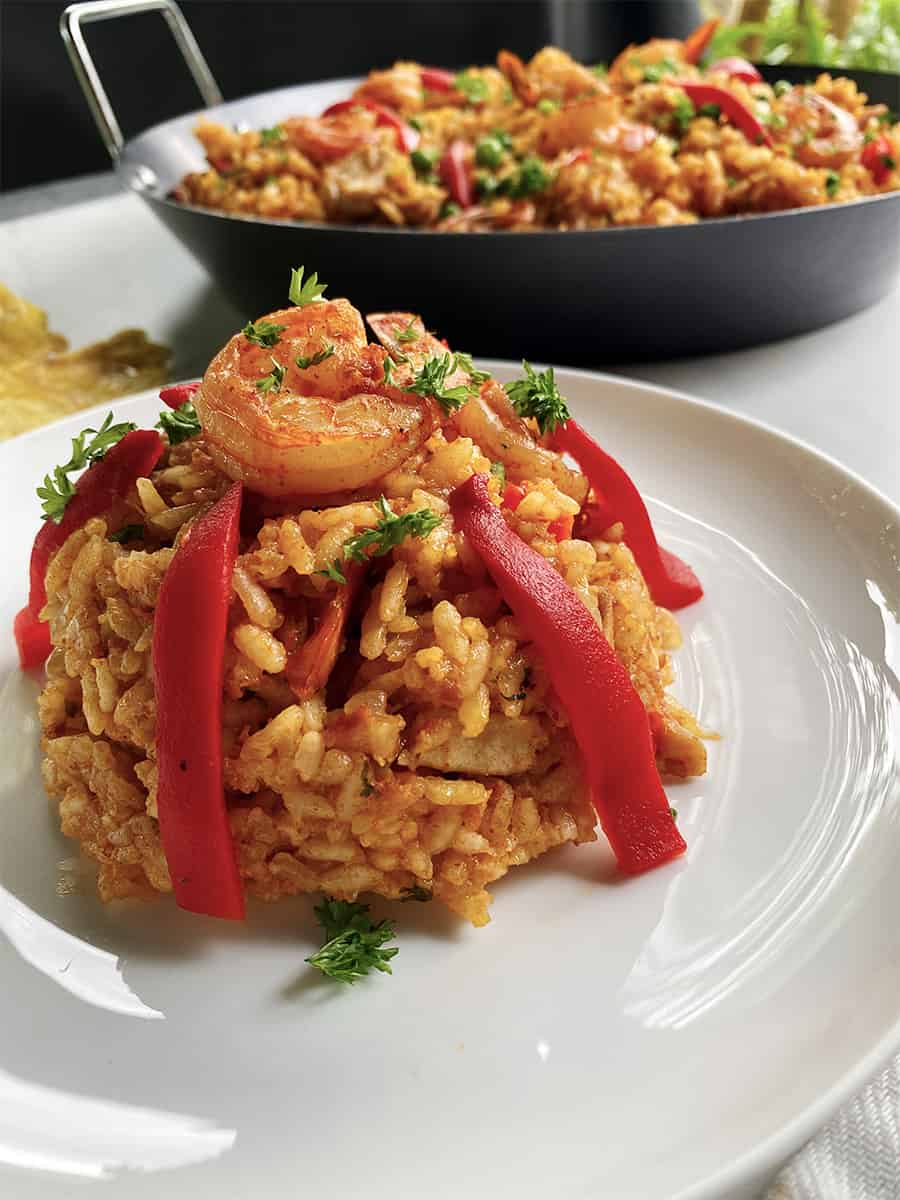
Paella Mixta is party food! Actually, Paella Parties are very much a thing in Miami. Catering companies dazzle party guests with their paella pan the size of a kiddie pool and proceed to cook it right in front of them like it’s no big deal. I love Miami!
Paella is originally from Spain, but my recipe is Cuban Paella (of course!) made with chicken, shrimp, and chorizo. As much as I loved Paella, I had never made it myself so I invited Mami to a paella party in my kitchen. While it had been years since she’d made paella mixta, she still had it! I loved watching my mom in her element, in the kitchen, cooking up a storm and telling me what to do! She does love to tell me what to do ;-)
I’ve since made this paella mixta many times. It’s my daughter’s favorite! Recently my son helped me make this dish, and he wanted to make a few edits to my recipe. I was very resistant initially, but seeing as he’s a professional cook, I gave in. The end result was much tastier!
Not gonna lie. I’m both excited and annoyed that his is better. So here are a few things he did to level up my paella recipe.
My Son’s Edits To My Cuban Paella Mixta Recipe
He used ground chorizo instead of sliced. This added more flavor and color to the whole dish.
Instead of adding paprika to the sofrito, he seasoned the chicken and shrimp with the paprika and salt and then added more to the sofrito. Seasoning at every stage really stacked the flavor.
He dried the proteins before sauteing, so they got some really good color and crispness.
He killed the heat after the rice came to a boil. Once I add the rice, I usually bring to a boil and lower the heat and simmer it without a lid. He brought it to a boil, turned off the burner, and covered the rice. It came out with just a bit of bite, but not as wet as mine. While mine is excellent the first day, the rice did tend to get a little mushy when reheating leftovers. (I always make enough for leftovers!)
The paella spices in this dish are paprika and saffron. I like using smoked paprika and a generous pinch of saffron. Pound for pound, saffron is the most expensive seasoning you can buy. Luckily you don’t need to use more than a pinch. I paid about $8 for enough saffron threads to make 2-3 recipes. Don’t skip this ingredient because it’s an essential paella seasoning. It gives your dish authentic paella flavor. The rice you use is also a key factor. You need to use short-grain rice similar to risotto. Cubans use Valencia rice, but if you can’t find it, use Arborio rice.
Now let’s talk paella pan. The traditional paella pan is wide and shallow and doesn’t have a lid. But you can use any wide skillet. I make mine in my mom’s caldero, a HUGE dutch pot that’s older than me. I know I was cooking in it when I was in my teens, and it was old then. These calderos are very common in Cuban cooking, and it’s what I use for most of my mom’s signature recipes. You can buy the calderos in various sizes, but Mami’s is extra-large because mom often cooks for a crowd. Yea, she’s extra.
Oh, and the cool thing about paella leftovers is that you can make these amazing fried rice balls. You’ll love them as much as the paella!
Wondering what to serve with Paella? My favorite paella side dishes are twice-fried plantains (tostones) and a side salad. You can use this recipe to make the tostones or buy toston chips at the supermarket. Now let’s get cooking!
Sometimes we can be too stubborn to change, even when it’s for our betterment. Standing in the grocery store arguing with my son about switching up my chorizo is an example. Here’s the kid whose diapers I changed telling me how to make Paella! I have pots older than him!
But the truth is that my son is a very talented chef. I let go of my pride and allowed him to show me his techniques, which turned out to be an improvement. Pride gets in the way of our growing unless we learn to eat a little humble pie. The flavor is actually better than you would imagine ?
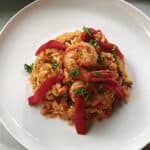
Paella is party food, a delicious crowd pleaser with a Latin flair. This chicken and shrimp paella has a little chorizo thrown in for an irresistible spicy flavor.
Ingredients
Scale
1/3 cup olive oil
2 cups white onion, medium dice (about 1 large)
8 cloves garlic, pressed
1 red bell pepper, diced
1/3 cup chopped parsley
2 tablespoons tomato paste
1 1/2 tablespoons salt, more to taste*
1 tablespoon paprika, or a bit more*
3 cups Valencia rice
4 cups chicken broth
generous pinch saffronaffiliate link threads (Do not crumble the saffron.)
1 lb shrimp, peeled and deveined with tails on
2 lbs skinless, boneless chicken thighs
½ lb ground Spanish chorizo (this is already cooked)
1 cup white wine
For Garnish
Jarred pimento peppers, cut into thin strips
Frozen sweet green peas, thawed
Instructions
Heat paella pan, caldero or skillet over medium heat for a few minutes. While it heats, prepare your ingredients.
Trim the excess fat from the chicken thighs and thoroughly dry them. Then season with smoked paprika and salt on both sides. Set aside.
Peel and devein the shrimp. Thoroughly dry and season with smoked paprika and salt on both sides. Set aside.Dice the onion and peppers.
Rinse the rice. (I usually just rinse once.)
Now that the pot is hot add the chorizo and cook for 2 minutes until it’s starting to crisp. Remove from the pot but leave the drippings.
Add the chicken thighs in one layer and don’t crowd them. Cook it in stages if necessary. Cook on each side for about 5 minutes each. Remove it and let it rest.
Add the shrimp and cook on one side for about 3 minutes (you don’t want it to overcook and get rubbery. It will finish cooking with the rice. Once it’s done on one side, remove it and let it rest.
Saute onions, garlic, pepper for about 5 minutes, until softened.
Stir and cook for one more minute. Stir in tomato paste and cook one more minute.
Add the rice and cook it for about 6 minutes.
Add the chicken broth, wine, and saffron threads. Add the chicken, shrimp, and chorizo and stir and adjust seasonings if needed.
Bring to a boil, turn off the heat, and cover. Let it coast for about 20 minutes. Rice should be a bit al dente. If you want to cook it a little bit longer, let it coast for another 10 minutes. If you’re not serving right away, you can transfer the pot to a 250-degree oven while you get everything else ready.
Once the rice is al dente, add the garnish and serve. Let’s get the party started!
Seasoning: You’ll season each element individually, so you may end up using a bit more (my son does not measure his spices). I usually use the measurements provided, so I suggest you measure out the spices first and then sprinkle them from your measured portion. If you end up running out, just use a little more, it will be fine.
Pans: I used an extra large calderoaffiliate link that has been in my family for decades. But you can use a paella panaffiliate link. I’ve also linked to a caldero that’s similar to the one I have. Keep in mind that this is a very large pot and you may not have many uses for it, unless you cook for large groups.