Breakfast Toast is the Best Way To Start Your Day!
These easy-to-make breakfast toasts are perfect for a quick weekday breakfast or a lazy Saturday morning brunch! If you’re still messing around with butter and jam, it’s time you kicked it up a notch and tried one of these fun breakfast toasts.
What I love about breakfast toast is that it’s so versatile. You can mix and match spreads and toppings based on what you have on hand. If you’re feeding a crowd, you can serve these up buffet style and let folks make their own versions.
Building The Perfect Breakfast Toast
You need three good layers for your breakfast toast and then a few finishing touches to turn your morning breakfast into a foodie feast.
Your Canvas: You need a good slice of sourdough, it’s hearty enough to stand up to all the fixins’ and the flavor is mild enough to go with just about anything. Other good choices here would be a hearty Italian loaf or ciabatta. Brioche or challah bread are too soft to do the job right.
Your Base: What are you in the mood for, sweet or savory? The base will determine the direction you go with your toppings. The spreads I love to use are goat cheese, avocado mash or almond butter. Goat cheese and avocado are very versatile, and almond butter is so good with fruit!
Toppings: Once you’ve got your base figured out, we’re ready to build! Goat cheese is perfect with berries or smoked salmon. And, avocado mash is delicious with goat cheese, smoked salmon or a fried egg. Almond toast is great with sliced bananas or berries.
Three Toast Combos to Try
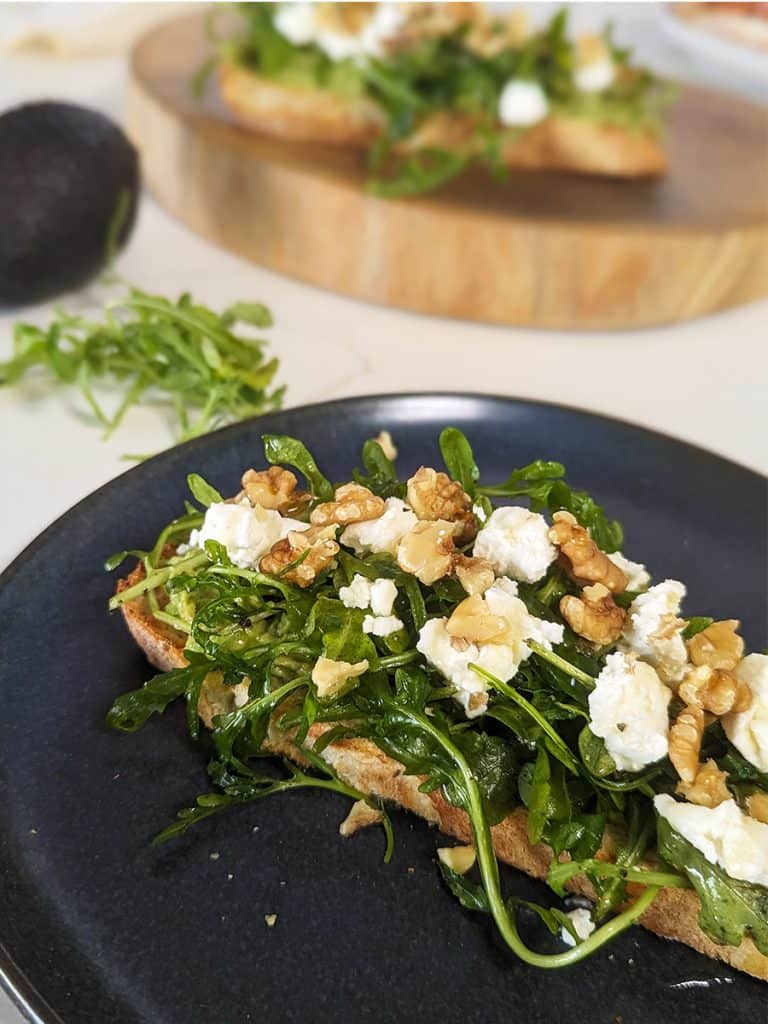
Avocado, Goat Cheese and Arugula
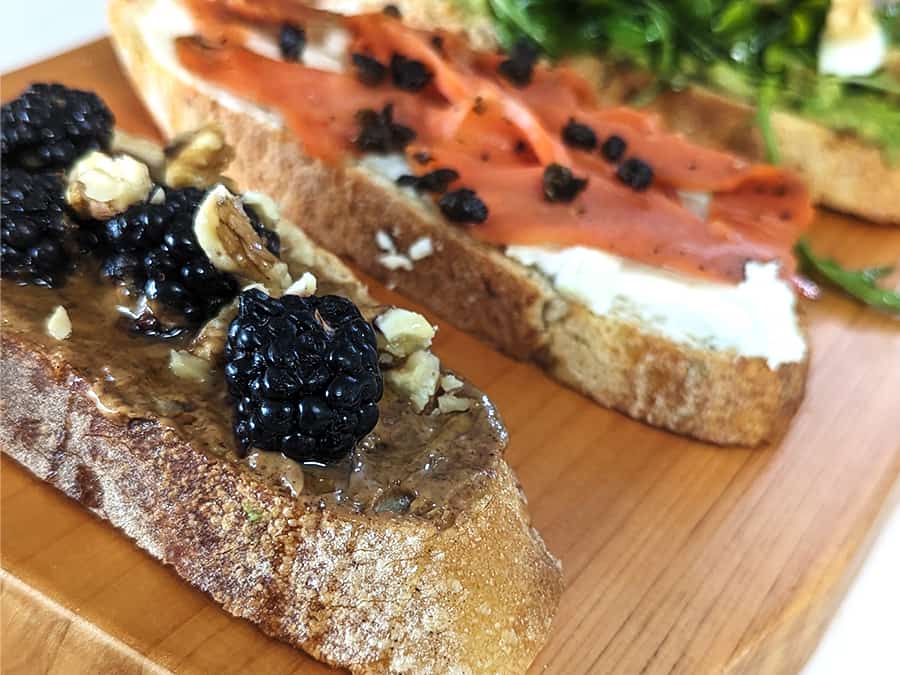
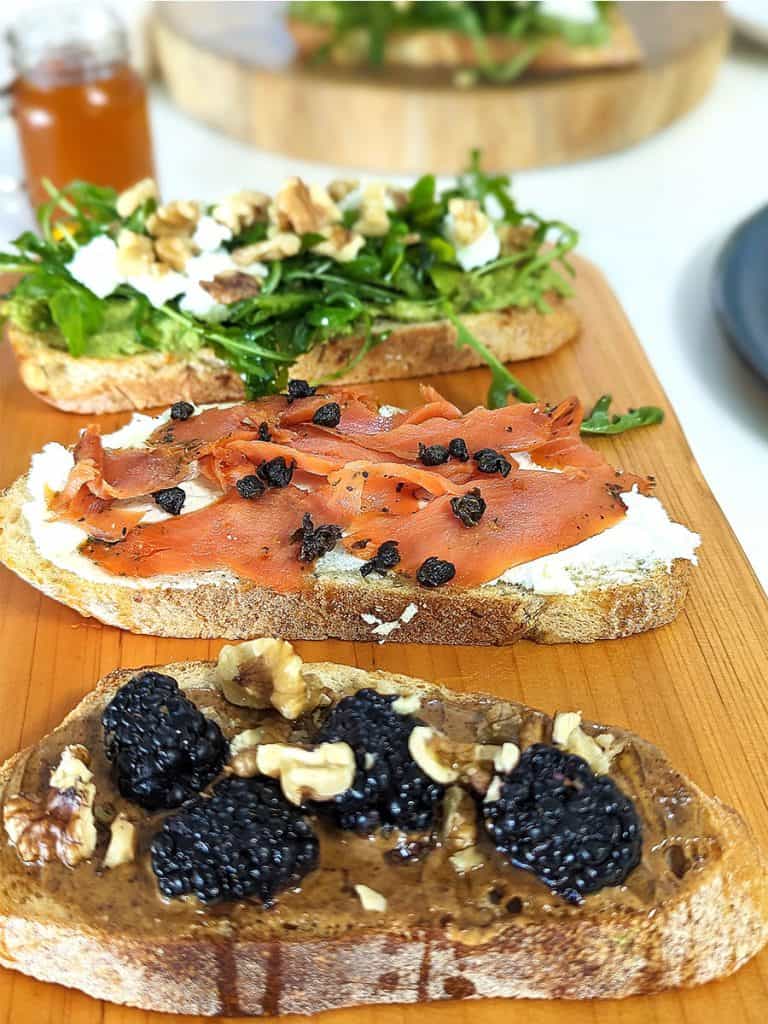
I first tried this combo at a local spot in Midtown Miami called La Toast Avocado Bar. It was so good I had to try it at home! It’s so easy and the flavors work so well together. You start with the avocado mash and then top with the arugula, crumbled goat cheese, walnuts and, what really makes this shine, a drizzle of honey. This last ingredient was unexpected when I first tried this toast. I would not have thought to pair honey with avocados, but it was so good that now I add honey to all my breakfast toasts. You need a little golden sweetness in your life, especially in the morning!
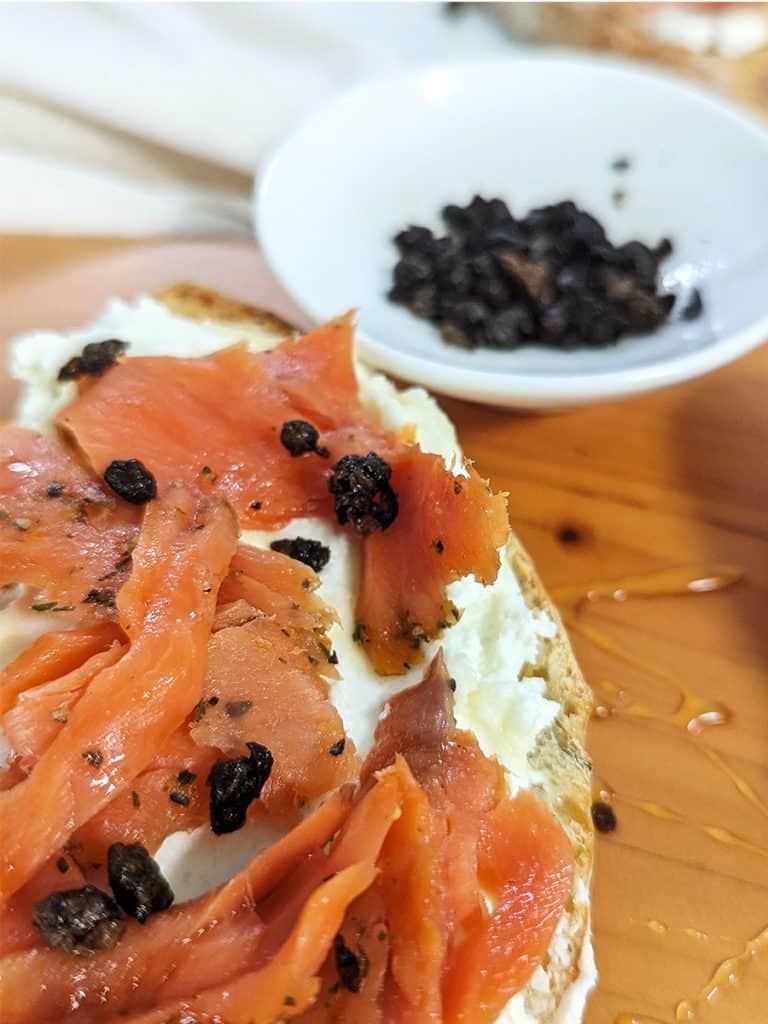
Goat Cheese, Smoked Salmon and Fried Capers
This little toast is actually a tapas dish at Bulla Gastrobar, a local tapas restaurant in Miami. Their version had a thick layer of goat cheese on a French baguette, topped with smoked salmon, fried capers and honey. Fried capers sounds like a lot to do in the morning, but it’s super easy and quick to make, you can do it even before you’ve had your first cup of coffee.
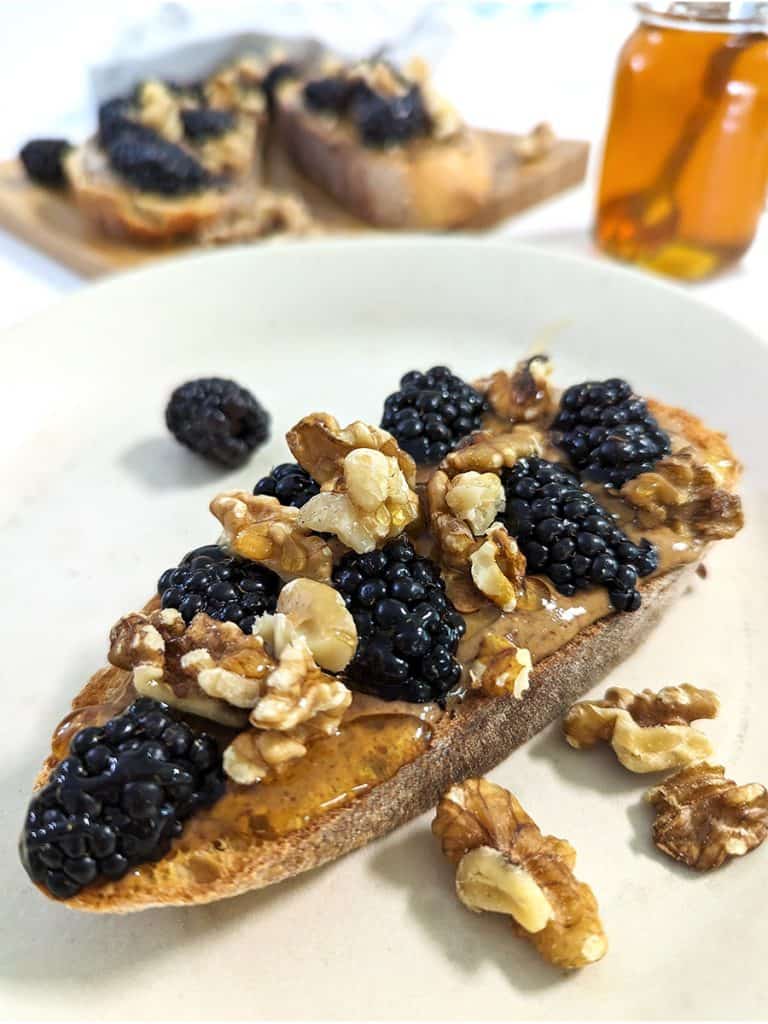
Almond Butter Toast with Berries
This is the simplest one to make and the one I have most often. Just top your thick slice of sourdough with a generous spread of almond butter and then add fresh berries, almonds and honey. Nothing can go wrong the rest of the day after this toast! Go to recipe –>
Breakfast is the most important meal of the day, so don’t skip it. Treat yourself to a thick slice with your favorite toppings and a good, strong coffee. Sit down and savor the moment before your day gets started… it will make your day!
Print
Avocado, Goat Cheese and Arugula
- Prep Time: 15
- Cook Time: 5
- Total Time: 20 minutes
- Yield: 4 1x
- Category: breakfast
- Method: toasting
Description
This avocado toast is a complete meal! Topped with arugula, goat cheese, walnuts and honey, it’s got lots of protein, healthy fats, and just a drizzle of sweetness to make your morning perfect!
Ingredients
4 slices of sourdough or hearty Italian bread, about 1⁄2 inch thick
2 Haas avocados, peeled and mashed
1⁄4 cup walnuts
2 tablespoons honey
2 cups arugula
2 ounces goat cheese, room temperature
2 teaspoons olive oil
1⁄2 teaspoon salt
1⁄2 teaspoon black pepper (a few twists of a pepper mill)
Instructions
Prep
Peel the avocado and chop into pieces, add 1⁄4 salt, 1⁄4 teaspoon black pepper, and mash with a fork.
Toss the arugula with the olive oil and the remaining salt and black pepper.
Chop the walnuts.
Toast the bread.
Assembly
Spread a quarter of the avocado mash, top with a quarter of the arugula, sprinkle 1 tablespoon of the walnuts and drizzle with honey.
Notes
I like to use sourdough, but other good breads to use would be ciabatta, hearty Itallian, French baguette, multi-grain.
Keywords: best avocado toast, avocado toast ideas, toast for breakfast, brunch toast, breakfast toast

Goat Cheese, Smoked Salmon and Fried Capers
- Prep Time: 10
- Cook Time: 10
- Total Time: 20 minutes
- Category: breakfast
- Method: toast, fry
Description
This toast is super easy to make and so deliciously different. The goat cheese is a great complement to the smoked salmon and the fried capers and honey add contrast and depth. It’s a nice twist to the traditional bagel and lox version and it’s quick and easy for a lazy Sunday morning.
Ingredients
4 slices of sourdough or hearty Italian bread, about 1⁄2 inch thick
4 ounces goat cheese, room temperature
4 ounces smoked salmon
2 tablespoons honey
2 tablespoon capers, drained
2 tablespoon olive oil
Instructions
Prep
Heat the olive oil, toss in the capers and fry for about a minute (maybe less). Stir the goat cheese to a spreadable consistency. If you were not able to bring the goat cheese to room temperature, microwave for 30 seconds to soften it first.
Toast the bread.
Assembly
Spread each slice with one ounce of goat cheese, one ounce of smoked salmon, 1⁄2 tablespoon of capers, drizzle with honey.
Keywords: breakfast toast, brunch toast, smoked salmon toast, breakfast toast recipes, toast for breakfast
Almond Butter Toast with Berries
- Prep Time: 5
- Cook Time: 5
- Total Time: 10 minutes
- Yield: 4 1x
- Category: breakfast
- Method: toast
Description
This almond butter brunch toast nutritious and delicious, and takes just a few minutes to make! We used blackberries in our version, but you can use different berries or even swap the berries for a banana. Try it for a delicious start to your day!
Ingredients
4 slices of sourdough or hearty Italian bread, about 1⁄2 inch thick
8 tablespoons almond butter
2 tablespoons honey
1⁄4 cup walnuts, chopped
1 cup blackberries
Instructions
Toast the bread. Spread 2 tablespoons of almond butter on each slice, sprinkle with 1⁄4 cup blackberries, one tablespoon of chopped walnuts, drizzle with honey.
Keywords: toast for breakfast, breakfast toasts, almond toast, brunch toast, breakfast toast, breakfast toast recipes, almond butter toast
Breakfast Toast is the Best Way To Start Your Day! Read More »