APPETIZERS

Gazpacho Is The Best Spanish Soup For Summer!

You’ll love gazpacho, it’s a Spanish soup that’s just perfect for summer feasting! Made with raw, blended vegetables, this Spanish soup is served cold, making it incredibly healthy and refreshing on hot days.  You’ll get more than a full serving of veggies without even trying 🍅❤️

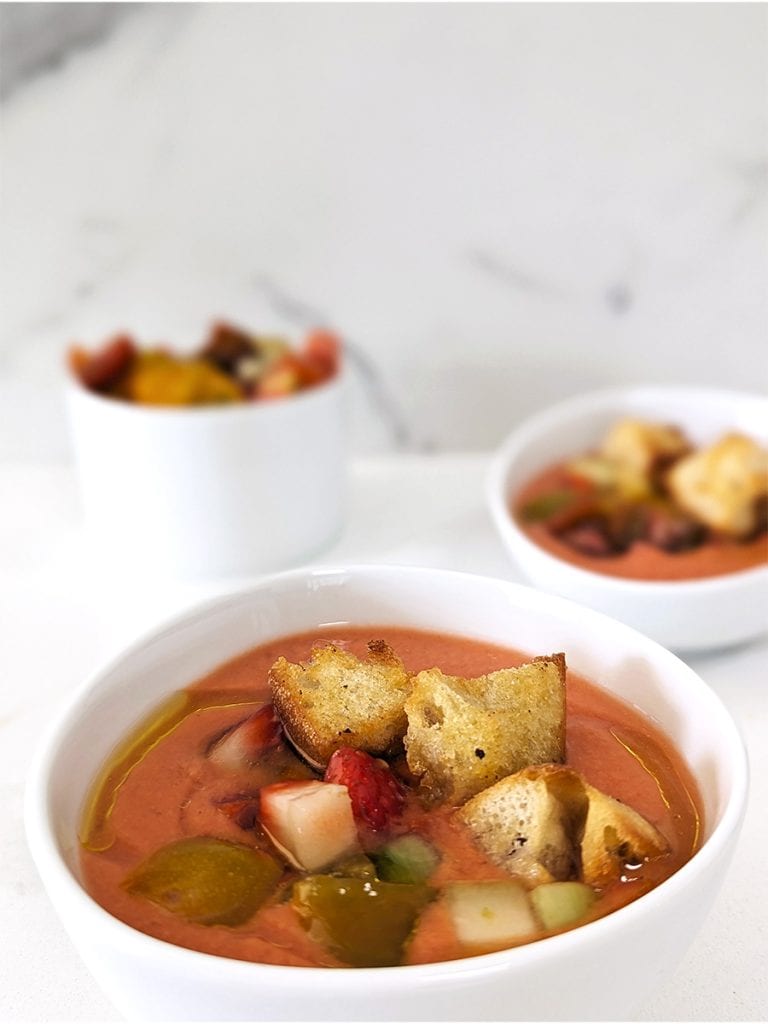
I like to serve gazpacho as a starter to a summer barbecue or a light brunch. Its vibrant hues make for a stunning presentation, whether you ladle it into soup bowls or pour it into cocktail shooters. And it makes great leftovers to be eaten as a deliciously nutritious snack the rest of the week.

When, Where And What Is Gazpacho?

Gazpacho is a traditional Spanish soup from southern Spain. Some say this cold soup has ancient origins dating back to Greek and Roman times. There’s also a  version of gazpacho dating back to Islamic Spain between the 8th and 13th centuries.

The original gazpacho recipe was made with bread, olive oil and garlic, no veggies included. The version we enjoy today, enriched with summer vegetables, surfaced in the 15th century with the arrival of tomatoes from the New World.  It’s one of the earliest fusion foods blending old and new together. 

cold soup

Gazpacho Ingredients In The Modern Age

Once tomatoes were introduced, gazpacho was changed forever… and I’m glad for it! Now, with its showy vibrant red color, tomatoes tend to hog the spotlight in this Spanish soup. But to achieve the deliciously complex flavor of gazpacho, we can’t forget the old ingredients: bread, olive oil, garlic and also a little sherry vinegar.

Now, that we’ve got the traditional base, let’s cue the vegetables, starting with ripe, luscious tomatoes. Heirloom tomatoes are also a great option. I don’t use cherry or grape tomatoes in the soup because they just don’t have enough tomato meat for this dish, but they’re great for garnish, if you have them. 

The other vegetables usually found in gazpacho are cucumbers, peppers and onions, and some also add fruit for a hint of sweetness. I opted for strawberries in my gazpacho, but you can choose other fruits such as melons or peaches. 

I’ve come across some recipes that just used chopped up vegetables with tomato soup… that’s not authentic gazpacho! The traditional version is thick, made with mashed or blended tomatoes, bread and olive oil. 

spanish soup

How To Make Gazpacho

Traditionally, bread, olive oil and garlic is mashed in a mortar and pestle to create a paste and then the vegetables and sherry are worked in. I love the idea of this, but I like how smooth the soup is when you make it in the blender… plus it’s easier and less messy. Besides, all the cool kids use the blender 😉

I skip the bread mashing and let the veggies do the heavy lifting for me. I roughly chop them, add them to a bowl, and sprinkle 1 ½ teaspoons of salt and toss them. Then, I add the cubed bread and let it sit for 15 minutes. The salt draws out moisture from the veggies, softening the bread in the process. And the bread isn’t just for flavor; it also helps thicken the soup and prevents it from separating. The soup should be thick with a smooth consistency, not at all watery. 

While the veggies are doing their magic on the bread, I prep the garnish, finely chopping gazpacho veggies and making homemade garlic croutons (these are ridiculously easy to make).

After fifteen minutes, we’re ready for the blender. I add the veggies and bread mix to the blender along with the vinegar and minced garlic. If all the veggies don’t fit into the blender, no worries. Fit in as many as you can and then start blending on low, the volume will reduce and you’ll be able to add the rest of the veggies. I continue to blend until smooth, slowly increasing the speed on the blender. 

Once veggies are fully blended, I drizzle in the olive oil. While you can use up to a half cup of olive oil, I prefer a bit less to reduce the calorie count. After blending, I strain the soup for an extra smooth consistency. While you can enjoy it immediately, it tastes even better after letting the flavors meld overnight.

gazpacho

Finishing Touches

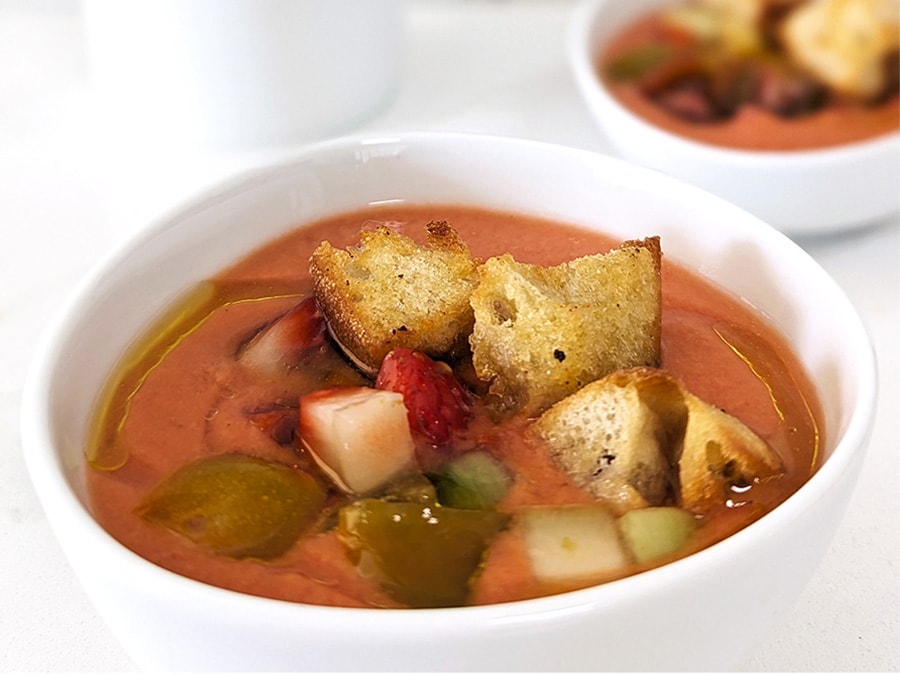
Pour the soup into a bowl or cocktail shooter and top with the finely chopped veggies, homemade croutons, a drizzle of olive oil and a dusting of cracked black pepper. Oh, I want some now but it’s 10pm and I’m saving my last portion for lunch tomorrow. This gazpacho keeps well in the fridge for up to a week. Avoid freezing it, as the emulsion will break, altering its texture and flavor. ¡Buen provecho!

Print
clock clock iconcutlery cutlery iconflag flag iconfolder folder iconinstagram instagram iconpinterest pinterest iconfacebook facebook iconprint print iconsquares squares iconheart heart iconheart solid heart solid icon

Gazpacho Is The Best Spanish Soup For Summer!

  • Author: Sandi Abbott
  • Prep Time: 30
  • Total Time: 30 minutes
  • Yield: 8 1x
  • Category: soup
  • Cuisine: spanish

Description

You’ll love gazpacho, it’s a Spanish soup that’s just perfect for summer feasting! Made with raw, blended vegetables, this Spanish soup is served cold, making it incredibly healthy and refreshing on hot days.  You’ll get more than a full serving of veggies without even trying.


Ingredients

Scale

Soup:

3 large ripe tomatoes

1 ½ hothouse cucumbers

3/4 bell pepper

3/4 lb strawberries

½ red onion

¼ cup olive oil

2 cloves garlic

2 tablespoons sherry vinegar

3 slices white bread, such as sourdough or Italian, cubed, crusts removed

12 teaspoons salt

Black Pepper

Garnish:

1 cup cherry tomatoes

1/2 hothouse cucumber

1/4 red bell pepper

1/4 red onion

3 slices white bread, such as sourdough or Italian, cubed, crusts removed

34 tablespoons olive oil

2 pinches of salt


Instructions

Prep:

  • Mince the garlic cloves and place them in a small bowl with 2 tablespoons of olive oil and a pinch of salt. Let it sit while you move onto the next ingredients.
  • Peel and seed the cucumber and roughly chop.
  • Roughly chop the tomatoes, onion and red bell pepper.
  • Add the chopped vegetables to a bowl and toss with 1 1/2 teaspoons of salt. Fold in the bread and let sit for 15 minutes. 

Prep Garnish:

  • Peel and seed the cucumber and finely chop the vegetables for garnish, toss with a pinch of salt and set aside.
  • Strain the olive oil that’s been sitting with the garlic and save it to add to the blender later.
  • Toss the bread crumbs with the strained olive oil and toast in a toaster oven or air fryer until they are golden and set aside. 

Blend:

  • Place the veggies in the blender. Don’t worry if all the veggies don’t fit, just fit as many as you can.
  • Add the sherry vinegar and minced garlic that you set aside and start blending on low. Once the vegetables are roughly blended, you can add the rest of the vegetables that didn’t fit in originally.
  • Continue blending until smooth, slowly increasing the speed on the blender.
  • Once it’s well blended, slowly drizzle in a quarter cup of olive oil. Taste and adjust the salt, if necessary.
  • Strain the gazpacho through a sieve to achieve a smooth consistency. Place in a glass or plastic container and refrigerate overnight.

To Serve:

  • When you’re ready to serve, pour into a bowl or cocktail shooter and garnish with the finely chopped veggies, homemade croutons, a drizzle of olive oil and a dusting of cracked black pepper.

Notes

This gazpacho keeps well in the fridge for up to a week. Avoid freezing it, as the emulsion will break, altering its texture and flavor.

Keywords: what is in gazpacho, strawberry gazpacho, how to make gazpacho, easy gazpacho recipe, cold spanish soup, spanish soup, cold tomato soup, cold soup

Gazpacho Is The Best Spanish Soup For Summer! Read More »

steak skewers

Steak Skewers With Peruvian-Style Marinade… So Good!

You’ve got to try these Peruvian-style steak skewers for your next barbecue! Tender sirloin tidbits, lightly charred and bursting with flavor, smothered with a zesty pepper sauce and placed on a bed of fried potato slices… it’s just a party waiting to happen! 

Skewers, known as pinchos in Latin cooking, are fun party food and the stuff of epic summer barbecues. Serve these as tapas or as a main course. Feeding a large crowd? You can add some chicken skewers to the mix and you have yourself quite the feast!

steak skewers

Peruvian Lomo Saltado Marinade

What makes these skewers so delicious is the marinade that’s inspired by a very popular Peruvian dish, called Lomo Saltado (stir fried sirloin). The traditional Peruvian stir fry is made with filet mignon or sirloin strips with onions, tomatoes and french fries served over white rice. You’re probably thinking, “rice and french fries?” The first time my daughter and I tried this dish we thought the potatoes were unnecessary, but these spuds soak up all the sauce and become an integral part of this dish!

Now let’s talk about the sauce… the ingredients in traditional Lomo Saltado include soy sauce, ginger, aji amarillo (Peruvian yellow peppers) and vinegar, which are all included in my marinade. My version also includes fried potato slices because it’s a delivery vehicle for the saucy goodness. The potatoes soak up all the juices from the skewers, which is similar to the french fries soaking up the stir fry sauce. You can also make white rice on the side, if you want the full experience. 

steak skewers

Top Your Steak Skewers with Zesty Aji Sauce

But the marinade is just the beginning! The mix of tamari sauce and aji amarillo in the marinade really intensifies the umami goodness of these steak skewers. But as good as it is on its own, you can kick it up a notch by topping your steak skewers with a tangy table sauce made with peppers, parsley, vinegar and onions. 

This is similar to the ají de la casa sauce served with skewers at a local Peruvian restaurant me and the kids love, Pisco y Nazca. I haven’t cracked the code on all that is in this sauce, but my version gives the steak skewers that same intense, tangy, peppery flavor that makes me want to drink up the sauce. 

Peruvian peppers are the main ingredient in this sauce, but I didn’t have fresh ones on hand, so I improvised with jalapeño and Fresno peppers instead. The other ingredients include garlic, shallots, olive oil, red wine vinegar, tomatoes, and lots of finely chopped parsley. You can also use it as a marinade, like I did in my Peruvian-style chicken skewers

steak skewers

BBQ Good Times

There’s just something so fun about hanging out in your patio or backyard grillin’ and chllin’ with friends! While the skewers are cooking you can enjoy a little sangria or mojitos with tapas. In Miami, we can do this year-round, but we tend to avoid the summer months (too hot to handle!).

I hope you give these steak skewers a try for you next backyard party. Then, tell me all about it!

Print
clock clock iconcutlery cutlery iconflag flag iconfolder folder iconinstagram instagram iconpinterest pinterest iconfacebook facebook iconprint print iconsquares squares iconheart heart iconheart solid heart solid icon

Steak Skewers With Peruvian-Style Marinade 

  • Author: Sandi Abbott
  • Prep Time: 9
  • Cook Time: 45
  • Total Time: 54 minutes
  • Category: dinner
  • Method: grilling
  • Cuisine: Peruvian

Description

Try these steak skewers made with sirloin, lightly charred and topped with a zesty pepper sauce and placed on a bed of fried potato slices.


Ingredients

Scale

4 lbs top sirloin

2 tablespoons crushed garlic

½ cup olive oil

½ cup tamari (or use low-sodium soy sauce)

⅓ cup red wine vinegar

1 inch piece of ginger (about 1 tablespoon grated)

1 tablespoon aji amarillo paste

1 teaspoon ground black pepper

1 teaspoon ground cumin

1 tablespoon salt

1 tablespoon oregano

Wooden bamboo skewers

Aji Sauce

1 cup olive oil

¼ cup red wine vinegar

¼ cup cherry tomatoes, salted and roughly chopped

½ bushel flat-leaf parsley, finely chopped, with stems removed

½ Fresno pepper, finely diced and seeded (you can use more if you like spicy)

½ Jalapeño pepper, finely diced and seeded

1 shallot, finely diced

2 tablespoons crushed garlic, (that’s about one head of garlic, maybe more depending on the size)

1 tablespoon salt

1 teaspoon black pepper


Instructions

Make the Aji Sauce

Roughly chop the cherry tomatoes, sprinkle with salt and drain on paper towels. While the tomatoes are draining, pull out a mixing bowl so you can throw in the ingredients as you prep them.

Wash the parsley and dry with paper towels to remove excess water. Then remove the stems and finely chop. To remove the stems, you can use an herb stem stripper or just pinch the stem as you pull on the leaves with your other hand. Finely chop the parsley and add to the mixing bowl.

Cut the Fresno and jalapeño peppers in half lengthwise, remove the seeds and finely chop half of each one. Save the rest for later. Throw the diced peppers into the mixing bowl. Make sure to wash your hands after you’ve handled the peppers and do not touch your eyes!

Marinade & Skewers

Mix all the other ingredients in a mixing bowl.

Place the steak chunks in a shallow glass dish or a ziploc bag and cover with the marinade.

Marinate the steak for four hours or overnight. If the steaks are not fully submerged, make sure to turn them halfway through the marinating time.

Soak the skewers in water for at least two hours before grilling.

Grill the Steak

Cut the steak into 2 inch cubes.

Set the grill to the highest heat and let it preheat for at least ten minutes, preferably twenty. Place the skewers in the center. Cook until the meat gets nice and caramelized, about 3 minutes. Flip and cook the other side until it’s caramelized. This should take about five to eight minutes, but times will vary based on your grill, so use the times provided as a guide.


Notes

Plating Deliciousness: I love to serve these skewers on a bed of fried potato slices. Place 3-4 potato slices in a row and top with one skewer. Spoon the aji sauce on top and you’re good to go. I usually serve these on a cutting board or long serving platter. It’s quite impressive!

Serving Suggestions: Serve these skewers with a tossed salad or grilled veggies.

Nutrition

  • Serving Size: 8

Keywords: pinchos, steak skewers, beef skewers, steak pinchos

Steak Skewers With Peruvian-Style Marinade… So Good! Read More »

Fried Potato Slices

Fried Potato Slices Are Golden Delicious And Simple To Make

These fried potato slices are the perfect complement to so many dishes! I like to serve them with Peruvian-Style Chicken Skewers. In fact, I got the idea from one of my favorite Peruvian restaurants in Miami, Pisco y Nazca. They serve their chicken anticuchos (Peruvian-style skewers) atop fried potato slices. These little potato medallions soak up all the flavor of the chicken skewers, it’s a perfect pairing!

Yukon Gold potatoes are the best for this dish because they have a delicious balance of soft and creamy on the inside and crunchy on the outside. I peel the potatoes and then slice them into half-inch rounds. These potato medallions taste best pan-fried (doesn’t everything?). But you can just as easily make them in the air fryer or roast them in the oven which makes these potatoes easy to cook in the background while you prepare other things. 

How To Prep The Potato Slices

The potatoes in this recipe are twice-cooked. First, you boil the potatoes and then you fry them. The trick to getting the best crunchy exterior is to add a little baking soda to the boiling water. This helps break down the outside of the potato and makes for a crunchier crust. I learned this trick from Serious Eats, they really get into the science of it all.

fried potato slices

Once the potatoes are softened, transfer them to a tray lined with paper towels. The instructions change from this point on, depending on how you plan to finish cooking the potatoes.

For the pan-fried version, you’ll need to heat about ¼ cup of olive oil in a skillet over medium-high heat. Season the potatoes with salt, pepper and Italian seasoning and add to the skillet. Spoon hot oil from the pan over the top, while the bottom cooks. To make it easier to scoop the oil, it helps to tilt the pan just slightly so the oil pools on one side. Once the bottom is crispy and brown, turn the slices over and cook them on the other side. This traditional French technique helps the top of the potatoes cook evenly and incorporates more flavor into the final dish.

Using this French technique transported me back to my childhood, with my mom making her fried eggs for breakfast in the same fashion. I never knew Cuban cooking had such worldwide roots! I thought it was just the Cuban way to fry eggs (so clueless!).

The pan-fried potatoes turn out evenly crispy and buttery soft on the inside. But, if you’d rather not fry, I get you. You can coat the slices in vegetable oil and cook them in the air fryer. They are not quite as good as the pan-fried version, but a very close second. To be honest, when I make these on my own, I like to use the air fryer because it’s easier and uses less oil. But if I’ve got help in the kitchen, we pan-fry.

fried potato slices

Fun And Versatile Potato Medallions

You can have lots of fun with these little fried potato slices! Consider them as a canvas for all sorts of fun toppings, like picadillo, chorizo and cheese, or Argentine sausage, onions and chimichurri sauce. Or try them with my Peruvian Chicken Skewers. You’ll love them!

Print
clock clock iconcutlery cutlery iconflag flag iconfolder folder iconinstagram instagram iconpinterest pinterest iconfacebook facebook iconprint print iconsquares squares iconheart heart iconheart solid heart solid icon

Fried Potato Slices

  • Author: Sandi Abbott
  • Prep Time: 15
  • Cook Time: 35
  • Total Time: 50 minutes
  • Yield: 6 1x
  • Category: side dish
  • Method: frying

Description

These fried potato slices are the perfect complement to so many dishes! You can use them as a base for lot of fun appetizers or serve them as a side. I like to serve them with Peruvian-Style Chicken Skewers.


Ingredients

Scale

5 large Yukon Gold Potatoes

½ teaspoon baking soda

2 tablespoon salt

1 tablespoon olive oil (for boiling the water)

1 teaspoon Italian seasoning

½ teaspoon black pepper

½ cup vegetable oil (for pan-frying) or 1/4 cup olive oil (for air fryer or oven roasting)

handful of parsley for garnish (optional)


Instructions

Set 3 quarts of water on high heat to boil, add ½ teaspoon of baking soda, a tablespoon of salt and the olive oil. As the water heats up, peel the potatoes and slice into ½ inch rounds. Once the water is boiling, add the potatoes and lower the heat slightly to a simmer. Cook for about 8-10 minutes. The potatoes should be soft enough that a fork can pierce through them, but not so soft that they fall apart. Then remove from the heat. Since stove top temperatures can vary, start checking the potatoes around minute 8.

Drain the potatoes on paper towels.

Three Ways To “Fry” The Potatoes

These potato slices are at their best when you pan-fry them. But it’s definitely easier to air fry or roast. So, below are all three methods. If I’ve got the time and the extra help in the kitchen, I pan fry. But if I’m cooking solo I would air fry or roast. 

Pan Frying Method

Add enough oil to a skillet to generously coat the bottom, about ¼ – ½ cup. Set on medium-high heat. While the  pan is heating, season the potatoes with salt, pepper and Italian seasoning. Once the oil is shimmering in the fry pan, add the potato slices — enough to cover the pan in one layer, don’t crowd them. As the bottom cooks, tilt the pan and spoon the hot oil over the top, to begin cooking the top of the potatoes as well. Once the bottoms are golden brown, flip them and cook the other side. This should take roughly five minutes per side. Once done, remove from heat, drain on paper towels and garnish with parsley.Repeat until all the potatoes are done. You may need to add more oil as you go along, and slightly reduce the heat as you’re cooking to ensure the last potatoes don’t burn.


Air Fryer Method

Place the slices on a cutting board, serving platter or sheet tray in one layer. Brush oil on each slice and sprinkle salt, pepper and Italian seasoning on each slice. Turn the slices over and repeat. Add the slices in one layer to the air fryer and roast using the preset temperature and time on your air fryer. Check in on them and turn over to ensure even browning. Depending on the size of your air fryer, you may have to do this step in batches.


Sheet Pan Method

Preheat the oven to 425ºF with the sheet pan inside. While the oven preheats, place the slices on a cutting board, serving platter or sheet tray in one layer. Brush oil on each slice and sprinkle salt, pepper and Italian seasoning on each slice. Turn the slices over and repeat. Once the oven is preheated, add the slices to the hot pan in one layer and roast for 10 minutes on one side, flip and roast on the other side. Depending on your oven, you may need to give it a little more time, just check in to make sure they are evenly browning. Once browned on both sides, the potatoes are done. This should take about 20-25 minutes.


Notes

Serve with grilled chicken skewers.

Nutrition info I’m sharing is the air fryer version.

Keywords: fried potato slices, potato medallions

Fried Potato Slices Are Golden Delicious And Simple To Make Read More »

fried rice balls with arroz con pollo

Fried Rice Balls Made With Cuban Arroz Con Pollo Is A Great Way To Use Leftovers

Fried rice balls are not usually a Cuban thing, but they are a delicious Cuban appetizer when you make them with arroz con pollo.  These are essentially arroz con pollo fritters, so it’s surprising that it’s not a Cuban thing because we make fritters from just about anything, and we have so many rice dishes. 

I first got the idea to make these from Finka Table and Tap, a local restaurant serving Latin fusion food in Miami. They have these on their menu and I just loved them so much I couldn’t wait to try them at home. My mom tried these and loved them too, so they have the Cuban seal of approval.

These rice balls are a perfect way to turn leftover Cuban chicken and rice into great tapas. And I gotta say I so love a tapas party made with leftovers… like picadillo empanadas or ropa vieja sandwich and now these arroz con pollo fritters. 

fried rice balls with arroz con pollo

How To Make Rice Balls

My son tells me that these fried rice balls are an Italian appetizer known as arancini, made with leftover risotto. My Cuban arroz con pollo a la chorrera that I made a few days ago uses a short grain rice very similar to risotto. So I can use my arroz con pollo to make a similar rice ball. The sticky rice keeps its shape nicely. But the recipe won’t work as well with long grain rice. 

Ingredients for the fried rice balls:

  • 2 cups leftover Cuban arroz con pollo a la chorrera
  • ¾ cups shredded mozzarella cheese
  • ½ cup sifted all-purpose flour
  • 1 cup panko break crumbs
  • 2 eggs
  • Vegetable oil for frying

I took a ¼ cup of rice and shaped into a patty, added about a tablespoon of shredded cheese to the center and shaped into a tight ball. I tried making these with cubes of mozzarella, but the cheese didn’t melt enough when you cooked it. So, I used the shredded cheese. It can get a bit messy stuffing the balls with the shredded cheese, but it doesn’t have to be perfect. Just make a nice, tight rice ball and then freeze for about ten minutes so they’ll hold their shape while you’re frying. 

Then take them out of the freezer, dredge them through flour, dip them in beaten eggs and coat with panko breadcrumbs. You can stick them in the freezer while you heat up the vegetable. Also, fry these on high heat, since they don’t need to be cooked through. This way, the rice balls don’t fall apart. I fried them for about two minutes per side on medium-high heat. 

Rice Balls Recipe

It’s that easy! I like to serve mine with a little siracha mayo. You can buy this ready-made or easily make your own with about a third-cup of mayo and a teaspoon of sriracha sauce. It’s a perfect sauce for these fried rice balls!

You can also make these fried rice balls with leftover paella rice or risotto. And you can stuff them with other types of cheese. Experiment with whatever you have on hand. Add a little wine and you’ve got a tapas night!

Try making my Cuban arroz con pollo or paella mixta first and then make the rice balls with the leftovers. Tell me how you like them!

bean train food for thought

I love cooking with leftovers because it can be fun finding creative ways to turn the week’s leftovers into party food. It’s like recycling… it’s good for us and good for the environment. 

But I almost threw this rice away and missed my chance to make the fried rice balls. I had made a delicious arroz con pollo a few nights ago and had just a bit left, not enough for another night. So it was off to the trash. But then I remembered the arroz con pollo fritters I had at Finka Table & Tap and my leftover rice became this amazing appetizer. 

The reason I share this story is because we tend to throw away things that can have a second life, and I’m not just talking about food. Sometimes it’s a part of ourselves or our past. But our past can be recycled. Even our pain can be put to good use in helping someone else. God has taught me that in His economy, nothing is wasted. So I’m always looking for ways to turn ashes into beauty… and leftovers into Cuban appetizers. 

I encourage you to find ways to recycle and find the beauty even in used things. 

Print
clock clock iconcutlery cutlery iconflag flag iconfolder folder iconinstagram instagram iconpinterest pinterest iconfacebook facebook iconprint print iconsquares squares iconheart heart iconheart solid heart solid icon
Rice Balls Recipe

Fried Rice Balls Made With Cuban Arroz Con Pollo Is A Great Way To Use Leftovers

  • Author: Sandi Abbott
  • Prep Time: 15 minutes
  • Cook Time: 12 minutes
  • Total Time: 17 minutes
  • Yield: 9 balls 1x
  • Category: appetizers
  • Method: frying
  • Cuisine: Cuban

Description

Fried rice balls made with Cuban arroz con pollo are a fun way to turn leftover rice into a Cuban tapas party!


Ingredients

Scale

2 cups arroz con pollo a la chorrera

3/4 cups shredded mozzarella

1 cup panko breadcrumbs

1/2 cup sifted all-purpose flour

2 eggs, beaten

2 cups vegetable oil for frying

Optional:

Sriracha mayo (1/3 cup mayo with 1 teaspoon sriracha)


Instructions

Prep:

  • Pulse the panko breadcrumbs to make the crumbs just a bit smaller (or stick in a ziplock bag and crush for a bit)
  • Take 1/4 cup of rice and shape into a patty. Add 1 tablespoon shredded mozzarella to the center and shape into a tight ball. 
  • Place rice balls in the freezer for ten minutes
  • Dredge the rice balls through flour, dip in beaten egg and coat in panko bread crumbs. 
  • Stick the rice balls in the freezer while you heat the oil for frying

Cook:

  • Heat two cups vegetable oil for frying over medium heat
  • Test the oil by throwing in a bit of panko to see if it’s sizzling  hot
  • Once it’s sizzling, add the rice balls a few at time so you don’t crowd them
  • Fry the rice balls for two minutes on each side
  • Drain on paper towels

Serve with sriracha mayo.


Nutrition

  • Serving Size: 1 ball

Keywords: Rice Balls Recipe, How to make rice balls, fried rice balls, cuban chicken and rice, arroz con pollo, cuban arroz con pollo, stuffed rice balls, arancini rice balls

Fried Rice Balls Made With Cuban Arroz Con Pollo Is A Great Way To Use Leftovers Read More »

pork sliders

Pan Con Lechon Is One Of The Best Leftover Pork Roast Recipes

Pan con lechon is the BEST way to use leftover Cuban roast pork. But pan con lechon does not play second fiddle to Cuban roast pork. It’s a popular Cuban dish in its own right, and you’ll find it on the menu in all Cuban restaurants. You’ll often see it served at Cuban parties, too. I love to make pork sliders with my leftover pork. Also, I have a thing about tapas and mini sandwiches. 🥪😍

Cuban Roast Pork

Cuban Roast Pork With Mojo 

The star of pan con lechon is Cuban roast pork. Bone-in pork shoulder is marinated with mojo overnight and then slowly roasted for hours until the internal temperature reaches 165 degrees, and the skin is crispy and worth fighting over (let’s get some crackling!!). This dish is also known as lechon asado, and it’s served with congri and yuca

You always make enough roast pork for leftovers. This is a cardinal rule. You can even skip the rice and yuca and go straight to making pan con lechon. That’s a popular dish for parties. 

pan con lechon

Pan Con Lechon Time!

Cuban roast pork is usually served for Christmas Eve (Noche Buena) or other celebrations. So, the day after, no one wants to spend quality time in their kitchen, unless it’s for eating. That’s why Pan con lechon is perfect, because it’s quick and easy to make with the leftovers. It’s so, so good! It’s the best leftover pork roast recipe you’ll ever make. Seriously. I know Cubans exaggerate it, but not this time, I promise.

You can make this with any leftover roast pork, it doesn’t have to be Cuban, although I’m partial. What makes this dish taste so good is that the leftover pork is chopped and seared in the skillet and then finished with extra mojo sauce and sautéed onions. Mojo is a marinade and finishing sauce made with sour oranges and lots of garlic. If you can’t find sour oranges, you can use half lime and half orange juice to make it. 

Lechon asado

Another thing I love about this dish is that it doesn’t require a recipe, you can throw the stuff together, and the amount of mojo and onions you used is to taste. But don’t worry… I got a recipe for ya, to make it easy. 😉

The pan in pan con lechon is Cuban bread. If you can’t find it, you can use sub rolls.  Or, you can serve it on slider buns as I did for this post. Chances are you’re still in party mode anyway. 💃🕺

The best part is everyone gathering in the kitchen to hang out, making jokes, and teasing each other. Cubans love to tease each other!

pan con lechon with yuca fries

Yuca Fries 

How can pan con lechon be even better? Pair it with a side of yuca fries made with leftover yuca with mojo. This Cuban combo is classic! If you’ve never had fried yuca, think of them as a crunchier and creamier version of regular fries. Yuca is a dense and starchy root vegetable that’s boiled and served with mojo and onions, usually with roast pork. The leftover yuca is then cut into planks, fried, and served with pan con lechon on Day 2.

Try making the traditional Christmas Eve (Noche Buena) meal of Cuban roast pork, yuca with mojo, and congri. Then enjoy pan con lechon and yuca fries the next day… and the next day, too!

Print
clock clock iconcutlery cutlery iconflag flag iconfolder folder iconinstagram instagram iconpinterest pinterest iconfacebook facebook iconprint print iconsquares squares iconheart heart iconheart solid heart solid icon
pan con lechon

Pan Con Lechon Is One Of The Best Leftover Pork Roast Recipes

  • Author: Sandi Abbott
  • Prep Time: 5
  • Cook Time: 10
  • Total Time: 15 minutes
  • Yield: 9 slider buns 1x
  • Category: appetizers
  • Method: stovetop
  • Cuisine: cuban

Description

Pan con lechon is made with leftover pork roast sautéed in a pan with mojo sauce and onions and served on Cuban bread. It’s great as pork sliders for appetizers or pan con lechon sandwiches for lunch. Yum!


Ingredients

Scale

1 lb leftover Cuban Roast Pork, roughly chopped or shredded (see note)

1 yellow or white onion, thinly sliced

4 sour oranges (see note)

2 large garlic cloves, crushed

Salt and Pepper to taste

1 loaf Cuban Bread (see note)

Dash of cumin and oregano (totally optional, but I like it)

Olive Oil


Instructions

Roughly chop the pork leftovers and squeeze the sour oranges to get about a half cup of juice. If you can’t find sour oranges, use 1/4 cup each of fresh squeezed lime juice and orange juice.

Heat a skillet (cast iron is preferred) over medium heat. Add 2 tablespoons olive oil to the skillet and sauté the pork until cooked through and crispy on the ends. The best way to do this is to let the pork cook for a few minutes on one side and then turn the pieces over and let the other side crisp up a bit. The amount of crispy edges is a matter of taste so cook more or less to get the desired texture. Remove from skillet, leaving the drippings. 

Add enough olive oil to coat the skillet and add the onions and garlic and sauté until the onions are soft and translucent, about 4 minutes. Once cooked, remove from the heat and add the sour orange juice and salt and pepper to taste. You can also add a dash of cumin and oregano, if you like. (Mami doesn’t but she’s not watching!)

Heap the pork on the bread and top with the mojo and onions sauce. 


Notes

If you don’t have Cuban roast pork, you can use any leftover roast pork you have on hand.

Sour oranges can be found at Latin markets. But if you can’t find them, substitute with equal parts fresh squeezed lime juice and orange juice. Do not use lemons, though. You want that limey punch! If you do find the sour oranges, I’m having you get a few extras because they don’t always have enough juice (the juice yield can be a bit hit or miss.) If they’re juicy you won’t need to use all four.

Cuban bread can be found at Latin markets. But if you can’t find it, you can substitute sub rolls or slider buns. 

The yield is all going to depend on what type of bread you use. But if you use slider buns, I add just under two ounces of pork to each. So you could make nine slider buns or four pork sandwiches. Of course, you may have more than 1 pound of meat. In that case, make a little more mojo and onions and invite me over!


Nutrition

  • Serving Size: 1 slider bun

Keywords: Pan con lechon, roast pork sandwich, leftover pork roast recipes, pork sliders, Cuban roast pork, yuca fries

Pan Con Lechon Is One Of The Best Leftover Pork Roast Recipes Read More »

Yuca Fries

Cuban Yuca Two Ways: Yuca With Mojo and Yuca Fries

Yuca with mojo or yuca fries are great side dishes to serve with Cuban roast pork. In fact, yuca is preferred over the usual fried plantains. As much as we love our fried maduros and tostones, yuca and roast pork are a Cuban power couple. The traditional Cuban dish we serve for the holidays consists of Cuban roast pork, yuca con mojo, and congri rice. And, of course, we have to make enough for pork sandwiches and yuca fries the next day!

Yuca With Mojo

What is Yuca

Good question! Yuca is a root vegetable that is denser and starchier than potatoes and is served boiled and smothered with mojo and onions. It has a very mild taste that absorbs all the garlicky goodness of the mojo, and the texture is creamy but firm. It’s quite a surprise when you first eat it! 

Although the texture and taste are good, what makes this dish so praiseworthy is the mojo, which consists of sour oranges, garlic, olive oil, salt and pepper, and sauteed onions. When I say the yuca is smothered, I do mean smothered! In fact, I always serve a side of mojo so you can have extra!

Cuban Yuca

Yuca is a very long vegetable, and it has a thick bark-like skin. So you need to make sure you remove the top layer that’s dark brown and the second layer that’s light pink. In fact, the best way to peel the yuca is to cut a slit lengthwise and then start to peel off the skin, similar to how you would a bark. 

Cuban Yuca

It’s easier to remove the bark if you first cut the yuca into four-inch pieces lengthwise. Once the bark is removed, split each yuca piece in half or thirds. You’ll notice there’s a tough string-like piece in the center. You’ll want to remove that because it’s too tough to eat. The easiest way to remove it is after you boil the yuca. So boil the yuca until tender and remove the thick string-like center.

If you can’t find fresh yuca in the produce section, you may be able to find frozen yuca chunks ready to cook.

Cuban Roast Pork

How To Make Mojo Sauce

This is a versatile sauce that’s also used as a marinade. When you use it as a marinade you omit the onions and add a little cumin and oregano. Mojo is easy to make, and it packs such a nice citrusy punch!

To make the mojo sauce for the yuca, sauté sliced onions and crushed garlic in olive oil until the onions are softened. Then add fresh-squeezed sour orange juice at the end. If you can’t find sour oranges, you can use a combination of equal parts fresh-squeezed lime juice and orange juice. Add some salt and pepper and that’s it! You can play it pretty fast and loose with the ingredients and add as much or as little as you like to get it where you like it. You’ll find you’ll be using this sauce to top meat dishes and veggies all the time!

Yuca Fries

Make Yuca Fries With The Leftovers!

You always want to make a little extra yuca and mojo for the second day because you’ve got to make yuca fries. To make the yuca fries, slice the yuca pieces into planks that look somewhat similar to wedge fries but so much better, IMHO. When you fry the yuca, the outer skin gets super crunchy, and the inside gets creamy. This is the best way to enjoy your leftover yuca! If you want just go for the yuca fries, you’ll still need to boil the yuca and let it cool before you make the yuca fries.

Serve the yuca planks with mojo on top or on the side. Or, my favorite, serve it with a little lime-cilantro aioli. OMG! I want some right now🤤

A local fast food place in Miami called Pollo Tropical serves Yucatan fries (fried yuca), and they are the best. They also cut the yuca into tiny chunks to make the Cuban version of tater tots. So, yes, you can also cut the yuca into 1-inch pieces and make them tater tot style. If you live in Florida, you’re probably familiar with this chain. If not, stop by when you visit the state!

Want to try the yuca with the Cuban roast pork? Here’s the recipe for lechon asado. And, if you want to go for the full Cuban feast, make caramel flan for dessert, too.

Print
clock clock iconcutlery cutlery iconflag flag iconfolder folder iconinstagram instagram iconpinterest pinterest iconfacebook facebook iconprint print iconsquares squares iconheart heart iconheart solid heart solid icon
Yuca Fries

Cuban Yuca Two Ways: Yuca With Mojo and Yuca Fries

  • Author: Sandi Abbott
  • Prep Time: 5
  • Cook Time: 20
  • Total Time: 25 minutes
  • Yield: 10 1x
  • Category: vegetable
  • Method: boil or fry
  • Cuisine: cuban

Description

Yuca with mojo sauce is a great side dish for roast pork. This Cuban root vegetable is dense, creamy and is often eaten as yuca fries, too.


Ingredients

Scale

23 big yuca root vegetable (about 2 pounds)

1 sliced yellow onion

56 cloves minced garlic

¼ cup olive oil

Juice from 12 sour oranges, or to taste (see note)

Salt and black pepper to taste


Instructions

Boiled Yuca With Mojo

  • Heat a pot of salted water and bring to a boil. 
  • While the water heats up, slice the onions and mince the garlic.
  • Cut the yuca into 4 inch pieces and then half each piece. 
  • Peel the yuca skin (you need to remove both the dark outer skin and the pink layer underneath… see note).
  • Add the yuca to the boiling water and lower the heat to a simmer. Cook the yuca until fork tender (about 20 minutes or so).
  • Heat the olive oil in a skillet over medium heat and cook the onions and garlic until the onions are softened but not browned.
  • Add the sour orange juice to taste.
  • Add salt and pepper to taste.
  • Pour over boiled yuca. 

Yuca Fries

  • Cut the leftover boiled yuca pieces into wedges. (It’s best to cut while it’s cold.)
  • Heat 1-2 cups of vegetable oil in saucepan.
  • Fry the yuca wedges.
  • Remove from the heat and drain on paper towels.
  • Serve with leftover mojo sauce (or make some more, if you ate all if to the day before!). You can also serve the yuca with lime cilantro aioli. 

Notes

You should be able to find sour oranges in Latin markets. But if it’s not available, use a mixture that’s equal parts lime juice and orange juice. You’ll want roughly ¼ cup of juice.

If you can’t find the yuca in the produce section, you’ll probably find it in the freezer section.

The best way to peel the yuca is to cut the long yuca into 4 inch pieces. Then cut a slit into the thick bark-like skin. Peel back the bark as you would on a tree. This way, you’ll remove both the outer skin that’s dark brown as well as the inner layer that’s light pink. The pink layer is hard and is not appetizing. 

This recipe makes enough for about 6 servings of yuca and leftovers for about 3-4 servings the next day. 


Nutrition

  • Serving Size: 10

Keywords: yuca, yuca fries, yuca with mojo, boiled yuca, yuca con mojo, yuca frita, yuca recipes, cuban yuca, fried yuca

Cuban Yuca Two Ways: Yuca With Mojo and Yuca Fries Read More »

chicken croquettes

Chicken Croquettes Are A Super Popular Cuban Appetizer

Chicken croquettes are the bomb! (Or, as my kids would say… FIRE!) If I could only eat one Cuban appetizer for the rest of my life, I think I would have to go with chicken croquettes! Crunchy on the outside with a creamy chicken filling made with bechamel sauce, these hearty little darlings travel well, can be eaten for breakfast, lunch, afternoon snack, or by the tray full at parties. Cubans wouldn’t know how to throw a party without these! 

chicken croquettes

Croquettes are an all-star Cuban appetizer. You’ll find them at every Cuban birthday party, baby shower, happy hour, or holiday gathering. And they come in so many flavors, including chicken, ham, fish, meat, or cheese. Today, we’re going to zero in on chicken croquettes because I had leftover chicken, and this chicken croquette recipe is the best way to use up the chicken. That’s the other thing about croquettes. They are a great way to use leftovers!

chicken croquettes

What Are Chicken Croquettes

Croquettes are made with minced, seasoned meat that’s incorporated into a bechamel sauce and then breaded and fried to make delectable tapas food. They are great by themselves, with saltine crackers or in a sandwich with lettuce and tomato. 

Known as croquetas in Spanish, these tasty appetizers are originally from French but became a tapas favorite in Spain. From there, they made their way to Cuba and the rest of the Latin American and Caribbean region. Chicken and Ham croquettes are very popular for parties because just about everyone likes these flavors. But you can find them in all kinds of flavors at Cuban bakeries and restaurants, including codfish and chorizo flavors. Or a combination of flavors like ham and Manchego cheese. 

chicken croquettes recipe

How to Make Croquetas de Pollo

The key component to making croquettes is the bechamel sauce. Once you’ve got that down, the rest is relatively easy. You need just a few basic ingredients:

  • Finely chopped or minced chicken
  • Finely diced onion
  • Butter
  • Crushed garlic
  • Flour
  • Milk
  • Nutmeg
  • Salt and pepper
  • Cooking wine
  • Parsley (optional)
  • Breadcrumbs and eggs for the coating
  • Frying Oil 

I usually make these croquettes with leftover rotisserie chicken, but you can use any chicken leftovers. If you don’t have leftovers, you can poach two chicken breasts until cooked through and let cool. If you’re using the leftover rotisserie, save the drippings to add the sauce, they are great for seasoning your chicken croquettes. Pulse the chicken meat in a food processor until finely minced, then set aside.

Heat the butter in the skillet and cook the onion and garlic until softened but not browned. Blend the milk, flour, nutmeg, salt, and pepper and add to the skillet. Cook until the sauce thickens. You should be able to run a spoon across the bottom of the pan and leave a path. Add the chicken, pan juices, and cooking wine and mix to combine. My mom likes to use Move the mix to a bowl and bring it to room temperature and then refrigerate overnight. You must give the mixture a chance to rest and chill. If the mix is not thoroughly chilled, the croquettes will burst open when you fry them. That’s no bueno.

The next step is the coating. Beat two eggs in a bowl and add 2 cups of cracker meal to another bowl. Take about 2 tablespoons of the chicken croquette mix and shape into a ball, then slightly flatten into an oval. Do this with all the mixture. Once you have the croquettes shaped, dip them in the egg and then the breadcrumbs and repeat the process. 

chicken croquettes

Once they are all coated, you can store the chicken croquettes until you’re ready to eat them, or you can fry them right away. I like to chill them for about an hour before I drop them in the frying oil. This way, there’s less of a chance of them bursting as you cook them. The bursting happens because the interior of the chicken croquette is already cooked. As the outside gets heated and cooked, the internal temperature rises. If it’s not cold enough, the inside can overheat and burst. Fry them in hot oil until they are golden on each side.

Croquettes are best when you eat them while they are still hot because the outside coating is crunchy. But they keep very well and can be eaten at room temperature or even heated up later. That’s what makes these tasty little Cuban appetizers such a crowd pleaser!

chicken croquettes

Want more Cuban appetizer recipes? Check out my Cuban Tapas Party recipes!

The Versailles Restaurant Cookbook

Looking for a Good Cuban Cookbook?

I love the The Versailles Restaurant Cookbook affiliate link! The recipes are very authentic and traditional, similar to what I grew up eating. They have several croquette recipes including ham and codfish croquettes, plus other popular Cuban recipes.

Print
clock clock iconcutlery cutlery iconflag flag iconfolder folder iconinstagram instagram iconpinterest pinterest iconfacebook facebook iconprint print iconsquares squares iconheart heart iconheart solid heart solid icon
chicken croquettes recipe

Chicken Croquettes Are A Super Popular Cuban Appetizer

  • Author: Sandi Abbott
  • Prep Time: 30
  • Cook Time: 30
  • Total Time: 1 hour
  • Yield: 1518 1x
  • Category: appetizer
  • Method: frying
  • Cuisine: cuban

Description

Chicken croquettes are crunchy on the outside with a creamy chicken filling made with bechamel sauce. They make a great snack or appetizer.


Ingredients

Scale

2 Cups Finely chopped or minced cooked rotisserie chicken (reserve pan drippings)

1/4 cup finely diced yellow onion

2 tablespoons butter

1 teaspoon crushed garlic

3/4 cup flour

1 cup milk

Dash nutmeg

1 teaspoon salt

1/4 teaspoon black pepper

1 tablespoon cooking wine

1 tablespoon fresh minced parsley (optional)

Coating
2 eggs

2 cups cracker meal

2 cups vegetable oil


Instructions

Prep

Finely chop the onion and crush the garlic. Mince the parsley, if you’re using.

Pulse the chicken.

Blend the milk, flour and spices in the blender. 

Cook

Heat the butter in the skillet over medium heat and cook the onion and garlic until softened but not browned.

Add the milk mixture and cook until the sauce thickens. You should be able to run a spoon across the bottom of the pan and leave a path.

Add the chicken, pan juices, and cooking wine and mix to combine. Taste and adjust seasons as desired. I sometimes add a little salt or pepper, depending on the seasoning used in the rotisserie chicken.

Chill

Move the mix to a bowl and bring it to room temperature and then refrigerate overnight. 

Coat

Beat two eggs in a bowl and add 2 cups of cracker meal to another bowl. Take about 2 tablespoons of the chicken croquette mix and shape into a ball, then slightly flatten into an oval. Do this with all the mixture. Once you have the croquettes shaped, dip them in the egg and then the breadcrumbs and repeat the process. Chill the croquettes for an hour before frying. 

Fry

Heat the oil over medium heat and test with a bread crumb before dropping in the croquettes. Make sure to fully coat the croquettes with the oil and fry until golden on each side. Gently turn them to keep them from bursting. Fry them in small batches so you don’t crowd them. It takes about 6 minutes too fry each batch. Drain on paper towels to cool a bit and then devour!


Notes

You must give the mixture a chance to rest and chill. If the mix is not thoroughly chilled, the croquettes will burst open when you fry them. 

You can also freeze at this point. They freeze well and can be kept in a ziplock bag or container for up to 6 months. You can fry them frozen, too. 


Nutrition

  • Serving Size: 2 croquettes

Keywords: Chicken Croquettes, Chicken Croquettes Recipe, How to Make Chicken Croquettes, Cuban Appetizers, Cuban Appetizers, What are chicken Croquettes, croquettes, croquetas, croquetas de pollo

Chicken Croquettes Are A Super Popular Cuban Appetizer Read More »

double crust chicken pot pie

Double Crust Chicken Pot Pie Cuban Style Is The Best

This double crust chicken pot pie is like no other you’ve tasted! Instead of a cream-based filling, it has a tomato base with raisins and olives. This is a Cuban version of chicken pot pie called pastelón de pollo. You can usually find pastelón de pollo at Cuban bakeries and some Cuban restaurants. In fact, this Cuban recipe is from the famous Versailles Restaurant on Calle Ocho in Little Havana. 

Why is the Versailles Restaurant so famous? Because it’s where every politician courting the Cuban vote goes to have their photo op! It’s also where Cubans gather whenever anything happens. Of course, it’s not the only place, but certainly one of the most popular restaurants for Cubans to hang out.

The restaurant is a Cuban landmark, established in 1971 in Little Havana and still thriving today. I love to go there whenever I’m in the neighborhood. The Cuban food is delicious and feels so much like home. ?

I recently gifted myself a copy of The Versailles Restaurant Cookbook, and this chicken pot pie is one of the Cuban recipes that really caught my eye. While I love pastelón de pollo, it’s not something I had ever made at home. So, of course, I had to give this recipe a try!

What Makes This Chicken Pot Pie So Good

This pie is packed with chicken, and it’s very savory! American-style chicken pot pie is like a chunky, creamy soup in a pastry. This double-crust chicken pot pie is not soupy at all. It’s more of a meat pie. It tastes a lot like chicken fricassee, which is a fantastic Cuban chicken stew. And just like the stew, it’s so delicious the second day!

Ingredients For This Double-Crust Chicken Pot Pie

The ingredients for this Cuban chicken pot pie are very simple. You need:

  • Chicken Breast
  • Onions, Peppers, Garlic
  • Tomato Sauce
  • Raisins and Olives
  • Cooking Wine 
  • Oregano, Bay Leaf, and Cumin
  • Refrigerated Pie Crust

Except for the pie crust, these are the usual ingredients you find in most Cuban dishes. While this double-crust chicken pot pie recipe calls for chicken breast, I would prefer it with a mix of chicken thighs and breasts. I find chicken breast to be a bit dry. But I have to say the final dish, made with the chicken breast, was very moist and flavorful. The reason for this is that you cook the chicken in the delicious sauce for forty-five minutes before you bake it in the oven. 

This chicken pot pie would be a good potluck dish to make for your next get together. It can served as an appetizer or a main dish. It’s good at room temperature too. I sometimes even eat it cold, but that’s just me. My kids think I’m weird that way.?

A Word About The Crust In this Chicken Pot Pie

My one beef about this recipe is that it calls for refrigerated pie crust. But traditional pastelón de pollo uses a different type of dough. Unfortunately, the Versailles Restaurant Cookbook did not provide their dough recipe. They explained that the process was too labor-intensive for a home kitchen. So, while it was good with the refrigerated crust, it would have been even better with the traditional crust. Perhaps The Versailles Restaurant didn’t want to part with their secret recipe? I’ll forgive them for that since the recipe they did provide was so tasty!

The Versailles Restaurant Cookbook

What are some other recipes to try from this cookbook?

I love the The Versailles Restaurant Cookbook! The recipes are very authentic and traditional, similar to what I grew up eating. Their ropa vieja, picadillo, and chicken fricassee were just like my mom used to make. 

The cookbook had a comprehensive mix of appetizers, soups, main dishes, and desserts and covers most Cuban menu items. If you’re looking for an all-around good Cuban cookbook, I highly recommend this one! Some popular Cuban recipes to try include croquettes, which come in ham, chicken, and codfish varieties. And you’ve got to try the desserts! They, of course, have all the traditional Cuban desserts like flan, arroz con leche and bread pudding. But another one that’s worth the effort is the tres leches. Yup, you can expect a few more Versailles recipes soon, including the tres leches!

Print
clock clock iconcutlery cutlery iconflag flag iconfolder folder iconinstagram instagram iconpinterest pinterest iconfacebook facebook iconprint print iconsquares squares iconheart heart iconheart solid heart solid icon
cuban chicken pot pie

Double Crust Chicken Pot Pie Cuban Style Is The Best

  • Author: Sandi Abbott
  • Prep Time: 30 minutes
  • Cook Time: 2 hours
  • Total Time: 2 hours 30 minutes
  • Yield: 8 1x
  • Category: dinner
  • Method: baking
  • Cuisine: Cuban

Description

This double crust chicken pot pie is like no other you’ve tasted! Instead of a cream-based filling, it has a tomato base with raisins and olives. This is a Cuban version of chicken pot pie called pastelón de pollo.


Ingredients

Scale

¼ cup olive oil

½ cup chopped yellow onion

4 garlic cloves finely minced

½ cup chopped red bell pepper

1 teaspoon garlic powder

1 teaspoon onion powder

½ teaspoon dried oregano

½ teaspoon ground cumin

1 ½ teaspoons salt, or to taste

1 whole skinless, boneless chicken breast (about 1 ½2 pounds), coarsely chopped

¾ cups tomato puree

¼ cup cooking wine

¼ cup golden raisins

¼ cup chopped green olives

2 refrigerated pie crust

1 beaten egg with 2 teaspoons sugar (sugar is optional, but it adds a bit of sweetness to the crust)


Instructions

Prep

Chop the chicken breast and set aside.

Chop the onion and pepper and mince or crush the garlic cloves. 

Cook:

Heat ¼ cup of olive oil in a pan and sauté the onion, garlic and pepper until softened, about 5 minutes. Add the spices and half the salt and cook for 30 seconds. Add the chicken and cook about 8 minutes, stirring occasionally. 

Add the wine, tomato puree, raisins, and olives. Add the remaining salt, if needed. Reduce heat, cover and cook for about 1 ½ hours.

While the chicken is cooking, preheat the oven to 400 degrees. Lightly grease a pie pan and place one of the pie dough discs in the pan and gently mold. The recipe calls for trimming the pie crust to fit the pie pan, but I found that some of the dough shrinks a bit, so I did not trim. With the tines of a fork, poke a few holes on the bottom and sides of the pie dough. Bake in the oven for 5 minutes. Remove from the oven and let it cool.

Once the chicken mixture is done, let it come to room temperature. Mash any large bits of chicken with the back of a spoon to make sure all the pieces are very small. 

You can also make the chicken mix the day before. If you decide to make the chicken the day before, don’t precook the bottom dough until you’re ready to bake the chicken pot pie. 

Bake:

Preheat the oven to 350. Place the cooled chicken mixture in the pie plate and cover with the second pie dough. The recipe calls for folding the edges down and over the bottom dough, but you can crimp the edges the way you would a regular pie, if that’s easier. 

The recipe calls for baking for about 20 – 25 minutes, but I ended needing to cook the dough for about Bake in the oven for about 35 minutes to get the crust golden. And I use a gas oven.

Once you take it out of the oven, let it rest for 10 minutes before serving. May be served hot or at room temperature. 


Notes

This recipe makes 6-8 lunch or dinner portions or 16 appetizer portions. 

Nutrition

  • Serving Size: 1 slice

Keywords: chicken pot pie, double-crust chicken pot pie, chicken pot pie with pie crust, chicken pot pie recipe, chicken pie, dairy free chicken pot pie, best chicken pot pie, pastelon de pollo

Double Crust Chicken Pot Pie Cuban Style Is The Best Read More »

Malanga Fritters

Malanga Fritters (Frituras de Malanga) Have Such A Great CRUNCH!

What I love the most about malanga fritters is the CRUNCH! Frituras de malanga, as they are called in Spanish, are a super crunchy Cuban appetizer that’s quick and easy to make. My daughter and I love them, especially with a drizzle of Sriracha mayo or lime cilantro sauce. It’s a super Cuban recipe but not as popular as maduros or plantain chips. Well, I’m glad I can give these malanga fritters a little hype today, because they do deserve it!

Malanga

What Is Malanga?

Here I am waxing poetic about malanga fritters, and you’re probably wondering what the heck is a malanga?! Malanga is a root vegetable that’s very common in Latin America and the Caribbean. It’s creamier than a potato and more nutrient-dense. And the skin is hairy… I know, that sounds weird! It’s also skinnier than a potato.

Malanga is a great source of fiber and very easy on the stomach. In fact, when Cubans have any stomach issues, the home remedy is a nice bowl of mashed malanga (puree de malanga). Read this article to learn more about the health benefits of malanga. 

Malanga is also used in soups instead of potatoes. We make a delicious cream of malanga soup that’s actually very popular and featured on most Cuban restaurant menus. 

If you can’t find malanga for this recipe, you can try using taro. While not the same, the two are pretty similar and sometimes sold interchangeably.

Frituras de Malanga

Ingredients for Malanga Fritters

The ingredients list is super short and simple for this one:

  • Malanga
  • Minced Onions
  • Minced Parsley
  • Garlic Powder
  • Salt
  • White Pepper
  • Vinegar

The onions and the parsley should be finely minced. You’ll notice in my recipe photos there are some bigger pieces of parsley… that’s just mami (aka Bean Train) doing her own thing while my back was turned ? I think it’s better when everything is finely minced, but mami likes chunky stuff. You decide which version you like best (but try mine first!)

Malanga Fritters

How to Make Frituras de Malanga

These fritters have very few ingredients, so it’s an easy Cuban recipe to make. The most difficult thing is grating the malanga because it can get a bit slippery. Not slimy, just slippery so it makes grating a bit of a challenge. Weird, right? I use a paper towel to hold the malanga in place as I’m grating it. You can process it in the food processor, but the texture is better if you grate it. 

Once you’ve heated the oil in a frying pan, drop the malanga mix by tablespoons into the hot oil. What type of spoon you use to drop the dough into the batter will determine the shape. My mom always used a heaping spoonful and they come out an irregular oval, like you see in some of the photos. I like to use a mini ice cream scooper to give them a more rounded look. Also, you can make the malanga fritters a bit bigger, but I like how crunchy they are when they’re small. I serve them with a lime-cilantro sauce or Sriracha mayo. It just kicks it up a notch?

As with most fritters, frituras de malanga are best eaten hot. They tend to get soggy if you let them sit too long. So, I suggest you make as many fritters are you think your crew will eat and save the remaining dough in the fridge to make another day. The dough keeps in the refrigerator for a few days. This recipe should make about 24 fritters.

If you can find malanga, I hope you give these a try. This is a delicious Cuban appetizer to serve at your next tapas party… with a glass of sangria, of course. ¡Buen provecho!

Frituras de Malanga

Want more recipes for Cuban appetizers? Check out my Cuban Tapas Party recipes!

Print
clock clock iconcutlery cutlery iconflag flag iconfolder folder iconinstagram instagram iconpinterest pinterest iconfacebook facebook iconprint print iconsquares squares iconheart heart iconheart solid heart solid icon
Frituras de Malanga

Malanga Fritters (Frituras de Malanga) Have Such A Great CRUNCH!

  • Author: Sandi Abbott
  • Prep Time: 15
  • Cook Time: 15
  • Total Time: 30 minutes
  • Yield: 24 1x
  • Category: fritters
  • Method: frying
  • Cuisine: Cuban

Description

These malanga fritters (aka frituras de malanga) are a super crunchy cuban appetizer perfect for tapas. If you’re not familiar with malanga, it’s a root vegetable that’s creamier and more nutrient-dense than potatoes. 


Ingredients

Scale

2 cups grated malanga (about 3 malangas)

½ cup finely diced onion

1 teaspoon grated garlic

2 tablespoons finely chopped parsley

2 teaspoons salt

½ teaspoon white pepper

1 tablespoon white vinegar

1 beaten egg

2 cups vegetable oil (for frying)


Instructions

Peel and grate the malanga using a box grater affiliate link (or use a food processor). While you can use a food processor, the texture is much better if you grate it. The last little bits are hard to grate, so you may want to use the food processor for those bits or discard them. 

Finely dice the onions and the parsley. (My mom tends to leave the parsley a bit bigger, but I prefer it finely diced!)

Malanga Fritter Dough

Add the rest of the ingredients to the grated malanga. Taste and adjust the salt and pepper.

Malanga Fritters

Heat the vegetable oil in a medium frying pan on medium-high heat for about 5 minutes, then drop the malanga mixture by tablespoonfuls into the hot oil. Fry for about 7-8 minutes or until golden brown. Drain on paper towels. Add a little salt and serve. 

Makes 24 fritters. 


Notes

Grating the malanga is a bit of challenge because malanga is slippery. I use a paper towel to get a firmer grip on the malanga. You need to use the side of the grater with the smallest holes. 

Fry only the ones you intend to eat right away, as fritters get soggy if you let them sit too long. Then, you can refrigerate the uncooked dough for another day. The dough keeps for a few days in the fridge. 

Serve with sriracha mayo or lime cilantro sauce. 


Nutrition

  • Serving Size: 2 fritters

Keywords: malanga, malanga fritters, frituras de malanga, cuban appetizers

Malanga Fritters (Frituras de Malanga) Have Such A Great CRUNCH! Read More »

Pan Con Tomate

Pan Con Tomate Is An Easy Spanish Tapas

Pan Con Tomate is a very traditional Spanish tapas that is deceptively simple and so, so amazing! I must confess that I just recently tried this, although it’s something my mom loves and has told me about literally for decades. It just seemed too simple to be a “thing.” But I stand so, so corrected!

Pan Con Tomate is basically bread with tomato… see what I mean? It sounds so basic, so meh. But don’t dismiss it until you’ve tried it!! It’s similar in taste to Italian bruschetta but simpler, more subtle, and a great complement to a Tabla Mixta (cheese and charcuterie board). You can eat it on its own or pile on some cheese and Spanish ham. 

I tried Pan Con Tomate for the first time at Bulla Gastrobar, one of my favorite tapas bars in Miami. We ordered a Tabla Mixta and an order of Pan Con Tomate to go with it.  And sangria, of course! I devoured it. I just couldn’t wait to make it at home and show it to you!!

Pan Con Tomate

Super Easy Recipe

This requires no cooking and can really be done with just four basic ingredients in ten minutes tops. The tomato topping is literally grated tomato with a bit of salt and pepper. That’s it! Here are the steps:

  • Cut the baguette loaf into 3-4 pieces crosswise and then split each piece in half, like you would for a sandwich. Or you can cut it into thin diagonal slices, similar to crostini.
  • Brush a little olive oil on the bread and toast it.
  • Cut a tomato in half and gently squeeze to remove most of the seeds. Then grate each half into a bowl using a box grater. Add a little salt and pepper.
  • Cut a garlic clove in half and rub it on the toasted bread.
  • Spread a layer of the grated tomato on top of the garlic-rubbed toast. 
  • Drizzle with a bit of olive oil.
  • Pile on extra toppings if you’re so inclined.
  • Daintily devour it with wine or sangria. 

Easy to make and easy to make it disappear!

Pan Con Tomate

Quality Ingredients Go Into This Pan Con Tomate Recipe

The beauty of this Spanish tapas dish is that it’s so very simple to make. But for this Pan Con Tomate tapas to shine and be all it’s meant to be, you need quality ingredients to build it. Here’s what you need:

Loaf of Bread – You need a good quality loaf of French bread or Ciabatta for this Pan Con Tomate recipe. I used a baguette loaf from a great local baker – shout out to Zak the Baker bread, available at my local Whole Foods.

Tomato – You want a nice, firm, vine-ripened tomato for this. I tried an heirloom tomato, thinking that would be best, but I found it not as good as the vine-ripened tomatoes. 

Garlic – make sure to use fresh, fresh garlic! I tried this recipe with some poor little leftover garlic cloves the first time I made the Pan Con Tomate, and the garlic flavor was not strong enough.

Olive Oil – You need a drizzle of good quality olive oil. It brightens things up and adds just the right notes. Has to be olive oil.

Prosciutto – This is optional, but I highly recommend it! The traditional ham to use for this is Spanish Iberico Ham or Serrano Ham. But me and my peeps really love prosciutto, so I used that instead.  

Manchego Cheese – Again, totally optional, but a great addition. 

spanish tapas

This is the perfect, easy start to a lovely meal or tapas party. Or a great way to get date night off to the right track ?

Try it with a pitcher of red wine sangria… now you’re talkin’!

bean train food for thought

I must admit I can be such a brat! For years my mom would gush about how good Pan Con Tomate (bread with tomato) was. And how she grew up eating Pan Con Aguacate (bread with avocado – aka avocado toast), and I would roll my eyes and refuse to try them. 

When I was growing up and hearing about these dishes, it sounded so ethnic. It was stuff old Cubans ate, but not for young Americans. I just wanted to be American and eat hamburgers and apple pie. I suppose every immigrant child goes through a phase like this as they try to assimilate and fit in with other kids. 

Now the joke’s on me, because everybody loves avo toast and my trendy tapas bar serves Pan Con Tomate. I really should have listened to my mother. ?

Print
clock clock iconcutlery cutlery iconflag flag iconfolder folder iconinstagram instagram iconpinterest pinterest iconfacebook facebook iconprint print iconsquares squares iconheart heart iconheart solid heart solid icon
Pan Con Tomate Recipe

Pan Con Tomate Is An Easy Spanish Tapas

  • Author: Sandi Abbott
  • Prep Time: 5
  • Cook Time: 5
  • Total Time: 10 minutes
  • Yield: 8 1x
  • Category: appetizers
  • Method: toast
  • Cuisine: spanish

Description

This simple and delicious Pan Con Tomate is a traditional tapas recipe that’s super quick and easy to make. It requires no cooking and can be done with just four basic ingredients in ten minutes tops. Try it with a little prosciutto, wine and cheese. You’ll love, love it!


Ingredients

Scale

Loaf of French baguette bread

1 garlic clove

¼ cup olive oil, more or less (I usually don’t measure this, just drizzle as I see fit 😉

3 vine-ripened tomatoes

Salt and pepper


Instructions

  • Cut the baguette loaf into 3-4 pieces crosswise and then split each piece in half, like you would for a sandwich. Or you can cut it into thin diagonal slices similar to crostini.
  • Brush a little olive oil on the cut sides of the bread and toast it.
  • Cut the tomatoes in half and gently squeeze to remove most of the seeds. Then grate each half into a bowl using a box grater affiliate link. Add a little salt and pepper to taste.
  • Cut the garlic clove in half and rub it on the cut sides of the toasted bread
  • Spread a layer of the grated tomato on top of the garlic-rubbed toast
  • Drizzle with a bit of olive oil
  • Cut into smaller pieces if desired
  • Optional: top with Iberico ham or prosciutto

Notes

Serve with cheese and charcuterie board. 

Calorie count does not include ham. 

Nutrition

  • Serving Size: slice

Keywords: Pan Con Tomate, Pan con tomate recipe, spanish tapas, traditional spanish tapas

Pan Con Tomate Is An Easy Spanish Tapas Read More »

Scroll to Top
Scroll to Top